Print Server User’s Manual
Copyright (C) 2004 PLANET Technology Corp. All rights reserved. The products and programs described in this User’s Manual are licensed products of PLANET Technology, This User’s Manual contains proprietary information protected by copyright, and this User’s Manual and all accompanying hardware, software, and documentation are copyrighted.
Table of Contents Chapter 1 Introduction 1 Features ........................................................................................................... 1 Safety Instructions ............................................................................................ 2 Package Contents ............................................................................................ 3 Models ..............................................................................................................
Overview......................................................................................................... 51 Internet Printing Protocol (IPP)....................................................................... 51 Internet Mail Printing ...................................................................................... 56 Printing through the Internet........................................................................... 60 SNMP ..............................................................
Chapter 1 Introduction 1 This chapter provides an overview of your Print Server's features. Features Congratulations on the purchase of your new Print Server. This device was designed to provide a simple and efficient network printing solution. It is packed with features, including: Ø Versatility. The Print Server supports many protocols: TCP/IP, SMB (Service Message Block), Apple EtherTalk, NetBEUI and NetWare (depend on different model).
Safety Instructions For your own safety, and to protect your Print Server, please observe the following safety advice. 1. Unplug this device from its power source before cleaning. Use only a slightly dampened cloth for cleaning. Do not use liquid or aerosol cleaners. 2. Avoid using this product near water. Exposure to water poses an electric-shock hazard. 3. Do not place the Print Server on an unstable surface. The device may fall causing serious damage to the device. 4.
Package Contents You should find the following items packaged with your Print Server. If any items are missing, contact your dealer immediately. • The Print Server • Power Adapter • One CD-ROM containing all support programs, drivers and this manual • Quick Install Guide Models This manual covers the following Print Server models. Details of the LEDs and DIP Switches are in this Chapter. Further details of each model are contained in Appendix A - Specifications.
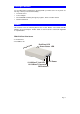
FPS-5P-M Fast Print Server 43 Parallel Ports 410/100Base-TX Red Error LED Green Status LED Parallel Port 3 Parallel Port 2 Parallel Port 1 12V Power 10/100BaseT Connector Reset Button 10/100BaseT LED DIP Switches Page 4
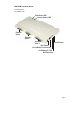
FPS-2PUW Print Server 41 USB Printer Port 41 Parallel Printer Port 4IEEE 802.
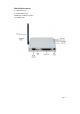
FPS-1UA Print Server 41 USB Printer Port 410/100Base-TX Page 6
FPS-2PUWG Print Server 41 USB Printer Port 41 Parallel Printer Port 4IEEE 802.
LED Indicators LEDs - FPS-5P-S, FPS-5P-M FPS-5P-S and FPS-5P-M have two LED indicators on the top. The Status/Error LED is orange or red. The Power/Link indicator LED is green. The LED indicator modes are described in the following table. Green LED Red/Orange LED Status Description Off Off No power. On On Hardware error. Flashing Flashing Firmware upgrade in progress. On Off Normal operation - idle. Flashing Off Normal operation - transmitting or receiving packets from the network.
LEDs - FPS-2PUWG FPS-2PUWG has 5 additional LED indicators as follows: LED Description STATUS On - Device power on Off - Device power off LAN On - LAN port is connected Off - LAN port is not connected Flashing - Packets are transmitting or receiving WLAN On - WLAN port is connected Off - WLAN port is not connected Flashing - Packets are transmitting or receiving P1 On - Parallel port is connected Off - Parallel port is not connected Flashing - Packets are transmitting or receiving P2 On - USB por
DIP Switch Table Some models are fitted with DIP switches. • The default position for all switches is UP. • Normally, there is no need to change the settings of the DIP switches. • The purpose of these switches is described in the following tables. Any other possible settings are reserved, and should not be used.
Chapter 2 LAN Installation 2 This chapter describes how to install the Print Server in your Local Area Network. Procedure Before use • Make sure the printer you used is not a GDI (Graphical Device Interface) printer. Printserver is not support GDI interface. If connect the GDI printer to printserver, it will work incorrectly. You can refer to the PDF file in GDI Printer folder of the CDROM. There have list some printers that designed with GDI interface.
LAN Installation 4. Power Up Plug in the power adapter cable and power up. Start-up will take only a few seconds. Use only the Power Supply unit provided with the device. Power Supply units for different models are not interchangeable. 5. Check the LEDs For FPS-5P-x • • The Red Error LED should flash, then turn Off. When the Red LED goes off and the Green LED remains lit or flashes, the Print Server is ready.
Chapter 3 Print Server Configuration 3 This chapter provides an overview of the configuration process. Overview The Print Server is designed to support many different platforms, and the configuration required would depend upon the environment in which it is installed. • When you first time install your printserver to your LAN. We will suggest you install utility “Bi-Admin” to configure your PrintServer in Windows. It can provide an advance and complete configuration for your printserver.
WPConfig This program requires Windows 3.1, and the IPX/SPX protocol. This program is on the CD-ROM, in the Utilities\WPConfig folder. Instructions for using the program are in a sub-folder of the Manual folder on the CD-ROM. PSConfig Menu-based DOS program, intended only to configure the Print Server for use with NetWare V2, 3 and 4. This program is on the CD-ROM, in the Utilities\DOS folder. Instructions for using the program are in a sub-folder of the Manual folder on the CD-ROM.
4 Chapter 4 Client PC Configuration The chapter details the client configuration required on LAN clients to use the printer or printers attached to the Print Server. Overview Before performing client configuration, the following conditions must be met: • Print Server must be installed on your network. • Print Server must be configured (refer to Chapter 3). • Both the Print Server and the attached printer must be powered ON.
Printing Methods The Print Server supports a number of printing methods: • Peer-to-Peer Print Driver is installed by running setup.exe in the CD-ROM Driver/PTP20 folder. The print jobs are stored (queued) on your PC, and sent to the Print Server when it is available. • Server-based Print Queue means that all print jobs are stored (queued) on the Network Server (e.g. NetWare, Windows NT/2000/XP/Server 2003) and then sent to the Print Server. This allows the Network Administrator to modify the Print Queue.
Figure 1: Network Configuration • The top line in the list (NetBEUI -> PCI Fast Ethernet Adapter) indicates that the NetBEUI protocol is installed on this PC. Your PC will show the name of the your Network card rather than "PCI Fast Ethernet Adapter". • The highlighted line (TCP/IP -> PCI Fast Ethernet Adapter) indicates that TCP/IP is installed. Your PC will show the name of the your Network card rather than "PCI Fast Ethernet Adapter". 2.
Windows Peer-to-Peer Print Driver With this printing method, print jobs are stored (queued) on your PC, and then sent to the Print Server when it is available. Install Peer-To-Peer Print Driver Before performing the following procedure, the Print Server must be installed on your LAN, and configured as described in Chapter 3. Both the Print Server and the attached printer should be powered ON. 1. Insert the supplied CD-ROM into your drive. Please run SETUP.
6. Accept the default Program Folder. Click Next. The Setup windows will appear as the files are copied to your computer. 7. The installation will be stopped in 95% for a few seconds and a screen like the following will be displayed. • • Click Browse. The Configure screen will search all the Print Server in your LAN. Select the Print Server you want to use in the Print Server list. Note: You can find the print server’s default name in the back panel as SCxxxxxx.
If your Print Server is not listed: • Check that both the Print Server and the printer are properly connected, and powered on. • Check that the Print Server has been configured. • If using TCP/IP, try installing the NetBEUI protocol. See the earlier section Checking your Network Protocols for details. Then uninstall and re-install the Peer-to-peer Print Driver. 8. Now you can find the new printer port when you want to change the printer to other printer port and select the new port to work.
w For Windows NT, 2000, XP and Server 2003, click on Ports and then Add Port. 6. When the Add Port window appears, w For Windows 95, 98 and Me, select Other and then PrintServer under the listed ports to add. Click OK. w For Windows NT, 2000, XP and Server 2003, select PrintServer and click on New Port.
7. The Configure PrintServer window appears, shown below. 8. Click on Browse and choose from the list that appears. It may take a few seconds for the list to appear. If you have multiple PrintServers on your network, be sure to pick the correct name and click OK. 9. Click on the Select Device Port button.
10. If you are using PrintServer with more than one port, choose the PrintServer port connected to the newly installed printer. 11. In the Configure PrintServer window, set the Retry interval, which determines how many seconds, Windows waits before attempting to send a print job again if the PrintServer was busy. 12. If you want each print job to be identified with the user’s name, enable the banner. If you need postscript printing for the banner, select the PostScript option.
Use Start - Settings - Printers to open the Printers folder, then right-click the Printer, and select Properties. The Port Settings button is on the Details or Ports tab, depending on your version of Windows. An example screen is shown below: Figure 3: Port Settings (Peer-to-peer Driver) Items shown on this screen are as follows: Port If desired, click Browse to select a different Print Server. If the selected device has multiple ports, the Select Device Port button can be used to select the port.
Windows SMB Printing This method requires no additional software to be installed, but the NetBEUI protocol must be installed and enable on your PC. Use the following procedure to install the Print Server's printer as a Windows SMB network printer: 1. Double-click the Network Neighborhood (or My Network Places) icon on the desktop. 2. On the View menu, select Details. 3. Locate the desired Print Server, as shown below: • If it is the same Workgroup as your PC, it will be listed on screen.
• Select the Printer Manufacturer and Model to match the printer connected to this port on the Print Server, and complete the Wizard. 7. This printer will now appear in your Printers folder (Start - Settings - Printers) and can be used like any other printer. However, SMB printing is not suitable for large complex print jobs - you should use the Peer-to-peer Print Driver instead. Printing from Windows DOS mode Windows can redirect print data from a parallel port on your PC (e.g.
Windows with Server-based Print Queues 1. Open your Printers folder, and start the Add Printer Wizard. 2. When prompted, select Network Printer. 3. When prompted for Network Path or Queue Name, click the Browse button, and locate the Server and Printer (or Print Queue) which your Network Administrator advised you to use. 4. Click OK, then Next. 5. Select the correct printer Manufacturer and Model, as advised by your Network Administrator, and click Next. 6. Follow the prompts to complete the Wizard.
Windows using NDPS Before using NetWare NDPS (NetWare Distributed Printing Service), one or more NDPS Printer Agents must be created on the NetWare Server. See Appendix B for details of this procedure. Also, on your workstation, ensure that: • Novell IntranetWare Client v2.2 (or later) is installed on your PC. • You have access to the Novell Printer Manager utility (e.g. Nwpmw32.exe). Procedure 1. Start the Novell Printer Manager utility. 2. Select Printer - New from the menu, then click Add. 3.
Macintosh (AppleTalk) The Print Server supports AppleTalk (EtherTalk), PAP, ATP, NBP, ZIP and DDP protocols, enabling Macintosh computers on the network to view and use the Print Server as a regular AppleTalk printer. Normally, no configuration is required. For advanced users, the PSTool program has been provided specifically for the Macintosh environment. Software Requirements System 7.x OS or newer. AppleTalk Setup 1. Click the apple icon and choose Control Panel. 2. Click Network. 3.
3. Double click the CONFIG file, and edit it. The appropriate values for each line are described in the following section. The file should look like the example below, but may vary depending on your model.
2 = parallel port 2 • ASCII communication is more reliable. 3 = serial port • The computer, Print Server and printer MUST all be configured to use the SAME protocol. Check your printer manual for details of printer configuration, and use the Print menu to configure your computer, so that they use the same settings as the Print Server.
Chapter 5 Bi-Admin Management Utility 5 This chapter describes the installation and operation of the Bi-Admin Configuration & Management program. Requirements This program requires: • Windows 95, Windows 98 or Me • Windows NT 3.51, Windows NT 4.0, Windows 2000, XP or Server 2003 Additional Recommendations: • Screen resolution of 800 * 600 or greater. • If using Novell NetWare, installation of Novell's Client 32 for Windows is strongly recommended.
Operation • Start the program by using the icon created by the setup program. • When run, the program searches the network for all active Print Servers, then lists them on screen, as shown by the example screen below. Main Screen Figure 8: Bi-Admin Main Screen Groups On the left side of the screen is a column for Groups. Each Print Server may be placed in a group, using the Configuration-System Configuration-Groups menu option.
Figure 9: System Configuration - Groups Device List On the right side of the screen is a list of all Print Servers found on the network. For each device, the following data is shown: • Default Name. The Default Server Name is shown on a sticker on the base of the device. • Device Name. If you have not changed the name, this will be the same as the Default Server Name. • Printer Port. The number and type of ports is shown in the right column.
Status Icons Once a Print Server has been selected, the Icons become active. The icons provide status information as well as access to the selected Print Server settings. If an icon is grayed out, that option or protocol is unavailable. Device Status Menu equivalent: Main - Device Status All of the settings for the current device are displayed in a read-only scrollable list in the left panel.
TCP/IP Selecting this icon will allow configuration for TCP/IP. Some models may have checkboxes for DHCP, Bootp, and Rarp. Some models may also display the setup data for the proprietary "Internet Printing" feature (printing via E-Mail). NetWare Bi-Admin supports configuration of both the Print Server and Novell NetWare servers. • You need to be logged into the NetWare server(s) with ADMIN rights.
Internet Printing The settings allow you to print via your mail server. You can also refer to the Chapter 7 to install our IPP driver to your PC. Then you can print to the printer via Internet connection. SNMP Configuration is only required if using Simple Network Management Protocol. See Chapter 7 for details. Wireless This Icon will be active if the selected device has the capability to serve as a Wireless Station for your LAN. See Wireless Configuration in Chapter 7 - Special Features for details.
a sticker on the base of the device. Reset Device This will cause the device to reboot. This should be done after making any configuration changes, or if the device stops responding after some problems. Restore Factory Default This will restore ALL device values to their factory defaults. To restore only the current screen, use the Set to Default button on the screen.
Configuration Menu The System option allows you to: • Change the name of the selected Print Server. • Change the "Group" for the selected Print Server. • Set the Network Protocols used the selected Print Server. (Any protocols not used on your LAN may be disabled. This may improve performance.) The Configuration Menu also contains selections for each of the following.
6 Chapter 6 Web Interface Setup This chapter explains how to use your Web Browser to configure the Print Server. Overview The Print Servers have incorporate the HTTP server. This allows you to connect to the Print Server and configure it using your Web Browser. Most browsers should work, provided they support tables and forms. Note: FPS-5P-S, FPS-5P-M, FPS-2PUW, FPS-2PUWG and FPS-1UA web interface are just a little bit different. Because they have support some different functions that others without.
Connecting to the Print Server 1. Start your Web Browser. 2. In the Address box, enter HTTP:// followed by the IP Address of the Print Server. e.g. http://192.168.0.1 3. You will then be prompted for the password. If no password has been set, just press ENTER. 4. Use the menu bar on the top of the screen to move about. Remember to save each screen before changing to a different screen.
NetBEUI Figure 11: NetBEUI Screen Domain Name Enter the designated work group to be serviced by the Print Server. This field is not case sensitive, so names with different case will be considered to be the same name. Response Time Set how fast the print jobs are sent to the printer. The default value of zero (0) delay should be increased only if your printer cannot cope with no delays. Abort Print Job if Error YES terminates a print job if a printing error occurs.
NetWare The NetWare screen will not be available for FPS-2PUW, FPS-2PUWG and FPS-1UA. Figure 12: NetWare Screen General NetWare Mode Select Print Server or Remote Printer, as appropriate. The default is Print Server. Frame Type Select the frame types used by your network. (Ethernet 802.2, Ethernet 802.3, Ethernet SNAP, and Ethernet II) By default, all frame types are enabled. Remote Printer Mode Novell Printer Server for P1 NetWare print server to service the Print Server's parallel port 1.
Master File Server (Bindery Mode only) Name of the Print Server's master file server. NetWare Password The password on the NetWare Server. The Print Server device needs this password to connect to the NetWare server. Job Notification The options are: Polling Queue Interval • Job notification at only the workstation where the print job originated. • Job notification at all workstations that you have logged into. Defines how often the Print Server will poll the queues to be serviced.
Access Select the desired level of access. Trap Receivers Receiver No. Select the Trap Receiver number (1..4), and click the Get Data button to update the display for the selected item. IP Address Enter the IP Address of the Trap Receiver, which will be sent the Trap message. Community This is a text field. Enter the name of the community. Enable Check to enable; select the severity level. Note: Currently, all traps are level 1.
Configure Server Figure 15: Configure Server Screen Print Server Name Change the default name if you wish. The new name must not contain any spaces or blanks. Password Enter the device password, and again in the Verify field. Once a password is entered, it is required in order to gain access and change the configuration. Enable Protocols Non-TCP/IP protocols may be disabled if they are not required on your LAN.
Wireless Configuration The Wireless screen will be available on FPS-2PUW and FPS-2PUWG, the settings on this screen must match the other Wireless stations in order for communication to occur. The configure screen arrangement of FPS-2PUW and FPS-2PUWG is a little bit different, but the settings are the same.
Configuration Regulatory Domain It is illegal to use this device in any location outside of the regulatory domain. Station name This is the same as the Device (Host) Name on the WAN screen. On your PC, some Wireless status screens may display this name as the Access Point in use. Network Type Select the correct value for your Wireless LAN. SSID (Service Set Identifier) • Infrastructure mode is used when each Wireless station connects to the Wireless Access point.
128 Bit Key If selected, data is encrypted using the key before being transmitted. The receiving station must be set to use 128 Bit Encryption, and have the same Key value. Otherwise, it will not be able to decrypt the data. Key Enter the key value you wish to use. Other stations must have the same key WEP Authentication Options are "Open System" or "Shared Key". Some Wireless cards do not support both methods. Check your Wireless card's documentation to determine the correct value.
Other Screens Server Status This screen shows server system data and the current settings for all of the other screens. It is read-only; no data can be input on this screen. Printer Ports This screen displays the current status of each port. For each port, the following data is listed: • Connected Printer- the model name of the printer connected to the port, if the printer name is known. (If the printer is not bi-directional, this information is unavailable.
Chapter 7 Special Features 7 This chapter covers the special features of the Print Server. Overview The Print Server has four (4) special features: • Some Print Servers support IPP (Internet Printing Protocol). • All model support the proprietary Internet Mail Printing system. • SNMP (Simple Network Management Protocol) is supported by all models. • Wireless Station - supported by FPS-2PUW and FPS-2PUWG.
IPP Client Setup - Windows 95/98/Me/NT 4.0 The IPP Client Software can be installed on any of the following systems: • Window 95/98/Me • Windows NT 4.0 Installing using IPPCLIENT.EXE 1. Please run IPPCLIENT.EXE in Driver\IPP folder on CD-ROM by clicking on Start, Run, and enter D:\Driver\IPP\ippclient.exe (where D is the letter of your CD-ROM drive). Click OK. 2. The IPP Setup program will then run. 3. Follow the prompts to complete the installation. IPP Client Configuration (Windows 95/98/Me/NT 4.
Figure 18: Select Printer for IPP Port 6. Either select an existing printer to use the new port, and click OK. OR Click the Add New Printer button to create a new printer to use the IPP port. This will start the Add Printer wizard. Follow the prompts to complete the process. Ensure that the new printer uses the IPP port. The installation is now complete. • To create additional IPP Ports, repeat the entire procedure. • The Proxy Server and other options are set individually for each IPP Port.
IPP Client Setup - Windows 2000, XP and Server 2003 Windows 2000, XP and Server 2003 have their own IPP Client, and there is no need to install the supplied IPP Client Software. To use Windows 2000/XP/Server 2003's IPP Client with the Print Server, follow this procedure: 1. Start the Add Printer wizard. 2. Select Network Printer, and click "Next" to see the Locate your Printer screen, as shown below. Figure 19: Windows 2000 - Locate your Printer 3.
Figure 20: Windows 2000: No printer driver 5. Click "OK", and then select the printer manufacturer and model to match the printer connected to the port on the IPP Server. 6. Click "Next", and complete the Wizard. The IPP printer is now ready for use. Using IPP Printers The IPP Printer can be selected and used like any other Windows printer. If the IPP Server is not on your network, your Internet connection needs to be active.
Internet Mail Printing The Internet Mail Printing System allows users to print data to your printer across the Internet. Users send the Internet Print Server an E-Mail, with the print job normally sent as an attachment to the E-Mail. The Print Server will retrieve the E-Mail and print it. System Requirements Mail Server • Accessibility. The Mail Server must be accessible by the intended clients or users. Normally, this means a permanent connection to the Internet. • Protocols.
Internet Mail Printing Configuration The Print Server must be configured with the data in the following table. The supplied Bi-Admin utility program, or the Web-base interface can be used to set the following entries on the TCP/IP screen. Mail Server IP Address The IP Address of the E-Mail Server used by the Print Server. Mail Account The name of the E-Mail Account used by the Print Server. Mail Account Password Enter the password for the above Mail Account here.
User Software The software provided for remote users (InterNet Printing Port) should be installed by everyone intending to use Internet printing. Otherwise, remote users can print correctly only if: • They send E-Mail directly to the Print Server Mail Account, using their normal EMail application. • The E-Mail contains plain text only. • The Internet Print Server is configured with Print every E-Mail ON. Installation of the InterNet Printing Port software will create a new printer port.
Remote Printer E-mail Address The E-Mail address for the Internet printer. Your print jobs will be sent to this E-Mail address. Mail Server Name or IP Address This is the name or IP Address of your Mail Server. If you are on a LAN, ask the LAN Administrator. If using a dial-up connection, use the data provided by your ISP. Your Internet E-mail Address The normal address that people use to send you E-mail.
Checking the Printer Driver To make sure that the correct printer driver for the remote printer is installed on your system, you can use the InterNet Printing Port to send an E-Mail to the Internet Printer. The procedure is as follows: 1. Connect your default printer to the InterNet Printing Port. 2. Check that "Reply Notification Mail" in the InterNet Printing Port is ON. 3. From Notepad or another text editor, print a short message (e.g. "This is a test print") to the Internet Printer.
SNMP The Print Server supports SNMP (Simple Network Management Protocol). This allows network supervisors to monitor and control the Print Server using network management platforms such as HP OpenView, IBM SystemView, etc. The appropriate MIB file must be imported into your SNMP management program using the Import-Compile command. Check your management program for details on this procedure. The MIB files are provided in the MIB folder on the CD-ROM, as follows: Mib1p.mib Single port models. Mib3p.
Wireless Configuration Wireless Models - FPS-2PUW, FPS-2PUWG FPS-2PUW and FPS-2PUWG are Wireless stations, NOT access point. Like all other Wireless stations, they have 3 work modes: • 802.11 Ad Hoc mode - No Access Point is used, Wireless stations communicate directly with each other. This is the current standard. • Ad Hoc mode - No Access Point is used, Wireless stations communicate directly with each other. This is the older standard. Of the two (2) Ad-hoc modes, "802.11 Ad Hoc" mode is recommended.
performance. WEP Settings Must match the other Wireless stations. Must match Point. the Access Two (2) methods are available to perform the required configuration: • Bi-Admin management utility program - see below for details. • Web-based setup - see Chapter 6 for details. Bi-Admin Wireless Screen Installation and use of the Bi-Admin Windows utility is described in Chapter 5. Clicking the Wireless icon, or selecting Configuration - Wireless on the menu, will display the following screen.
SSID • If using an ESS (Extended Service Set, with multiple access points) this ID is called an ESSID (Extended Service Set Identifier). • To communicate, all Wireless stations MUST use the same SSID/ESSID. Change this value, or change the other Wireless stations, to ensure each Wireless station has the same value. • The default value is "null", so the Wireless station can join any Ad-hoc group. Note! The SSID is case sensitive. Channel No Network Type To communicate in "802.
64 Bit • If selected, data is encrypted, using the default key, before being transmitted. The receiving station must be set to 64 Bit Encryption, and have the same Key value in the same position in its key table. Otherwise, it will not be able to decrypt the data. • Default Key - select the key you wish to be the default. Transmitted data is ALWAYS encrypted using the Default Key; the other Keys are for decryption only. Key Table: This table is used when Encrypting and Decrypting data.
Wireless Link Info Screen After clicking the "Link Info" button on the Wireless Screen, a screen like the example below will be shown. Figure 25:Link Info Screen State This indicates which Access Point is currently in use. Current Channel The current channel which has been used. Current TX Rate The current transmitting speed. Throughput (Tx) This will show how much data has been transmitted per second. Throughput (Rx) This will show how much data has been received per second.
Chapter 8 Troubleshooting 8 This chapter describes some problem situations, which may arise, and the solutions to them. Overview If you encounter printing difficulties, please refer to the appropriate section. If, after following the advice in these documents, the Print Server still does not function properly, please contact your dealer for further advice. Hardware & LAN Problems Problem No. 1 All the Print Server's LEDs are off. Solution No. 1 Check the power supply or power connection.
Solution No. 5 If the Print Server is left on, but the DHCP server is turned off, then the Print Server will retain its IP Address without the DHCP Server being aware of it. Simply reset the Print Server so it will obtain a new IP Address. This problem would also arise if you assigned static IP Address, which is within the range used by the DHCP server. If so, use another address which is NOT within the range used by the DHCP server. AppleTalk (Macintosh) Problem No.
Problem No. 6 I can't select the "Remaining from:" item in the print dialog box. Solution No. 6 If you have selected the Layout value, "2 Up", or "4 Up", you cannot access the Remaining from item. Choose other selections. Problem No. 7 A cover page prints either on the first or the last page of the document. Solution No. 7 Select one of these solutions: • Turn the cover page feature off.
Novell NetWare Problem No. 1 My Print Server cannot print the jobs sent to the print queue. Solution No. 1 Try the following: 1. Check if the printer attached to the Print Server is on-line. 2. Check if your Print Server is logged into the file server (See Problem 2 below.). 3. Check the current status of the queues used by the Print Server, and ensure the queues are active. 4. Check if the NetWare printer number is correct. 0 = parallel port 1 of the Print Server.
Windows Printing Problems Problem No. 1 When I tried to install the Printing software for Peer-to-Peer printing, I received an error message and the installation was aborted.. Solution No. 1 This may be caused by an existing installation of the printer port software. Before attempting another installation: • Remove the existing installation • Restart your PC To remove an existing printer port installation: 1. Open Start - Settings - Control Panel - Add/Remove Programs 2.
7. Click the Add Port button. On the resulting screen, select Other, then Printer Server, as the port to add, as shown below. 8. Click OK to see the Print Port Configuration screen, as shown below.
9. Click the Browse Device button, select the desired Print Server, and click OK. 10. Click OK to return to the Printers folders, and right-click on the Printer. Ensure that the Work off-line option is NOT checked. The Printer should no longer be grayed out, and is ready for use. Problem No. 3 I connected and configured a WPS (Windows Printing System) printer as described, but I can't get the print job to print. Solution No. 3 Printer drivers for WPS printers poll the printer before sending print data.
• When the Spool Settings dialogue box appears, choose Start printing after last page is spooled and click OK. Problem No. 5 A printing device connected to the Print Server port cannot print or prints garbage. Solution No. 5 Check the following: • Cable connection between Print Server and printer. • Serial port configuration, if a serial device. • Printer driver in the application program or Windows matches the printer. Problem No.
Page 75
A Appendix A Specifications General Specifications FPS-5P-S Power Consumption 5w max. External Power Adapter 12V DC LEDs 3 Parallel Port 1 Centronic female DB-25 connector Ethernet Connector 10/100Base-TX FCC / CE Class B FPS-5P-M Power Consumption 5w max. External Power Adapter 12V DC LEDs 3 Parallel Port Three Centronic female DB-25 connectors Ethernet Connector 10/100Base-TX FCC / CE Class B FPS-2PUW Power Consumption 3w max.
Wireless Interface IEEE 80211b/g FCC / CE Class B FPS-1UA Power Consumption 5.5w max. External Power Adapter 9V DC LEDs 2 USB Port (1.
Parallel Port Pin Assignments Other Models Pin 1 2 3 4 5 6 7 8 9 10 11 12 13 14 15 16 17 18-25 Signal Name - Strobe +Data 0 +Data 1 +Data 2 +Data 3 +Data 4 +Data 5 +Data 6 +Data 7 - ACK + Busy + Paper End + Select - Auto Feed - Error - Init - Select In GND Direction To printer To printer To printer To printer To printer To printer To printer To printer To printer To Server To Server To Server To Server To printer To Server To printer To printer Ground Page 78
Protocol Support Model TCP/IP NetBEUI NetWare AppleTalk FTP/Telnet FPS-5P-S √ √ √ √ √ FPS-5P-M √ √ √ √ √ FPS-2PUW √ √ √ FPS-2PUWG √ √ √ FPS-1UA √ √ √ Feature Support Model HTTP Setup E-mail Printing IPP SNMP FPS-5P-S √ √ √ FPS-5P-M √ √ √ FPS-2PUW √ √ √ FPS-2PUWG √ √ √ FPS-1UA √ √ √ FPS-2PUW/2PUWG can also act as IEEE 802.11b/g Wireless Stations.
Regulatory Approvals FCC Statement This equipment generates, uses, and can radiate radio frequency energy. It has been tested and found to comply with the limits for a Class B digital device, pursuant to Part 15 of the FCC rules. These limits are designed to provide reasonable protection against harmful interference in a domestic environment. Operation is subject to the following two conditions: • This device may not cause harmful interference.
Appendix B Network Server Configuration B Windows NT Server Preparing for TCP/IP Printing If using Windows NT 3.51 or Windows NT 4.0, Microsoft TCP/IP Printing Support must be installed. • If it is already installed, proceed to Adding a TCP/IP Remote Printer. • Otherwise, the procedure to install TCP/IP printing support is as follows. Windows NT 3.51 1. Start the Network option in Control Panel.
Adding a TCP/IP Remote Printer Windows 3.51 1. From the Printer menu in Print Manager, select Create Printer. 2. In the resulting dialog box, enter data as follows: Printer Name Enter a name (up to 32 characters). This name appears in the title bar of the printer window. Driver Select the appropriate driver for the attached printer. Description Enter a printer description for other network users to reference. Print To Select Other. 3.
Client PCs can now be configured as described in Chapter 4 - Client Configuration.
Windows 2000, XP and Server 2003 1. Start the Add Printer Wizard, select Network Printer, then click Next to browse for the Print Server. 2. Locate and double-click the Print Server, select the desired port, and click Next. The following message will be displayed: Figure 26: Windows 2000 Message 3. Click "OK", and select the correct Manufacturer and Model for this printer. 4. Follow the prompts to complete the installation. 5. In the Printers folder, right-click the new printer, and select Sharing.
Bi-Admin For more control and flexibility, or to use NetWare Remote Printer Mode, you can use the supplied Bi-Admin management utility. Provided you have Novell's Client 32 installed, Bi-Admin will allow you to configure the NetWare Server as well as the Print Server. • Bi-Admin is installed by run the Setup.exe in Utility\Bi-Admin folder in the CD-ROM. • See Chapter 5 for general information on using Bi-Admin.
Server for P1 port 1. Novell Printer Server for P2, P3 & SP (if exist) NetWare print server to service the Print Server's parallel port 2 (P2), parallel port 3 (P3), or Serial port (SP), if these ports exist. Novell Print Server Mode NDS Tree Name Not applicable. (NetWare NDS mode only) Print Server NDS Context Not applicable. (NetWare NDS mode only) Master File Server (Bindery mode only) Name of the Print Server's master file server.
Figure 27: Create NDPS Manager Object 5. Type a name in the NDPS Manager Name.(e.g. SerMGR in Figure 1 above) 6. Browse the Resident Server and select where you want the NDPS Manager object to be assigned. (e.g. TECH_50.TeSupp in figure 1 above) 7. Browse the Database Volume and select where you want the NDPS Manager database to be assigned. (e.g. TECH_50_SYS.TeSupp in figure 1 above) 8. Click Create. The new NDPS Manager will appear in the main browser window.
4. Enter the desired name for the Printer Agent (PA) Name. 5. Normally, the NDPS Manager will be the NDPS Manger object you are using. 6. Select Novell Printer Gateway in the Gateway Type. (see figure2 above) 7. Click OK and then select the available printer. 8. Select Remote (LPR on IP) in the Connection Type. 9. Click Next to see the following Configure Port Handler screen. Figure 29 Configure Port Handler 10.
Unix Systems Your Print Server can be configured using FTP, and it supports the following Unix printing methods: • LPD • FTP • Direct Socket Interface • PSfilter (proprietary printing method) For full details on using Unix systems with your Print Server, refer to the Unix manual in the /Manual/Unix directory on the CD-ROM.