PLANET VIP-110/VIP-210 Web Configuration Guide Internet Telephony Gateway User’s manual VIP-110/VIP-210 release 1.
PLANET VIP-110/VIP-210 Web Configuration Guide Copyright Copyright (C) 2004 PLANET Technology Corp. All rights reserved. The products and programs described in this User’s Manual are licensed products of PLANET Technology, This User’s Manual contains proprietary information protected by copyright, and this User ’s Manual and all accompanying hardware, software, and documentation are copyrighted.
PLANET VIP-110/VIP-210 Web Configuration Guide Introduction………………………………………………………………………………………..1 VIP-110/VIP-210 Features.............................................................................. 2 Package Content ........................................................................................... 3 Physical Details............................................................................................. 3 LED Display & Button ...................................................................
PLANET VIP-110/VIP-210 Web Configuration Guide Introduction Overview In the past, real-time voice communication can only be performed on the PSTN. With the growth of Internet technology, Internet telephony service plays and turns into a cost-effective and highly reliable substitution system of the old-time traditional PBX system. PLANET VoIP (Voice over IP) system – VIP-110/VIP-210 offers toll quality voice and real-time fax data over IP networks.
PLANET VIP-110/VIP-210 Web Configuration Guide VIP-110/VIP-210 Features o Standards compliant & excellent voice quality The PLANET VIP-110/VIP-210 is H.323 standard version 3 compliant (including H.323 fast-start mode). The VIP-110/VIP-210 is interoperable with 3rd party voice gateways as well as other PLANET VoIP products.
PLANET VIP-110/VIP-210 Web Configuration Guide trusion. The firewall policy offers VoIP administrators access control privilege choices to apply to LAN users to restrict Internet access or prevent improper use. o Virtual Server, DMZ & Internet application capability With Virtual server, special applications, and DMZ features, the VIP-110/VIP-210 shares the LAN resources for Internet users, and provides various Internet application compatibility in a more convenient way.
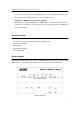
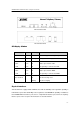
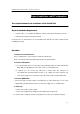
PLANET VIP-110/VIP-210 Web Configuration Guide VIP-210 Front Panel VIP-210 Rear Panel LED Display & Button Indicator Color Activity Indication PWR Green On Power is supplied to the gateway. CPU Green Blinking The system is running. (Heartbeat LED) Ÿ ACT Green On Data is presented on LAN. Ÿ LNK Green On The gateway is connected to LAN. Ÿ ACT Green On Data is presented on WAN. Ÿ LNK Green On The gateway is connected to WAN. PHONE/LINE Green Off The line is idle.
PLANET VIP-110/VIP-210 Web Configuration Guide Port Label Function RJ-45 LAN Connecting VIP to a 10/100 Mbps Ethernet network RJ-45 WAN Connecting VIP to a 10/100 Mbps Ethernet network / xDSL /Cable modem for Internet access RJ-11 Telephony Connect PBX Extension line/Telephone to VIP for voice communication Reset Button There is a push button located behind a small hole next to the PWR LED. This button allows you to reset VIP or force VIP to enter firmware upgrade mode.
PLANET VIP-110/VIP-210 Web Configuration Guide Physical Installation and IP Configuration This chapter illustrates basic installation of VIP-110/VIP-210 Physical Installation Requirement • Network cables. Use standard 10/100BaseT network (UTP) cables with RJ45 connectors. • TCP/IP protocol must be installed on all PCs. For Internet Access, an Internet Access account with an ISP, and either of a DSL or Cable modem (for WAN port usage) Procedure 1.
PLANET VIP-110/VIP-210 Web Configuration Guide 5. Check the LEDs • The PWR LED should be ON. • The CPU LED should flash. • For each LAN (PC) connection, the LAN LNK/ACT LED should be ON (provided the PC is also ON.) • The WAN LED should be ON. 6. Connecting to the telephony devices VIP-110/VIP-210 supports two types of telephony interfaces. One is FXO, and another is FXS. Each interface has two ports for connecting to telephony devices.
PLANET VIP-110/VIP-210 Web Configuration Guide ëNote Please locate your PC in the same network segment (192.168.0.x) of VIP-110/VIP-210. If you’re not familiar with TCP/IP, please refer to related chapter on user’s manual CD or consult your network administrator for proper network configurations. CLI configuration access: • You can connect the VIP-110/VIP-210 via telnet terminal program • Start up your terminal program, here, we use Hyper Terminal as the example.
PLANET VIP-110/VIP-210 Web Configuration Guide If you cannot get any response from the terminal program after strike “Enter” key several times. Please check the ëNote TCP/IP configurations of your computer, i.e. the destination VIP should be reachable by your PC. Then check the parameters above again. If all the network parameters are correctly configured, it is recommended to check if the network cabling is secure.
PLANET VIP-110/VIP-210 Web Configuration Guide to set up the network mask to “255.255.255.0”, for example. You can have the command as below and press the key: ITG>net set lan mask 255.255.255.0 You’ll need to save the configured LAN IP address, network mask value into machine via command: net store , then insert command: net reset to reboot machine and make thechanges effective.
PLANET VIP-110/VIP-210 Web Configuration Guide b. Double-click Protocol in the Select Network Component Type window, then the Select Network Protocol window appears. c. Choose Microsoft for the manufacturer. d. Choose TCP/IP for the network protocol. e. Click OK, and the Network window appears. Step 3.1 Change the TCP/IP settings to use DHCP as follows (DHCP environment): a. Double-click the first TCP/IP cable icon. The TCP/IP Properties window appears. b.
PLANET VIP-110/VIP-210 Web Configuration Guide Step 5 Add the DNS server given to you by your ISP or network administrator: a. Click the DNS Configuration tab. b. Click Enable DNS. c. Enter your host name in the Host field. d. Enter your domain name in the Domain field. e. Enter the IP address of the DNS server in the DNS Server Search Order field. f. Click Add. The IP address displays in the window below the field. Step 5 Click OK, and reboot machine to make the modifications effective in your PC.
PLANET VIP-110/VIP-210 Web Configuration Guide Windows NT4.0 - TCP/IP a) Click the Properties button to see a screen like the one below. Windows NT4.
PLANET VIP-110/VIP-210 Web Configuration Guide b) Select the network card for your LAN. c) Select the appropriate radio button - Obtain an IP address from a DHCP Server or Specify an IP Address, as explained. Specify an IP Address If your PC is already configured with an IP address, check with your network administrator before making the following changes. a) The Default Gateway must be set to match your network environment. To set this: • Click the Advanced button on the screen above.
PLANET VIP-110/VIP-210 Web Configuration Guide Windows NT4.
PLANET VIP-110/VIP-210 Web Configuration Guide Checking TCP/IP Settings - Windows 2000: Select Control Panel - Network and Dial-up Connection. a) Right - click the Local Area Connection icon and select Properties. You should see a screen like the following: Network Configuration (Win 2000) b) Select the TCP/IP protocol for your network card. c) Click on the Properties button. You should then see a screen like the following.
PLANET VIP-110/VIP-210 Web Configuration Guide TCP/IP Properties (Win 2000) Ensure your TCP/IP settings are correct with one of the following description. Using DHCP To use DHCP, select the radio button Obtain an IP Address automatically. This is the default Windows setting. If your networking environment is a DHCP environment, Using this option is recommended. Restart your PC to ensure it obtains an IP Address from DHCP server.
PLANET VIP-110/VIP-210 Web Configuration Guide Checking TCP/IP Settings - Windows XP Select Control Panel - Network Connection. a) Right - click the Local Area Connection icon and select Properties. You should see a screen like the following: Network Configuration (Windows XP) b) Select the TCP/IP protocol for your network card. c) Click on the Properties button. You should then see a screen like the following.
PLANET VIP-110/VIP-210 Web Configuration Guide TCP/IP Properties (Windows XP) Ensure your TCP/IP settings are correct with one of the following description. Using DHCP To use DHCP, select the radio button Obtain an IP Address automatically. This is the default Windows setting. If your networking environment is a DHCP environment, Using this option is recommended. Restart your PC to ensure it obtains an IP Address from DHCP server.
PLANET VIP-110/VIP-210 Web Configuration Guide LAN IP address configuration via web configuration interface Execute your web browser, and insert the IP address (default: 192.168.0.1) of VIP in the adddress bar. After logging on machine with username/password (default: admin / 123), browse to “Internet Access Setup” --> “LAN” configuration menu: Parameter Description IP address LAN IP address of VIP Default: 192.168.0.1 Subnet Mask, LAN mask of VIP-110/VIP-210 Default: 255.255.255.
PLANET VIP-110/VIP-210 Web Configuration Guide WAN IP address configuration via web configuration interface Execute your web browser, and insert the IP address (default: 192.168.0.1) of VIP in the adddress bar. After logging on machine with username/password (default: admin / 123), browse to “Internet Access Setup” --> “WAN” configuration menu, you will see the configuration screen below: Connection Type Data required. Usually, none.
PLANET VIP-110/VIP-210 Web Configuration Guide Internet Access Setup Ÿ When WAN interface of VIP-110/VIP-210 is properly configured, with default Windows TCP/IP settings, no changes need to be made on LAN side PC for Internet access. • If using a specified (fixed) IP address on your PC, refer to the user manual for details of the required changes: • The Gateway must be set to the IP address of VIP-110/VIP-210 • The DNS should be set to the address provided by your ISP.
PLANET VIP-110/VIP-210 Web Configuration Guide i Hint i Hint To verify the Internet connection, you may start ping command from command prompt to get response from an Internet node/site. If you’re unable to get response from the remote site, please check the following: VIP-110/VIP-210 is properly installed, LAN connection is OK, and it is powered ON. You can test the connection by using the "ping" command: ping 192.168.0.
PLANET VIP-110/VIP-210 Web Configuration Guide WEB CONFIGURATION Configuring and monitoring your VIP-110/VIP-210 from web browser The VIP-110/VIP-210 integrates a web-based graphical user interface that can cover most configurations and machine status monitoring. Via standard, web browser, you can configure and check machine status from anywhere around the world.
PLANET VIP-110/VIP-210 Web Configuration Guide VIP-110/VIP-210 logon page (Log on VIP-110/VIP-210 via username/password: admin /123 ) VIP-110/VIP-210 main page Start administration When you browse the left control panel in VIP-110/VIP-210 web configuration, the main function menus are listed in the left control panel: internet Access Setup, Dialplan Setup, H.323 Settings, Tools, Advanced Configuration and Help Menus.
PLANET VIP-110/VIP-210 Web Configuration Guide Internet Access Setup There are two sub configuration menus in this category: i. LAN The LAN configuration menu is used to configure LAN IP address, and DHCP server related information in VIP-110/VIP-210. Parameter Description IP address LAN IP address of VIP Default: 192.168.0.1 Subnet Mask, LAN mask of VIP-110/VIP-210 Default: 255.255.255.
PLANET VIP-110/VIP-210 Web Configuration Guide ii. WAN Four connection types supported in VIP-110/VIP-210: PPPoE/PPTP, Fixed IP, and DHCP PPPoE/PPTP screen VIP-110/VIP-210 natively integrates with PPPoE client, this makes VIP-110/VIP-210 is able to establish Internet connection via popular ADSL access. The PPPoE/PPTP configuration menu is used to configure and PPTP related information in VIP-110/VIP-210.
PLANET VIP-110/VIP-210 Web Configuration Guide inactive for longer than the Maximum Idle Time, then it will be dropped. Default: null IPCP Fixed IP Certain ISP provides a fixed IP address to each of its subscriber. This parameter allows users to setup the fixed IP address assigned by ISP for the PPPoE connection. Default: 0.0.0.0 Authentication VIP-110/VIP-210 implements two types of authentication protocol.
PLANET VIP-110/VIP-210 Web Configuration Guide Fixed IP screen Parameter Description IP address Static (Fixed) WAN IP address of VIP-110/VIP-210 Default: 172.16.0.1 Subnet Mask WAN interface network mask of VIP-110/VIP-210 Default: 255.255.0.0 Default Gateway Default gateway of VIP-110/VIP-210 WAN interface Default: 0.0.0.0 Primary DNS server First DNS server used for Internet domain name resolution Default: 0.0.0.
PLANET VIP-110/VIP-210 Web Configuration Guide through 7. d The D bit subfield, either 0 or 1. t The T bit subfield, either 0 or 1. r The R bit subfield, either 0 or 1. Default: 0 0 0 0 i Hint Please consult your network administrator or ISP personnel of DNS server IP address for best performance in name resolution. The DNS parameter is a must-have item while making a domain name call.
PLANET VIP-110/VIP-210 Web Configuration Guide connection setup, please insert the parameter here. Default: null MAC address Cloning If using a Cable modem, your ISP may have recorded the MAC (physical) address of your PC. Enable the " MAC address Cloning" and fill the desired workstation MAC address in the following parameter to establish Internet access. Default: off Cloned MAC address Some ISPs may require you to use MAC (physical) address for Internet connection.
PLANET VIP-110/VIP-210 Web Configuration Guide Dial Plan Management Dial plan in VIP-110/VIP-210 is a database, which contains the Address Translation and Parsing Manager (ATPM) to looks up for translating a dial string to a calling destination. The dial plan management menu allows you to modify and display the dial plan. Dial plan Concept Before you start setting up the dial plan in VIP-110/VIP-210, following basic concept associated with the dialplan in VIP-110/VIP-210 should be explained in advance.
PLANET VIP-110/VIP-210 Web Configuration Guide Hunt Group The “Hunt Group” here is an interpreter between phone number and Destination ID. VIP phone table will base on the number you dialed to find the related hunt group. So, different numbers can map to the same hunt group. Number è Hunt Group Many To One è ‘1’ ‘201’ ‘0201’ Hunt Group can map to different destinations. This function can be used if the first destination is busy.
PLANET VIP-110/VIP-210 Web Configuration Guide Dial plan/Dial setting Screen Dial Settings Clear Dial Plan Restore Dial Plan Store to NVRAM The Setup screen of the Dial Plan including: • Telephone Settings, which allows one to Add, Delete, Find, or List telephone numbers.
PLANET VIP-110/VIP-210 Web Configuration Guide Phone number setting screen You may modify VIP telephone address table here: you may add (delete, find or list) desired telephone number mapping to hunt group at this menu. Telephone Telephone number to match. This is only part of Number the total dialed string. Hunt Group ID For each hunt group ID, you need to assign it a unique identifier between 0 and 99. Min.
PLANET VIP-110/VIP-210 Web Configuration Guide Hunt Group setting screen You may modify VIP telephone hunt group table here: you may add (delete, find or list) desired hunt group at this menu. We can add (delete, find or list) desired hunt group ID mapping to destination ID at this menu. If you want to make the port calls to the secondary receiver, you can click one “More Destinations” you can then add the second, third receiver if the desired port/phone is busy.
PLANET VIP-110/VIP-210 Web Configuration Guide Save to NVRAM setting Screen After Dialplan configurations, you may save the modifications in this menu Clear Dialplan setting screen You may clear all the existing dialplan configurations and restore default dialplan configurations in this menu; however, the “clear” action will not take effects until this action is saved into machine via the “Save to NVRAM” link.
PLANET VIP-110/VIP-210 Web Configuration Guide i Hint If you’re not familiar with dialplan configurations, you may directly click on the dialplan help menu for more information.
PLANET VIP-110/VIP-210 Web Configuration Guide H.323 Configurations There are three sub configuration menus: General H.323 configuration, Gatekeeper, and H.323 Alias configurations in this category: i. General H.323 Configuration VIP-110/VIP-210 H.323 configuration page is used to configure H.323 parameters, these parameters are designed to meet most calling environment. Parameter Description Display Name This field is to set the display name information that is carried in the H.323 setup messages.
PLANET VIP-110/VIP-210 Web Configuration Guide Default: 30000 Outgoing Fast Start This field is to enable or disable the Fast start mode on the outgoing side of the call. Default: off Incoming Fast Start This field is to enable or disable the Fast start mode on the incoming side of the call. Default: off NAT_Call Mode Enables resolve proper calling address from remote sites, which use NAT routers with private IP networks behind.
PLANET VIP-110/VIP-210 Web Configuration Guide ii. H.323 Gatekeeper Configuration Parameter Description Gatekeeper Operation Enable or disable H.323 Gatekeeper function in VIP-110/VIP-210 Default: Gatekeeper mode in VIP-110/VIP-210 is disabled Gate Keeper Address Allow Calls Without Gate Keeper Specify the gatekeeper address when configured to manual mode. When auto mode is desired, this field should be set to auto. This field is to inform the H.
PLANET VIP-110/VIP-210 Web Configuration Guide is for setting the timeToLive to be encapsulated in the RRQ message. Default:0 endpoint_prefix This command is used to set the H.323 prefix that the VIP-110/VIP-210 will uses when registering to an H.323 gatekeeper. After registering to a gatekeeper using the prefix, the gatekeeper will map all Admission Request with destination matching the prefix to VIP-110/VIP-210. Default: null Terminal ID One of the UUIEs in the H.
PLANET VIP-110/VIP-210 Web Configuration Guide ii. H.
PLANET VIP-110/VIP-210 Web Configuration Guide Tools Menu VIP-110/VIP-210 provides a utility menu, which can adjust system-wide parameters, such as telnet access, system password, firmware upgrade, and display of system configurations. There are six sub configuration menus: Password Setup, Telnet Access, Firmware Upgrade, System Status, H.323 Configuration Status, and Voice Port status. Functionality in each submenu is shown below VIP-110/VIP-210 system administration password Password Setup setup.
PLANET VIP-110/VIP-210 Web Configuration Guide Advanced Configuration menu Advanced configuration menu in VIP-110/VIP-210 provides more Internet application compatibility adjustment, which can eliminate inconvenience brought by the NAT algorithm. There are six sub configuration menus: Virtual Servers, Port Forwarding, Special Application, DMZ, Dynamic DNS, and Access Control.
PLANET VIP-110/VIP-210 Web Configuration Guide Configuration Samples Without any configuration, your VIP is come with following basic information. Network: WAN IP: 172.16.0.1, Mask: 255.255.255.0, Gateway: 0.0.0.0 LAN IP: 192.168.0.1, Mask: 255.255.255.0 Mask: 255.255.255.0 Dial Plan: No. 201 202 Hunt Group 1 2 Dest. ID 1 2 Dest.
PLANET VIP-110/VIP-210 Web Configuration Guide i Hint You can also check LED indicators on VIP for telephony port status. When an incoming call reaches VIP, the related LED should flash. And after picking up the handset, it should remains on and goes off after the phone is onhook. VIP to VIP The previous section shows you how to test your VIP without modify any settings. This section we will shows you how to connect two VIP together and make the call.
PLANET VIP-110/VIP-210 Web Configuration Guide ITG>atpm req ITG>atpm dadd 10 h323 172.16.0.2 ITG>atpm hadd 10 2 10 ITG>atpm aadd 02 0 5 10 2 ITG>atpm done ITG>atpm store Dialplan setting on VIP B: ITG>atpm req ITG>atpm dadd 10 h323 172.16.0.1 ITG>atpm hadd 10 2 10 ITG>atpm aadd 01 0 5 10 2 ITG>atpm done ITG>atpm store The dial plan of the two ITGs adds a new record after those commands. VIP A: No. 02 Hunt Group Dest. ID 10 10 Dest. 172.16.0.2 Hunt Group Dest. ID 10 10 Dest. 172.16.0.1 VIP B: No.
PLANET VIP-110/VIP-210 Web Configuration Guide Pick up handset and dial “02201”, where ‘02’ points to VIP B and ‘201’ for port 1 of VIP B. The phone in VIP B should rings. VIP B: Pick up handset and dial “01201”, where ‘01’ points to VIP A and ‘201’ for port 1 of VIP A. The phone in VIP A should rings. i Hint i Hint In the example, we assign each VIP with a unique number. It is easier for users to think of it is as like an area code. Each VIP represents a different area.