85M Powerline Ethernet Bridge PL-201-UK/US User Manual
Copyright Copyright (C) 2005 PLANET Technology Corp. All rights reserved. The products and programs described in this User’s Manual are licensed products of PLANET Technology, This User’s Manual contains proprietary information protected by copyright, and this User’s Manual and all accompanying hardware, software, and documentation are copyrighted.
Trademarks The PLANET logo is a trademark of PLANET Technology. This documentation may refer to numerous hardware and software products by their trade names. In most, if not all cases, these designations are claimed as trademarks or registered trademarks by their respective companies. Revision User’s Manual for PLANET 85M Powerline Ethernet Bridge Model: PL-201-UK/US Part No.
Table of Content Chapter 1 Introduction .......................................................................................5 Overview .........................................................................................................5 Feature ............................................................................................................5 Specification ....................................................................................................5 Package Contents ................
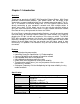
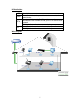
Chapter 1: Introduction Overview Thank you for purchasing PLANET 85M Powerline Ethernet Bridge. With Planet powerline communication products, your power outlets are no longer to be viewed only as power receptacles but also as network connection point. The PL201 is a Powerline to Ethernet Bridge with a RJ-45 Ethernet interface which directly connecting to your computer’s network card.
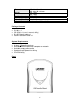
Dimension Weight Certifications Operating Temp.
LED definition LED PWR ETH PL Description Steady on indicate the powerline device connect to the power outlet Steady on indicates the RJ-45 port has correctly connected to the network card of your PC or the Ethernet network Blinking indicates the data are transferring Steady on indicates there exists another powerline device Blinking indicates the data are transferring Wire Diagram 7
Chapter 2: Installation Overview The installation of 85M Ethernet Bridge will only take minutes. No need to set up long wires through out the house, just simply install the utility, and physically plug the unit into the wall outlet, then to connect RJ-45 to the computer. Users can select to adjust its security functions and the platform of the network after the installation. For further assistance, please read our Frequently Asked Questions section.
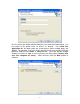
On this screen you will be asked to input the User Name and Organization. It is not crucial to the device itself, so enter it as desired. The ‘Install this application for’ will work under the circumstances which multiple logins are applied. For example: If the user wishes only he/she can use the utility with that particular account, then bubble in ‘Only for me’. For those without multiple accounts or wishes to allow all users to access the utility choose ‘Anyone who uses this computer (all users)’.
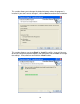
This section allows you to change the default directory where the program is installed. If you don’t want to change it, click on Next to continue the installation. This section allows a user to go ‘Back’ or ‘Install’ the utility. In case if the user wishes to change the previous options then go ahead, click on ‘Back’ to change the settings. If not, continue and click the ‘Install’ button.
This screen shows the progress of the installation. This screen shows that the installation was completed successfully. Click on Finish to exit the wizard.
Chapter 3: Configuration Overview The PL-201 uses 56-bit DES encryption to block outside access. The key is set by using the Configuration Utility on the CD. By default, the protection is enabled, however, it is recommended to change the default network password. All your powerline devices must use the same network password in order to be connected together.
*Note* If you do not see ANY unit in the device status but the powerline device does exist, try to unplug all devices and plug them back. Meanwhile, please make sure the cable is the right type and working correctly. If all seems to be correct, and you still receive nothing in the Device window, try rebooting your computer. Part 2: Diagnose a Network Powerline device The Main tab shows all the other powerline units on your home network.
with the units that you do not view in the network screen, you don’t have to do this with all units.) If the problem persists, try to move the unit closer to this current unit (adjacent plugs on the same wall socket is most preferable). If the problem still persists and that unit is still not shown on the network, then the unit might be defective please contact technical support. Otherwise if you view the unit working, distance might be the only issue.
Setting Up Security on a Network Powerline device The Privacy Tab will allow users to use one primary computer to control the Network Password of all units on the home network. You will have to go back to the Main Tab first then find the DEK (Device Encryption Key) Key located on the bottom of each device. Enter this Key into the Device Password area. Click Add. This Device Key will then appear in the bottom window. Add all the DEK Keys for each unit in your house.
**Note** The DEK is unique for EACH Powerline device. To use this you will need to input the DEK for each unit.