802.
Table of Contents Introduction .................................................................................. 3 Package Content.............................................................................. 4 Installing the Access Point................................................................ 5 Web Configuration........................................................................... 6 Further Configuration......................................................................
Introduction The WNAP-1120 is the 11n Wireless Access Point with one Ethernet port. The 1T2R 11n speed is up to 150Mbps. Fully compliant with IEEE802.11b/g standard, it provides powerful features such as the Web Configuration, Multiple SSID / VLAN tag, Built-in Radius server, MAC filter, WPA2-PSK, WPA and WPA2. With the six wireless operating modes, establish their wireless easily.
Package Content l 1 x Access Point l 1 x 12V1A Power Adapter l 1 x User’s Manual CD l 2 x 3dBi External Antenna l 1 x Ethernet Cable l 1 x Quick Installation Guide Note If any of the above items are missing or damaged, contact your local dealer for support.
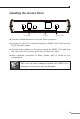
Installing the Access Point Power Socket LAN Port SMA Connectors l Connect bundled antenna to the two SMA connectors. l Connect the LAN PC or network devices to WNAP-1120 LAN port with RJ-45 Ethernet cables. l Connect power adapter to the power socket on WNAP-1120, and plug the other end of the power pack into an electrical outlet. l After hardware connection is done, please refer to below for the configuration. Note ONLY use the power adapter supplied with WNAP-1120.
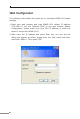
Web Configuration The following instructions will guide you to complete WNAP-1120 basic settings. 1. Open your web browser and type WNAP-1120 default IP address (192.168.1.1) into the “Address Field” of you web browser. Before configuration, please make sure your PC’s IP address is under the same IP range with WNAP-1120. 2. After enter the IP address and press Enter key, you can see the dialog box appear as below, please enter the User name and Password with “admin”. Then press “OK”.
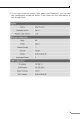
3. If you have entered correct User name and Password, you can see the configuration screen as below. It will show you the information of this Access Point.
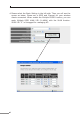
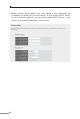
4. Please select the Basic Setting in the left side. Then you will see the screen as below. Please set a SSID and Channel for your wireless clients connected. When enable the Multiple ESSID function, you can apply Multiple SSID VLAN VID (0~4904) with the VLAN function. VLAN VID “0” is Untagged for managing AP.
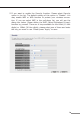
5. If you want to enable the Security function. Please select Security option in the list. The default setting of this option is “Disable”. You may enable WEP or WPA function to protect your wireless connection. If you are select WEP in the pull-down list, you will see the dialog box below. Please define the WEP (Wired Equivalent Privacy) function by yourself. There are 4 keys available for the 64bit (10 Hex digits) or 128bit (26 Hex digits), please select one of them and enter the key you want to use.
6. Select System Utility option. You may assign a new Password and IP address to WNAP-1120 in this option. If you need a DHCP Server to your wireless network, you can also enable DHCP Server in this option to provide IP addresses to the clients.
Further Configuration If you want more detail CD-ROM. If installing or support.
This page is intentionally left blank