802.
Copyright Copyright 2003 by PLANET Technology Corp. All rights reserved. No part of this publication may be reproduced, transmitted, transcribed, stored in a retrieval system, or translated into any language or computer language, in any form or by any means, electronic, mechanical, magnetic, optical, chemical, manual or otherwise, without the prior written permission of PLANET.
Federal Communication Commission (FCC) Radiation Exposure Statement This equipment complies with FCC radiation exposure set forth for an uncontrolled environment. In order to avoid the possibility of exceeding the FCC radio frequency exposure limits, human proximity to the antenna shall not be less than 20 cm(8 inches) during normal operation.
TABLE OF CONTENTS CHAPTER 1 INTRODUCTION .................................................................................................. 1 1.1 PACKAGE CONTENTS ......................................................................................................... 1 1.2 SYSTEM REQUIREMENTS .................................................................................................... 1 1.3 FEATURES .....................................................................................................
.4 MULTIPLE BRIDGE MODE .................................................................................................. 51 CHAPTER 6 TROUBLESHOOTING.......................................................................................
Chapter 1 Introduction Thank you for purchasing WAP-4000. WAP-4000 is an IEEE 802.11g Wireless Access Point. IEEE 802.11g uses 2.4GHz frequency band, the same as IEEE 802.11b; but it provides more throughput rate than 802.11b. The maximum throughput rate of 802.11g can up to 54Mbps. WAP-4000 is also backward compatible and interoperable with IEEE 802.11b compliant wireless devices. Except for 64/128bit WEP encryption, WAP-4000 also integrates 802.1X authentication.
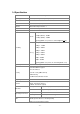
1.4 Specification Standard IEEE 802.11b, IEEE 802.11g Signal Type DSSS (Direct Sequence Spread Spectrum) Modulation BPSK / QPSK / CCK / OFDM Port 10/100Base-TX (RJ-45) * 1 Antenna Detachable Dipole Antenna * 1 Antenna Connector Reversed Polarity SMA Male Output Power 17dBm 11 Mbps (CCK): -82dBm 5.5 Mbps (QPSK): - 86dBm 802.11b 1, 2 Mbps (BPSK): - 90dBm (typically @PER < 8% packet size 1024 and @25ºC + 5ºC) 54 Mbps: -72dBm 48 Mbps: - 72dBm Sensitivity 36 Mbps: -76dBm 24 Mbps: -79dBm 802.
Input Power DC 5V, 2.5A Certification FCC, CE 1.5 Wireless Performance The following information will help you utilizing the wireless performance, and operating coverage of WAP-4000. 1. Site selection To avoid interferences, please locate WAP-4000 and wireless clients away from transformers, microwave ovens, heavy-duty motors, refrigerators, fluorescent lights, and other industrial equipments.
Chapter 2 Hardware Installation Before you proceed with the installation, it is necessary that you have enough information about the WAP-4000. 1. Locate an optimum location for the WAP-4000. The best place for your WAP-4000 is usually at the center of your wireless network, with line of sight to all of your mobile stations. 2. Assemble the antennas to WAP-4000. Try to place them to a position that can best cover your wireless network. The antenna’s position will enhance the receiving sensitivity. 3.
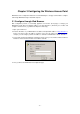
Chapter 3 Configuring the Wireless Access Point WAP-4000 can be configured via web browser or bundled utility. It is strongly recommended to configure and manage WAP-4000 using a wired LAN computer. 3.1 Configure through Web Browser Web configuration provides a user-friendly graphical user interface (web pages) to manage your WAP-4000. An AP with an assigned IP address (e.g. http://192.168.1.1) will allow you to monitor and configure via web browser (e.g., MS Internet Explorer or Netscape). 1.
3.1.1 Wizard Setup wizard provides a simple way to configure your WAP-4000. Clicking “Wizard” button on top panel of WAP-4000’s web page, Setup Wizard will pop up as below.. To quick configure WAP-4000, please follow the steps below to complete the configuration. Click “Next>” to continue. Step 1. Set your new password The default password for administrator (login name is “admin”) is “admin”. You can change the Password in this step. Click “Next>”. Step 2.
Enter the SSID of your WLAN and select the frequency channel. Click “Next>”. Step 3. Set Encryption You can enable WEP encryption and set WEP key in this screen. Click “Next>” to continue. Step 4. Restart Please click the “Restart” button to save the settings and restart WAP-4000. In the following web page, please click “Close” to close the Setup Wizard window.
3.1.2 Status: You can check your WAP-4000 settings and status in this screen. You can click the “View Log” button, and then the screen below will appear. You can view the logged message here. You can also clear or refresh the log record.
3.1.3 Basic Settings: You can set the AP Name, SSID, Channel and WEP function to this Access Point. After configuration, please click Apply to save your settings. AP Name: The host name of the WAP-4000. This can be any name for you to easily identify this access point. SSID: The SSID is the name shared among all points in the wireless network system, must be identical for all points.
IP address: This address is a unique numbers that identifies a computer or device on the WAN or LAN. These numbers are usually shown in groups separated by periods, for example: 123.123.23.2. Subnet Mask: Subnets allow network traffic between hosts to be separated based on the network's configuration. In IP networking, traffic takes the form of packets. IP subnets advance network security and performance to some level by organizing hosts into logical groups.
3.1.5 Advanced Settings: You can set the WAP-4000 operation mode and relative settings. After configuration, please click Apply to save your settings. AP Mode: WAP-4000 has four operation modes. By default, it is set to AP mode. Access Point: This mode is set to WAP-4000 by default. This connects your wireless PCs to a wired network. In most cases, no change is necessary. Up to 63 wireless clients can be connected through WAP-4000.
RTS Threshold: Use this field to specify a value for the RTS Threshold. Enter a value between 256 and 2346. This value should remain at its default setting of 2346. Should you encounter inconsistent data flow, only minor modifications are recommended. Fragmentation Threshold: This field is used to specify the fragmentation threshold. Enter a value between 256 and 2346. If you experience a high packet error rate, try to slightly increase your Fragmentation Threshold.
Password: Enter the new password in the "AP Password New" field and again in the next field to confirm. Click on "Apply" to execute the password change. The Password is case-sensitive, and can be made up of any keyboard characters. The new password must be between 0 and 15 characters in length. MAC Filters: Filter function is for the administrator to authorize who can gain network access through the Access Point by using MAC address filtering.
Enable/Disable: Enable or disable 802.1X authentication of WAP-4000. Encryption Key: Select one of the Encryption key length options. It should be set the same length as WEP key. Select one of the Encryption key lifetime options. Once the lifetime expires, RADIUS server will renew the Encryption key. RADIUS Server 1: Enter the IP address, communicate port number, and shared secret key of your primary RADIUS server.
3.1.8 Tools: You can backup or restore WAP-4000 settings, reset WAP-4000 to factory default and upgrade firmware in this option. Backup Settings: You can backup current settings to a file. Press “Backup” button, it will prompt you a location to save the backup file (config.bin). Restore Settings: When you try to restore the settings you have saved, please press “Browse…” to find out the backup file and then press “Restore”.
3. You can click “Browse” to specify the Destination Folder that you want to install the utility. Or you can keep the default setting and click ”Next” to continue. 4. Please click “Finish” to complete the software installation.
3.2.2 54M AP Utility configuration After installing utility, you can found the icon on your desktop, please double click this icon to run the configuration utility and select each option to setup your Access Point as you need. After settings in each option, please press “Apply” to save. It will show you the dialog box to enter User Name and Password. By default, the User Name and Password is “admin”. 3.2.2.
3.2.2.2 AP Settings Basic Settings: ESSID: ESSID is used by all wireless devices within the wireless network. The ESSID value must be the same on all stations and Access points in this WLAN. Channel: Select the appropriate channel from the list provided to correspond with your network settings, between 1 and 13 (in ETSI). All wireless devices with the same ESSID will automatically use this channel to communicate with this access point.
Advance setting: when you press the “Advance Setting button”, the dialog box below will appear. You can set more details parameters in this screen. SSID Broadcast: This allows the AP to broadcast its SSID. Other wireless client with site survey function can easily know this SSID and use this SSID to connect your access point. To secure your wireless network from unauthorized users, please disable this function. Beacon Interval: Specify the Beacon Interval value. Enter a value between 20 and 1000.
3.2.2.3 IP Settings Fix IP Address: You may give a fixed IP address to WAP-4000 manually by choosing this radio button. IP Address: Set an IP address for the AP. Subnet mask: Set the Subnet Mask for the AP. Gateway: The IP address of a gateway device necessary for communication with devices outside the subnet of the Access Point. If your network is not divided onto different subnets, this can remain blank.
3.2.2.4 WEP Settings Data Encryption: Select this option when you want to enable WEP function. Auth. Mode: Open Authentication: With this setting, any station in the WLAN can receives and transmits data from the Access Point (null authentication). Shared Authentication: With this setting, only stations using shared key encryption identified by the Access Point are allowed to associate with it. WEP Key Settings: You can define the WEP (Wired Equivalent Privacy) function by yourself.
3.2.2.5 802.1x Settings 802.1X Function: Enable or disable 802.1X authentication of WAP-4000. Encryption Key: Select one of the Encryption key length options. It should be set the same length as WEP key. Select one of the Encryption key lifetime options. Once the lifetime expires, RADIUS server will renew the Encryption key. RADIUS Server 1: Enter the IP address, communicate port number, and shared secret key of your primary RADIUS server.
Chapter 4 802.1X Authentication Setup 4.1 802.1X Infrastructure An 802.1X Infrastructure is composed of three major components: Authenticator, Authentication server, and Supplicant. Authentication server: An entity that provides an authentication service to an authenticator. This service determines, from the credentials provided by the supplicant, whether the supplicant is authorized to access the services provided by the authenticator.
6. The client validates the digital certificate, and replies its own digital certificate to the RADIUS server. 7. The RADIUS server validates client’s digital certificate. 8. The client and RADIUS server derive encryption keys. 9. The RADIUS server sends WAP-4000 a RADIUS ACCEPT message, including the client’s WEP key. 10. WAP-4000 sends the client an EAP Success message along with the broadcast key and key length, all encrypted with the client’s WEP key. 4.2 RADIUS Server Setup 4.2.
6. Enter the information that you want for your Certificate Service, and click “Next” to continue. 7. Go to Start > Program > Administrative Tools > Certificate Authority. 8. Right-click on the “Policy Setting”, select “new”. 9. Select “Certificate to Issue”. 10. Select “Authenticated Session” and “Smartcard Logon” by holding down to the Ctrl key, and click “OK” to continue.
11. Go to Start > Program > Administrative Tools > Active Directory Users and Computers. 12. Right-click on domain, and select ”Properties” to continue. 13. Select “Group Policy” tab and click “Properties” to continue.
14. Go to “Computer Configuration” > “Security Settings” > “Public Key Policies” 15. Right-click “Automatic Certificate Request Setting”, and select “New” 16. Click “Automatic Certificate Request ...
17. The Automatic Certificate Request Setup Wizard will guide you through the Automatic Certificate Request setup, simply click “Next” through to the last step. 18. Click “Finish” to complete the Automatic Certificate Request Setup 19. Go to Start > Run, and type “command” and click “Enter” to open Command Prompt. 20. Type “secedit/refreshpolicy machine_policy” to refresh policy. Adding Internet Authentication Service 21. Go to Start > Control Panel > Add or Remove Programs. 22.
Setting Internet Authentication Service 24. Go to Start > Program > Administrative Tools > Internet Authentication Service. 25. Right-click “Client”, and select “New Client”. 26. Enter the IP address of WAP-4000 in the Client address text field, a memorable name for WAP-4000 in the Client-Vendor text field, the access password used by WAP-4000 in the Shared secret text field. Re-type the password in the Confirmed shared secret text field.
27. Click “Finish”. 28. In the Internet Authentication Service, right-click “Remote Access Policies” 29. Select “New Remote Access Policy”. 30. Select “Day-And-Time-Restriction”, and click “Add” to continue.
31. Unless you want to specify the active duration for 802.1X authentication, click “OK” to accept for having 802.1x authentication enabled at all times. 32. Select “Grant remote access permission”, and click “Next” to continue.
33. Click “Edit Profile”. For TLS Authentication Setup (Steps 34 ~ 35) 34. Select “Authentication” Tab. 35. Enable “Extensible Authentication Protocol”, and select “Smart Card or other Certificate” for TLS authentication. Click “OK”. Then go to step 38.
For MD5 Authentication Setup (Steps 36 ~ 37) 36. Select “Authentication” Tab. 37. Enable “Extensible Authentication Protocol”. Select “MD5-Challenge” and enable “Encrypted Authentication (CHAP)” for MD5 authentication. Click “OK”.
38. Select “Internet Authentication Service (Local)”, click on “Action” from top panel. Then click “Register Service in Active Directory”. 39. Go to Start > Program > Administrative Tools > Active Directory Users and Computers. 40. Right click on the domain, and select “Properties”. 41. Select “Group Policy” tab, and click “Edit” to edit the Group Policy.
42. Go to “Computer Configuration” > “Windows Settings” > “Security Settings” > “Account Policies” > “Password Policies”. Double click on “Store password using reversible encryption for all users in the domain”.
43. Click “Define this policy setting”, select “Enabled”, and click “OK” to continue. 44. Go to Start > Program > Administrative Tools > Active Directory Users and Computers. 45. Go to Users. Right-click on the user that you are granting access, and select “Properties”. 46. Go to “Account” tab, and enable “Store password using reversible encryption”. 47. Click “Apply” to continue.
48. Go to the “Dial-in” tab, and check “Allow access” option for Remote Access Permission and “No Call-back” for Callback Options. Then click “OK”.
4.3 Authenticator Setup 1. For EAP-MD5 Authentication, WEP key must be set previously. Go to Basic Settings. Enable WEP key, and enter a desired key string. You can skip this step if using EAP-TLS Authentication. 2. Click on 802.1X for detailed configuration.
3. Enable 802.1X Authentication by selecting “Enable”. 4. If EAP-MD5 is used, you can leave the settings in Encryption Key Length and Lifetime as default. If you are using EAP-TLS authentication, set the Encryption Key Length ranging from 64 to 256 Bits and the Lifetime from 5 Minutes to 1 Day. As soon as the lifetime expires, RADIUS server will renew the Encryption Key. 5. Enter the IP address, Port number, and Shared Secret Key used by the Primary Radius Server. 6.
4.4.1 EAP-MD5 Authentication 1. Go to Start > Control Panel, double-click on “Network Connections”. 2. Right-click on the Wireless Network Connection which using WL-3555. 3. Click “Properties” to open up the Properties setting window. 4. Click on the “Wireless Network” tab. 5. Click “Properties” of one available wireless network, which you want to associate with.
6. Select “Data encryption (WEP enabled)” option, but leave other options unselected. 7. Enter the network key in “Network key” text box. The string must be the same as the first set of WEP key which you set to WAP-4000. 8. Click “OK”.
9. Select “Authentication” tab. 10. Select “Enable network access control using IEEE 802.1X” to enable 802.1x authentication. 11. Select “MD-5 Challenge” from the drop-down list box for EAP type. 12. Click “OK”. 13. When wireless client has associated with WAP-4000, a user authentication notice appears in system tray. Click on the notice to continue. 14. Enter the user name, password and the logon domain that your account belongs. 15. Click “OK” to complete the validation process.
4.4.2 EAP-TLS Authentication Get Digital Certificate from Server The following procedures are based on obtaining a certificate from Windows 2000 Server which acts as a CA server. Furthermore, you must have a valid account/password to access the server. 1. Active web browser, enter “http://192.168.1.10/certsrv” in the Address field which 192.168.1.10 is the IP address of our server. This will directly access to Certificate Service of a Windows 2000 server.
4. Select “User Certificate request”, and click “Next” to continue. 5. Click “Submit >” to continue.
6. The Certificate Service is now processing the certificate request. 7. The certificate is issued by the server, click “Install this certificate” to download and store the certificate to your local computer.
8. Click “Yes” to store the certificate to your local computer. 9. Certificate is now installed. Wireless Adapter Setup 1. Go to Start > Control Panel, double-click on “Network Connections”. 2. Right-click on the Wireless Network Connection which using WL-3555. 3. Click “Properties” to open up the Properties setting window. 4. Click on the “Wireless Network” tab.
5. Click “Properties” of one available wireless network, which you want to associate with. 6. Select “The key is provided for me automatically” option.
7. Click “OK”. 8. Click “Authentication” tab 9. Select “Enable network access control using IEEE 802.1X” option to enable 802.1x authentication. 10. Select “Smart Card or other Certificate” from the drop-down list box for EAP type. 11. Click “OK”. 12.
certificate for wireless network connection. If you only have one certificate in local computer, system will automatically use it for authenticate. If you have multiple certificates in local computer, click on the network connection icon in the system tray to continue. 13. Select the certificate that was issued by the server (in our demonstration: WirelessCA), and click “OK” to continue. 14. Make sure this certificate is issued by correct server, and click “OK” to complete the authentication process.
Chapter 5 Application This chapter describe the four operating mode of your WAP-4000. The four working modes of WAP-4000 are Access Point, Access Point Client Mode, Wireless Bridge mode and Multiple Bridge mode. 5.1 Access Point mode With this mode, your Wireless network connection could act as following. Any of your IEEE802.11b and 802.11g end nodes should found the nearest Access Point to communication with any other Wireless end-nodes or the wired Ethernet network.
5.3 Wireless Bridge mode The Wireless Bridge mode help to make the two Ethernet networks connected without any wire. With two WAP-4000s in this mode, the two LANs in distance can communicate to each other. This could be deployed if the networks are hard to make the wire in between. Please be noted, key in the LAN MAC address to make the WAP-4000 communicate with a specific remote Access Point, you can find the MAC address either from the utility or from the label under the Access Point.
Chapter 6 Troubleshooting This chapter provides solutions to problems usually encountered during the installation and operation of the WAP-4000. The WAP-4000 cannot power up. Use an electrical test meter to determine the output voltage of the power supply. Check if it matched the specification of WAP-4000. Cannot communicate with WAP-4000 through a wired LAN computer. Check the following: w WAP-4000 is properly installed, LAN connections are OK, and it is powered ON.