WS231
User’s Manual PREFACE FCC Compliance Statement This device complies with part 15 of the FCC Rules. Operation is subject to the following two conditions: 1. this device may not cause harmful interference, and 2. this device must accept any interference received, including interference that may cause undesired operation. FCC WARNING This equipment has been tested and found to comply with the limits for a Class B digital device, pursuant to Part 15 of the FCC Rules.
User’s Manual CE mark for Class B ITE (Following European standard EN55022/1998; EN61000-3-2/1995; EN61000-3-3/1995, EN55024/1998, EN60950/1992+A1+A2+A3+A4+A11) Radio Frequency Interference Statement Warning: This is a Class B product. In a domestic environment, this product may cause radio interference in which case the user may be required to take adequate measures.
User’s Manual Important Safety Instructions Please read the following instructions carefully. retained for future use. This manual should be 1. To clean the LCD Monitor screen, first, make sure the Monitor is in the power off mode. Unplug the Monitor from its power source before cleaning it. Do not spray liquid cleaners directly onto the unit. Stand away from the LCD Monitor and spray cleaning solution onto a rag. Without applying excessive pressure, clean the screen with the slightly dampened rag. 2.
User’s Manual TABLE OF CONTENTS PREFACE.................................................................................................................. I TABLE OF CONTENTS....................................................................................... IV CHAPTER 1 ..............................................................................................................1 Your new LCD Monitor!........................................................................ 1 Unpacking....................
CHAPTER 1 The LCD Monitor Your new LCD Monitor! Your LCD Monitor has been designed to be versatile, ergonomic and user-friendly. The LCD Monitor is capable of displaying most standards, from 640 x 480 VGA to 1600 x 1200 UXGA. The digital controls located on the front panel allow the user to easily adjust the Monitor’s display parameters. The LCD Monitor’s small footprint allows you more room in your workspace for other peripherals.
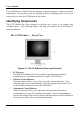
User’s Manual If you find that any of these items are missing or appear damaged, contact your dealer immediately. Do not throw away the packing material or shipping carton in case you need to ship or store the LCD Monitor in the future. Identifying Components The LCD Monitor has been designed to provide easy access to all controls and peripheral ports. The following figures will help you identify the LCD Monitor’s controls and ports.
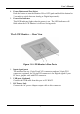
User’s Manual 4. 5. Power Button and Port Select Push the button to turn the Monitor ON or OFF (push and hold the button for 2 seconds to switch between Analog or Digital input mode). Power-On Indicator This LED indicator lights when the power is on. The LED indicator will blink when the LCD Monitor is in Power Saving mode. The LCD Monitor — Rear View Figure 1-2: LCD Monitor’s Rear Ports 1. 2. 3.
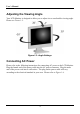
User’s Manual Adjusting the Viewing Angle Your LCD Monitor is designed to allow you to adjust it to a comfortable viewing angle. Please see Figure 1-3. Figure 1-3: Angle Settings Connecting AC Power Please refer to the following instructions for connecting AC power to the LCD Monitor. Plug the female end of the power cable into the AC power connector. Plug the male end of the power cord into a wall socket. The plug on the power cable will vary according to the electrical standard in your area.
User’s Manual Figure 1-4: Connecting Power to the LCD Monitor Connecting Video 1. 2. Turn off your PC and the LCD Monitor before connecting your LCD Monitor to the computer. Connect one end of the VGA signal cable to the PC’s D-sub VGA port and the other end to the monitor VGA port. Please refer to Figure 1-5.
User’s Manual Figure 1-5: Connecting the LCD Monitor to the PC 3. 4. If your PC has a graphic card with a 24-pin DVI connector, you may connect it with the Digital 24-pin DVI signal cable. Make sure the signal cable head is securely connected to the VGA port of your PC. Tighten the connecting screws to ensure a secure connection. If both analog (15-pin D-sub VGA) and digital (24-pin DVI) input ports are connected at the same time, the signal input can be selected with the port select button.
CHAPTER 2 The Display Controls The LCD Monitor’s Display Controls The LCD Monitor features an intuitive, menu-driven, On-Screen Display (OSD). You can access the OSD any time when the PC is powered on. If the PC is in a power saving mode, or is powered off, the OSD is inaccessible. The OSD make the adjusting display settings quick and simple. Press the Left Function button to access the OSD and the Function buttons are used scroll through the menu items.
User’s Manual The submenus for each are further described below: Display Setting sub Menu Figure 2-2: The Display Setting sub Menu Description: • CONTRAST • BRIGHTNESS • GRAPH/TEXT • AUTO ADJUST • EXIT Contrast adjustment. Backlight brightness adjustment. DOS 640x400 or 720x400 mode selection. To Auto-adjust the geometric parameters. Geometric sub Menu You should only use this menu if the result of the Auto Adjust function is not satisfactory.
User’s Manual Description: • SCALE • CLOCK • PHASE • H-POSITION • V-POSITION • EXIT Full Screen or native display selection. To adjust the pixel alignment of the display. To adjust the display for focus and clarity. Horizontal position adjustment. Vertical position adjustment. OSD Adjust sub Menu Figure 2-4: The OSD Adjust sub Menu Description • H-POSITION • V-POSITION • LANGUAGE • INFORMATION • RESET • EXIT OSD Horizontal position adjustment. OSD Vertical position adjustment.
User’s Manual Color temp. Sub Menu Figure 2-5: The Color temp. Menu Description: • 9300 • 6500 •R •G •B • EXIT CIE 9300°K color. CIE 6500°K color. User color R-Sub contrast adjustment. User color G-Sub contrast adjustment. User color B-Sub contrast adjustment.
User’s Manual Digital Input Mode (use 24 pin DVI port): Figure 2-6: The OSD Main Menu Main Menu Description: • DISPLAY • OSD-ADJUST • EXIT Display Setting parameters including Contrast, Brightness, Language, and Scale. OSD H-Position, OSD V-Position, Language, Information, Reset.
User’s Manual Description: • CONTRAST • BRIGHTNESS • LANGUAGE • SCALE • EXIT Contrast adjustment. Backlight brightness adjustment. To select different languages of OSD menu. Full screen or native display selection. OSD Adjust sub Menu Figure 2-8: The OSD Adjust sub Menu Description • H-POSITION • V-POSITION • INFORMATION • RESET • EXIT OSD Horizontal position adjustment. OSD Vertical position adjustment. To get the information of display mode and firmware version.
User’s Manual (Analog mode) (Digital mode) Figure 2-9: When there is no input signal The hotkey descriptions Figure 2-10: The Hotkeys 1. 2. 3. 4. Main Menu pop up /Auto-Adjust Hotkey Press this button to activate the OSD Main Menu. Press and hold this button for 2 seconds to activate the Auto Adjust feature. Contrast Adjust Hotkey Press this button to activate the Contrast Adjust function, use -/+ adjustment control buttons to increase or decrease the display’s contrast.
ADDENDUM A Technical Information TFT LCD Monitor Specifications Model FMT2315U LCD Panel Control Functions Power On-Screen Display (OSD) 23.1” UXGA Software switch with LED indicator DISPLAY--------------CONTRAST/BRIGHTNESS/AUDIO VOLUME /GRAPH.
Model FMT2315U Scanning Frequency H/V, Hz (Digital mode) 30-80kHz 56-85 Power Management Meets VESA DPMS Power Consumption (ON mode/OFF mode) 88W (max.)/5W (max.) (Measured from AC inlet) Dimensions WxHxD mm 568 x 570 x 240 Net Weight (Kg) Approx.
APPENDIX B Supported Timing Timing for Model FMT2315U (UXGA Resolution) Ite m Standards Resolution Dot Clock (MHz) Vertical Scanning Frequency (Hz) Horizontal Scanning Frequency (kHz) Sync Polarity or composite sync (H/V) Operating Mode 1 2 3 NEC PC98 NEC PC98 MAC 13” mode MAC 16” mode MAC 17” mode VGA VESA 640x400 640x400 640x480 25.20 21.05 30.24 70.15 56.42 66.67 31.50 24.83 35.00 -/-/-/- A A A/D 832x624 57.28 74.55 49.73 -/- A/D 1024x768 80.00 75.02 60.
Item Standards Resolution Dot Clock (MHz) Vertical Scanning Frequency (Hz) 28 29 30 31 32 33 34 35 36 37 VESA VESA VESA VESA SUN SUN SUN SUN SUN VESA 1280x960 1280x1024 1280x1024 1280x1024 1024x768 1024x768 1024x768 1280x1024 1280x1024 1600x1200 108.0 108.0 127.0 135.0 64.13 74.25 84.38 117.0 135.0 162.0 60.0 60.02 69.85 75.03 59.98 70.04 77.07 67.19 76.10 60.00 Horizontal Sync Polarity or Scanning composite sync Frequency (H/V) (kHz) 60.0 63.98 74.88 79.98 48.29 56.59 62.04 71.69 81.13 75.
APPENDIX C Troubleshooting Troubleshooting Procedures This LCD Monitor was pre-adjusted in the factory with standard VGA timing. Due to output timing differences among various VGA cards, you may initially experience an unstable or unclear display when a new display mode or new VGA card is selected. This LCD Monitor Supports Multiple VGA Modes. Refer to Addendum for a listing of the factory preset modes supported by this LCD Monitor.
PROBLEM: There is no LCD Display If there is no display on the LCD, please perform the following steps: 1. Make sure that the power indicator on the LCD Monitor is lit, all connections are secure, and the system is running on the correct timing. Refer to the Addendum for information on timing. 2. Turn off the LCD Monitor and then turn it back on again. Press the upper Function Control button (refer to Chapter 2) once and then press either the upper or lower Adjustment Control button several times.
02/04 6200507210