
user manual
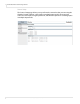
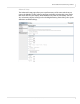
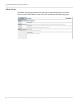
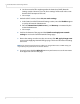
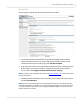
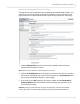
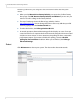
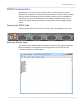
Table Of Contents
- Table of Contents
- Introduction
- Installing a Planar UltraRes Display
- LCD Installation
- Installing the UltraRes Control Software
- Using the UltraRes Control Software
- UltraRes Dimensions
- Display Dimensions - Front and Side Views
- Display Dimensions - Rear View
- Landscape Wall Mounts - Front View
- Landscape Wall Mounts - Sides Views
- Portrait Wall Mounts - Front View
- Portrait Wall Mounts - Sides Views
- Optional Pedestal Mount - Front View
- Optional Pedestal Mount - Top and Bottom Views
- Optional Pedestal Mount - Single and Double Sided
- Planar UltraRes Remote Monitoring Software
- RS232 Communication
- RS232 Commands
- Command Format
- Response Format
- Supported UltraRes 4K Commands
- Specifications
- Troubleshooting During Installation
- Accessing Planar’s Technical Support Website
- Regulatory Information
- Index

Planar UltraRes Remote Monitoring Software
Planar UltraRes User Manual 69
Date and Time
Use this page to change date and time information as needed.
1 Set the date and time manually in the box under the Manual Date and Time
section. The date format is very exact. Fill in the current date and time using
exactly the format shown on the page. Click Set date and time.
2 If you want to have the server periodically check the time from a network source,
fill in the NTP server name or address, and poll interval in the Date and Time
Server section. Click Apply new date and time server settings.
Note: If you don’t have a preferred NTP server, then www. pool.ntp.org
is a reasonable choice
for most installations.
3
Carefully read the instructions in the Local Time Zone section. Fill in the text box
and click Set time zone.
Note: The start and end of daylight saving time default to the first Sunday of April and the
last Sunday of October. As of 2007, U.S. locales that observe daylight saving time must enter
start and end dates in this section. For example, EST5EDT,M3.2.0,M11.1.0 is correct for U.S.
Eastern time zone as of 2007.