QUICK LINKS Contents Index Regulatory Compliance EX2 Display Controller Warranty Reference Guide GETTING STARTED About the Display Controller Check Package Contents INSTALLING THE BOARD Check System Requirements Install Controller Connect Cables FOR USE WITH Dome P1 System Dome P2 System Dome Q2 Display INSTALLING THE DRIVER Install Display Driver Adjust Display Properties APPENDIXES Troubleshooting Specifications Video Modes Driver Removal Gallery www.planar.
QUICK LINKS Contents Index Regulatory Compliance Warranty GETTING STARTED About the Display Controller Planar Systems, Inc. © 2004. All rights reserved. Information in this document has been carefully checked for accuracy; however, no guarantee is given to the correctness of the contents. This document is subject to change without notice. Planar provides this information as reference only. Reference to other vendors’ product does not imply any recommendation or endorsement.
QUICK LINKS Contents Contents Index Regulatory Compliance Regulatory Compliance . . . . . . . . . . . . . . . . . . . . . . . . . . . . . . . . iii 1 Warranty About the EX2 Display Controller . . . . . . . . . . . . . . . . . . . . . . . . . 1 GETTING STARTED About the Display Controller Package Contents . . . . . . . . . . . . . . . . . . . . . . . . . . . . . . . . . . . . 2 2 Check Package Contents Install the EX2 Controller . . . . . . . . . . . . . . . . . . . . . . . . . . . . . . .
QUICK LINKS Regulatory Compliance Contents Index Regulatory Compliance Warranty GETTING STARTED About the Display Controller Check Package Contents INSTALLING THE BOARD Check System Requirements Install Controller Connect Cables INSTALLING THE DRIVER Install Display Driver Adjust Display Properties APPENDIXES Troubleshooting FCC Compliance Statement Note: This equipment has been tested and found to comply within the limits of a Class B digital device, pursuant to Part 15 of the FCC Rules.
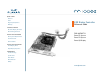
QUICK LINKS About the EX2 Display Controller Contents Index Regulatory Compliance Warranty GETTING STARTED About the Display Controller Check Package Contents INSTALLING THE BOARD Check System Requirements Install Controller Connect Cables The EX2 controller is an advanced workstation graphics accelerator based on a highbandwidth, parallel pipeline geometry and rendering architecture. It supports the landscape-to-portrait rotation commonly needed for viewing medical images.
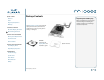
QUICK LINKS Package Contents Contents Unpacking and handling tips Index Wear an antistatic heel or wrist strap when handling and installing the display controller to avoid damage to board components. Regulatory Compliance Warranty GETTING STARTED About the Display Controller The EX2 display controller ships with the display driver and the quick reference. Speak with your sales rep if any item is missing or damaged.
QUICK LINKS Check System Requirements Contents Index Regulatory Compliance Warranty GETTING STARTED About the Display Controller Check Package Contents INSTALLING THE BOARD Check System Requirements Install Controller Connect Cables INSTALLING THE DRIVER Install Display Driver Adjust Display Properties APPENDIXES Troubleshooting Specifications Video Modes Driver Removal System requirements Make sure your computer system has these requirements before you install the your display and EX2 controller and dri
QUICK LINKS Install the EX2 Controller Contents Index Regulatory Compliance Be sure to remove any existing graphics card and its driver from your computer system before you install the EX2 controller and driver. Also disable any onboard graphics capability on the motherboard. Warranty GETTING STARTED About the Display Controller Check Package Contents INSTALLING THE BOARD Check System Requirements To install the controller 1 Turn off your computer and all peripherals.
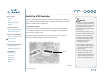
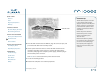
QUICK LINKS Contents Installation tips Index The EX2 board requires connection to the computer internal power supply for operation. A 300 W power supply or greater is recommended to ensure normal operation where a number of other internal devices are installed. Regulatory Compliance Warranty GETTING STARTED Installed EX2 controller About the Display Controller Check Package Contents Remove the power cable from the hard drive power connector before you install the power extension cable.
QUICK LINKS Connect the Video Cables Contents Index Regulatory Compliance Warranty GETTING STARTED About the Display Controller Check Package Contents INSTALLING THE BOARD Check System Requirements Installation tips Use only the cables supplied with your display. After you connect the video cables and the power cord, power on your display first, then the computer. 1 Plug one end of a video signal cable into the DVI port on the first display. Tighten the thumbscrews to secure the connection.
QUICK LINKS Install the Display Driver Contents Index Regulatory Compliance Warranty GETTING STARTED About the Display Controller Check Package Contents Upon restarting your computer system, you must log on with administrator privileges. On Windows 2000 systems, Service Pack 1 or higher must be installed. To install the display driver 1 Click Cancel on the Found New Hardware Wizard dialog box. Click No on the System Settings Change window when prompted to restart the computer.
QUICK LINKS Adjust the Display Properties Contents Index Regulatory Compliance Warranty GETTING STARTED About the Display Controller Check Package Contents INSTALLING THE BOARD The display driver installs two additional tabs on the Display Properties dialog box in the Control Panel. Use the Rotation tab to select the orientation of the display. Use the Information tab to retrieve controller-specific hardware and driver information.
Contents To change the video settings 1 Right-click the desktop and select Properties > Settings. Index 2 In Screen area, drag the slider to set the resolution. Regulatory Compliance 3 Click the Advanced button and select the Monitor tab. Warranty 4 Under Refresh Frequency (Screen Refresh Rates in Windows XP), set the refresh rate. QUICK LINKS GETTING STARTED About the Display Controller 5 Click Apply. Check Package Contents 6 Click OK to preview the new setting.
QUICK LINKS Troubleshooting Contents Index Problem Possible Solution Computer does not restart properly after installation of EX2 controller Verify that the installation instructions were followed correctly. Regulatory Compliance Warranty Check that the controller is properly connected to the display. Make sure a single display is connected to DVI port #1. GETTING STARTED About the Display Controller Check the connections to the video and power cables. Secure them as necessary.
QUICK LINKS Contents Index Problem Possible Solution Address and interrupt conflicts Ensure that the I/O and memory addresses reserved for the controller are not used by other hardware devices.
QUICK LINKS Controller Specification Contents Index Parameter Description Regulatory Compliance Operating environment Windows XP, Windows 2000 Warranty System requirements Intel Pentium 3, Pentium 4, Xeon; AMD Athlon XP/MP/Opteron or compatible GETTING STARTED Certifications FCC/DOC, ICES-003, CE/DOC, SMA C-Tick, MIC, BSMI, VCCI Dimensions Length: 228.6 mm (9.0 inches) Width: 108.0 mm (4.25 inches) Power requirements + 3.3 Volts DC: 9.4 Amps + 5 Volts DC: 0.6 Amps + 12 Volts DC: 2.
QUICK LINKS Controller Video Modes Contents Index Regulatory Compliance Warranty All video modes comply with VESA DMT (Discrete Monitor timing) or VESA GTF (General Timing format) standards. The display controller board supports HiColor, 16-bit modes and Truecolor, 32-bit (24 color, 8 alpha) modes. There is no support for 8-bit modes.
QUICK LINKS Driver Removal Contents Index Regulatory Compliance Warranty GETTING STARTED About the Display Controller You need to log on with administrator privileges to remove the display driver. Before removing the driver, close all open applications and temporarily disable any anti-virus software that is running on your computer system. To remove the display driver: Removing the controller When removing the controller from your computer, follow the same safety precautions you use to install it.
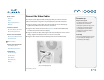
QUICK LINKS Gallery Contents Index A plug connects to EX2 controller Regulatory Compliance B plug Warranty GETTING STARTED About the Display Controller Check Package Contents C plug INSTALLING THE BOARD #2 #1 Check System Requirements DVI ports on EX2 controller Install Controller Connect Cables INSTALLING THE DRIVER Install Display Driver Adjust Display Properties RETURN TO PREVIOUS VIEW APPENDIXES Troubleshooting Specifications Video Modes Driver Removal Gallery B plug connects to computer power
QUICK LINKS Index Contents A E removing controller 14 display driver 14 resolution 9 rotating display screen 8 C electrostatic discharge, avoiding 4 S G specification controller 12 video mode 13 system requirements 3 Install Display Driver cables, connecting 6 changing video setting 9 chipset driver 3 configuring driver 7 connecting display cables 6 power cord 6 power extension cable 5 contents, package 2 controller installing 4 specification 12 customer support 19 Adjust Display Properties D
QUICK LINKS Standard Warranty Overview Contents Index Summary Regulatory Compliance • Standard 1-year “repair and return” warranty • Typical repair turnaround time of 10 business days Warranty GETTING STARTED About the Display Controller Check Package Contents INSTALLING THE BOARD Check System Requirements Install Controller Connect Cables INSTALLING THE DRIVER Install Display Driver Adjust Display Properties APPENDIXES Standard Warranty Return Procedure As a Planar Standard Warranty customer, you mu
QUICK LINKS Contents Index Regulatory Compliance Warranty GETTING STARTED About the Display Controller Check Package Contents INSTALLING THE BOARD Summary Limitations and Exclusions 1 The customer must provide original proof of purchase of the display system. 2 Warranty is void on any product with a defaced, modified, or removed serial number.
QUICK LINKS Contents Index Regulatory Compliance Warranty GETTING STARTED About the Display Controller Check Package Contents INSTALLING THE BOARD Check System Requirements Install Controller Connect Cables Exclusion of Damages THE LIABILITY OF PLANAR IS LIMITED TO THE COST OF REPAIR OR REPLACEMENT OF THE PRODUCT.