TECHNOLOGIE FÜR DEN HAUSHALT TECHNOLOGY FOR DOMESTIC USE Bedienungsanleitung Vollraumkühlschrank Instruction Manual Larder Fridge KS45 E Deutsch English Seite Page www.pkm-online.
Sehr geehrter Kunde! Sehr geehrte Kundin! Wir möchten Ihnen herzlich danken, dass Sie sich zum Erwerb eines Produkts aus unserem reichhaltigen Angebot entschieden haben. Lesen Sie die gesamte Bedienungsanleitung, bevor Sie das Gerät zum ersten Mal benutzen. Verwahren Sie diese Bedienungsanleitung zur zukünftigen Verwendung an einem sicheren Ort. Falls Sie das Gerät weitergeben, müssen Sie diese Bedienungsanleitung ebenfalls mit übergeben. Inhalt 1. Sicherheitshinweise ......................................
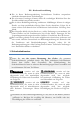
EG - Konformitätserklärung Die in dieser Bedienungsanleitung beschriebenen Produkte entsprechen sämtlichen harmonisierten Anforderungen. Die relevanten Unterlagen können durch die zuständigen Behörden über den Produktverkäufer angefordert werden. Die in dieser Bedienungsanleitung enthaltenen Abbildungen können in einigen Details von dem tatsächlichen Design Ihres Geräts abweichen. Folgen Sie in einem solchen Fall dennoch den beschriebenen Sachverhalten. Lieferung ohne Inhalt.
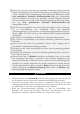
Prüfen Sie auf jeden Fall auch das technische Umfeld des Geräts! Sind alle Kabel oder Leitungen, die zu ihrem Gerät führen, in Ordnung? Oder sind sie veraltet und halten der Geräteleistung nicht mehr Stand? Daher muss durch eine qualifizierte Fachkraft (Elektrotechniker/-in) eine Überprüfung bereits vorhandener wie auch neuer Anschlüsse erfolgen.
WARNUNG! 1. Ihr Gerät wird mit dem umweltfreundlichen Kältemittel R600a betrieben. Das Kältemittel R600a ist brennbar. Deshalb ist es unbedingt erforderlich, dass keine Systemteile des Kühlkreislaufs während des Betriebs oder Transports des Geräts beschädigt werden. 2. Sollte ein Systemteil Beschädigungen aufweisen, darf sich das Gerät auf keinen Fall in der Nähe von Feuer, offenem Licht und Funkenbildungen befinden. Nehmen Sie in einem solchen Fall sofort Kontakt zu Ihrem Kundendienst auf. 3.
13. Die technischen Daten Ihrer elektrischen Versorgung müssen den auf dem Typenschild angegebenen Werten entsprechen. 14. Ihr Hausstrom muss mit einem Sicherungsautomaten zur Notabschaltung des Geräts ausgestattet sein. 15. Nehmen Sie keine Veränderungen an dem Gerät vor. 16. Schalten Sie vor dem Aufbau und Anschluss des Geräts unbedingt den Strom ab. STROMSCHLAGGEFAHR! 17. Trennen Sie das Gerät vor allen Wartungs- und Reinigungsarbeiten von der Stromversorgung. STROMSCHLAGGEFAHR!! 18.
HINWEIS! 1. Wenn Sie das Gerät bewegen, halten Sie es immer am unteren Ende fest und heben Sie es vorsichtig an. Halten Sie das Gerät dabei aufrecht. 2. Kippen Sie das Gerät nicht über einen Winkel von 450 hinaus. 3. Falls das Gerät in einer horizontalen Position transportiert wird, kann Öl aus dem Kompressor in den Kühlkreislauf gelangen. 4. Lassen Sie das Gerät für mindestens 4-6 Stunden aufrecht stehen, bevor Sie es an die Stromversorgung anschließen, damit das Öl in den Kompressor zurückfließen kann. 5.
3. Installation 3.1 Wahl des Standorts 1. Packen Sie das Gerät vorsichtig aus. Beachten Sie unbedingt die Hinweise zur Entsorgung des Geräts im Kapitel ENTSORGUNG. 2. Das Zubehör Ihres Geräts ist möglicherweise gegen Beschädigungen durch den Transport gesichert (Klebebänder etc.). Entfernen Sie solche Klebebänder äußerst vorsichtig. Entfernen Sie mögliche Rückstände der Klebebänder nur mit einem feuchten Tuch und etwas handwarmem Wasser sowie einem milden Reinigungsmittel (s.a.
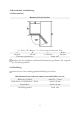
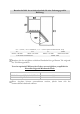
3.2 Raumbedarf und Belüftung 3.2.1 Raumbedarf Raumbedarf des Gerätes: A = TIEFE / B = BREITE / C = TIEFE (BEI GEÖFFNETER TÜR) A B C Höhe 468 mm 445 mm ca. 900 mm 500 mm 0 TÜRÖFFNUNGSWINKEL mind. 180 Beachten Sie den möglichen seitlichen Platzbedarf der geöffneten Tür aufgrund des Türöffnungswinkels. 3.2.2 Belüftung Achten Sie auf eine ordnungsgemäße Belüftung des Gerätes. MINDESTABSTÄNDE FÜR EINE ORDNUNGSGEMÄßE BELÜFTUNG: Rückseite ↔ Wand mind. 50 - 70 mm Beide Seiten ↔ Möbelstück / Wand mind.
Raumbedarf inkl. der mindestabstände für eine Ordnungsgemäße Belüftung: A 1 = TIEFE / B 1 = BREITE / C 1 = TIEFE (BEI GEÖFFNETER TÜR) A1 B1 C1 Höhe mind. 538 mm mind. 545 mm mind. 970 mm mind. 600 mm TÜRÖFFNUNGSWINKEL mind. 1800 Beachten Sie den möglichen seitlichen Platzbedarf der geöffneten Tür aufgrund des Türöffnungswinkels.
3.3 Gerät ausrichten Verwenden Sie zur ordnungsgemäßen Ausrichtung des Gerätes und zur Gewährleistung der Luftzirkulation in den unteren Bereichen die verstellbaren Standfüße. Sie können die Standfüße mittels eines geeigneten Schraubenschlüssels einstellen. Das obere Bild dient ausschließlich als Beispiel. Abweichungen sind möglich. Sie können mittels der verstellbaren Standfüße einen Neigungswinkel von 0,50 einstellen, damit sich die Türen von selbst schließen.
3.4 Wechsel des Türanschlags WARNUNG! Schalten Sie das Gerät vor dem Wechsel des Türanschlags aus und ziehen Sie den Netzstecker aus der Steckdose. STROMSCHLAGGEFAHR! VORSICHT! Führen Sie den Wechsel des Türanschlags mit mindestens zwei Personen durch, weil Sie ansonsten das Gerät beschädigen oder der Person, die an dem Gerät arbeitet, Schaden zufügen. Wir empfehlen, den Wechsel von einer Fachkraft durchführen zu lassen1. VORBEREITENDE MAßNAHMEN: ❖ Leeren Sie das Gerät vorher.
TÜRANSCHLAGSWECHSEL: 1. Entfernen Sie die Abdeckung (2) der des Türscharniers mit Hilfe eines kleinen Schlitzschraubendrehers und lösen Sie die 2 Schrauben um das obere Türscharnier abzuschrauben. Entfernen Sie die Tür indem Sie diese vorsichtig nach oben abziehen. Stellen Sie die Tür vorsichtig an einen Ort wo diese nicht beschädigt werden kann. Entfernen Sie Schraublochabdeckung (1) auf der linken Seite und drücken Sie diese auf der rechten Seite wieder ein.
Installieren Sie jetzt das obere Türscharnier (4) auf der linken Seite. Schrauben Sie dazu die beiden Schrauben (3) nicht direkt richtig fest. Richten Sie vorher die Tür am Gehäuse aus und schrauben Sie anschießend richtig fest. Setzen Sie anschließend die Scharnierabdeckung (2) anschließend auf das obere Türscharnier (4). HINWEIS! Richten Sie die Tür ordnungsgemäß aus. Die Dichtungen müssen ordnungsgemäß anliegen. 4. Bedienung 4.
1 3 5 7 9 Schraublochabdeckung Kühlboxtür Türablagen Ablauföffnung Eisfachklappe 2 4 6 8 Abdeckung oberes Türscharnier Türdichtung Tropfschale Eisfach 4.2 Temperaturregelung Betriebsstatus Aus Minimal Normal Maximal Einstellung OFF MIN MID MAX WARNUNG Die Einstellung 0/OFF/AUS schaltet lediglich den Kompressor ab. Um das Gerät. von der Stromversorgung zu trennen, müssen Sie den Netzstecker aus der Netzsteckdose ziehen. 1.
➢ Die Kühlstufenbeschreibungen sind nur Richtwerte. 4.3 Eisfach Das Eisfach erreicht, unabhängig von der Kühlstufeneinstellung, Temperaturen von ca. 0 0C. ➢ Das Eisfach ist nicht zum Einfrieren von Lebensmitteln oder zur Lagerung gefrorener Lebensmittel bestimmt. 4.4 Betriebsparameter 1. Das Gerät kann die entsprechenden Temperaturen nur dann erzeugen, wenn: a. die durchschnittliche Umgebungstemperatur der Klimaklasse entspricht. b. die Türen ordnungsgemäß schließen. c.
❖ Gewähren Sie den Lebensmitteln einen angemessenen Lagerungsbereich. Überfüllen Sie das Gerät nicht. ❖ Wickeln Sie einzulagernde Lebensmittel in Frischhaltefolie oder ein geeignetes Papier und ordnen Sie die Lebensmittel einzelnen Bereichen zu. So vermeiden Sie Verunreinigungen, einen Verlust an Wasser und eine Vermischung von Gerüchen. ❖ Lassen Sie heiße Lebensmittel auf Zimmertemperatur abkühlen, bevor Sie diese einlagern, da sonst der Energieverbrauch ansteigt.
Verunreinigungen. 2. Wischen Sie anschließend mit klarem Wasser nach. 3. Wischen Sie die gereinigte Fläche trocken. Innen 1. Reinigen Sie das herausnehmbare Zubehör und die Innenseiten mit warmem Wasser und einem milden Reinigungsmittel 2. Wischen Sie anschließend mit klarem Wasser nach 3. Wischen Sie die gereinigte Fläche trocken. Türdichtungen ➢ Waschen Sie diese mit warmem Wasser und einem milden Reinigungsmittel ab. 5.
6. Problembehandlung FEHLER ➢ ➢ ➢ ➢ ➢ ➢ ➢ ➢ ➢ MÖGLICHE URSACHE MASSNAHMEN Gerät arbeitet überhaupt nicht. Das Gerät ist mit dem Netzstecker ➢ Überprüfen Sie die fragliche nicht an der Steckdose Steckdose, indem Sie ein anderes angeschlossen. Gerät ebenda anschließen. Der Netzstecker ist locker. ➢ Überprüfen Sie die Haussicherung. Die Steckdose wird nicht mit Strom ➢ Vergleichen Sie die Angaben auf versorgt. dem Typenschild mit den Angaben Ihres Stromanbieters.
Die folgenden Betriebsvorgänge sind normal und kein Anzeichen einer Fehlfunktion ❖ Die Kühlflüssigkeit erzeugt ein Geräusch ähnlich fließenden Wassers. ❖ Gelegentlich sind Geräusche zu hören, die durch den Einspritzvorgang in das Kühlsystem verursacht werden. ❖ Es ist normal, dass die Seitenwände des Geräts aufgrund des Betriebs des Kühlkreislaufs warm werden. Ausgeprägte Geräuschbildung Bei Erstinbetriebnahme oder warmen Innentemperaturen.
❖ Wenn Sie das Gerät bewegen wollen: 1. Sichern Sie alle herausnehmbaren Teile und den Inhalt des Geräts. Verpacken Sie diese getrennt, falls nötig. 2. Transportieren Sie das Gerät ausschließlich in einer aufrechten Position. In jeder anderen Position kann der Kompressor beschädigt werden. 3. Beschädigen Sie die Standfüße nicht. Außerbetriebnahme, endgültige 1. 2. 3. 4. Ziehen Sie den Netzstecker aus der Steckdose. Schneiden Sie das Netzanschlusskabel am Gerät ab. Entfernen Sie alle Türen des Geräts.
9. Entsorgung 1. Bitte entsorgen Sie das Gerät unter Beachtung der jeweiligen Gesetzgebung hinsichtlich explosiver Gase. Kühlgeräte enthalten in den Kühlsystemen und Isolierungen Kältemittel und Gase, die fachgerecht entsorgt werden müssen. Beschädigen Sie an einem zur fachgerechten Entsorgung vorgesehenen Kühlgerät nicht die Kühlrippen und Rohre. Bei Austritt von Kältemittel besteht Brandgefahr. 2.
10. Garantiebedingungen für Elektro-Großgeräte der PKM GmbH & Co. KG, Neuer Wall 2, 47441 Moers. Der Hersteller leistet dem Verbraucher für die Dauer von 24 Monaten, gerechnet vom Tag des Kaufes Garantie für einwandfreies Material und fehlerfreie Fertigung. Dem Verbraucher stehen neben den Rechten aus der Garantie die gesetzlichen Gewährleistungsrechte zu, die der Verbraucher gegen den Verkäufer hat, bei dem er das Gerät erworben hat. Diese werden durch die Garantie nicht eingeschränkt.
Dear customer! We would like to thank you for purchasing a product from our wide range of domestic appliances. Read the complete instruction manual before you operate the appliance for the first time. Retain this instruction manual in a safe place for future reference. If you transfer the appliance to a third party, also hand over this instruction manual. Index 1. Safety instructions ................................................................................................................ 25 2.
The figures in this instruction manual may differ in some details from the current design of your appliance. Nevertheless follow the instructions in such a case. Delivery without content. Any modifications, which do not influence the functions of the appliance. shall remain reserved by the manufacturer. Please dispose of the packing with respect to your current local and municipal regulations. The appliance you have purchased may be an enhanced version of the unit this manual was printed for.
The appliance is not intended to be operated for commercial purposes, during camping and in public transport. Operate the appliance in accordance with its intended use only. Do not allow anybody who is not familiar with this instruction manual to operate the appliance.
6. While unpacking, the packaging materials (polythene bags, polystyrene pieces, etc.) should be kept away from children. CHOKING HAZARD. 7. Do not connect the appliance to the electric supply unless all packaging and transit protectors have been removed. 8. Operate the appliance with 220~240V/50Hz/AC only. All connections and energy-leading components must be replaced by an authorized professional. 9. Do not use a socket board or a multi socket when connecting the appliance to the mains. 10.
CAUTION! 1. The condenser and the compressor, located at the rear of the appliance, can reach high temperatures during ordinary operation. Carry out the installation according to this manual. An insufficient ventilation of the appliance will impair its operation and will damage the appliance. Do not cover or block the ventilation slats at any time 2. Do not put any gassy beverages into the freezer compartment of the appliance, because their containers could explode. 3.
2. Climatic classes Look at chap. TECHNICAL DATA for information about the climatic class of your appliance. Your appliance can be operated in rooms with relevant room temperatures as named below. CLIMATIC CLASS SN N ST T AMBIENT TEMPERATURE +100→+320 C e.g. unheated cellar 0 0 +16 →+32 C inner home temperature +160→+380 C inner home temperature +160→+430 C inner home temperature 3. Installation 3.1 Site 1. Unpack the appliance carefully. Dispose of the packaging as described in chapter waste management.
3.2 Space and ventilation requirements 3.2.1 Space requirement SPACE REQUIREMENT OF THE APPLIANCE: A = DEPTH / B = WIDTH / C = DEPTH (WHEN THE DOOR IS OPEN) A B C Height 468 mm 445 mm ca. 900 mm 500 mm 0 DOOR OPENING ANGLE mind. 180 Observe the possible lateral space requirement of the open door relevant to the door opening angle. 3.2.2 Ventilation Observe the required minimum distances for proper ventilation. MINIMUM DISTANCES REQUIRED FOR PROPER VENTILATION: Back ↔ wall min.
SPACE REQUIREMENTS INCL. MINIMUM DISTANCES FOR PROPER VENTILATION: A 1 = Depth / B 1 = Width / C 1 = Depth (when the door is open) A1 B1 C1 Height min. 538 mm min. 545 mm min. 970 mm min. 600 mm 0 DOOR OPENING ANGLE min. 180 Observe the possible lateral space requirement of the open door relevant to the door opening angle.
3.3 Levelling Use the adjustable feet for proper levelling and for proper air circulation in the lower sectors of the appliance. Adjust the feet using a suitable spanner. ❖ The figure above is an example only. Modifications are possible. You can adjust an inclination of 0.50 to allow the doors to close by themselves. If you have to move the appliance, set the adjustable feet to minimum position so the appliance can be moved on its rollers (depending on model) easily.
➢ Empty the appliance. ➢ Remove all door trays, glass shelves and drawers from the fridge (s. chapter 4.4.1 ➢ ➢ ➢ ➢ GLASS SHELVES and chapter 4.2.2 DOOR TRAYS) so that they cannot be damaged. It is necessary to tilt the appliance backwards while removing the door. You should rest the appliance on something solid so it will not slip while changing the hinge positions. Do not lay the appliance flat as this can damage the cooling system. All parts removed must be saved for proper reinstallation of the doors.
3. Take the door up carefully and place the door on the ground with a soft surface to prevent the surface of the door from being scratched. 4. Remove the screw hole cover (1) and transfer it to the corresponding hole on the right, be sure to firmly press it into the hole. 5. Remove the two screws (6) at the bottom 6. Remove the lower hinge parts (5) at the bottom 7. Remove the left adjustable foot at the bottom, transfer it to the hole corresponding to the bottom on the right. 8.
5 Shelf strip 7 Glass shelf 9 Star door 6 8 Water Drain Roll bond evaporator part After installation, please wait 4-6 hours before you connect the appliance to the mains. 4.2 Temperature control Operating status Off Minimum Normal Maximum Setting OFF MIN MID MAX WARNING The setting 0/OFF switches off the compressor only. You must unplug the appliance to disconnect it from the mains. 1. In case of high outdoor temperatures (e.g. hot summer days) select a higher setting. 2.
5. If you have disconnected the appliance from the energy supply, wait 10 minutes before you restart the appliance. Otherwise the appliance can be damaged. ➢ The setting definitions are standard values only. 4.3 Icebox The icebox has a cooling temperature of approx. 0 0C (not depending on the setting of the temperature control). ➢ The icebox is not intended to freeze food or to store frozen food. 4.4 Operational parameters 1. The appliance can only reach the relevant temperatures when: a.
❖ ❖ ❖ ❖ of water and a mingling of odours. Let warm or hot food cool down to room temperature before you put it into your appliance. Otherwise the energy consumption will increase. Put frozen food you want to defrost into the cooling-compartment of you appliance. Try opening the door as little as possible, especially when the weather is warm and humid. If you open the door, close it as fast as possible. Permanently check , that the appliance is well-ventilated.
5.1 Defrosting Cooling compartment/icebox: WARNING! Never use any mechanical items, knives or other sharpedged objects to remove the encrusted ice. RISK OF ELECTRICAL SHOCK! 1. Remove the contents and put them into a cooling box. 2. Switch off the appliance by turning the thermostat to position 0/AUS/OFF and disconnect it from the mains. 3. When the encrusted ice melts put some dry cloths into the appliance to hold the water back. 4. Do not support the defrosting procedure with hot water. 5.
➢ ➢ ➢ ➢ ➢ ➢ ➢ ➢ ➢ MALFUNCTION POSSIBLE CAUSE MEASURE The compressor operates for too long. The appliance has been switched off ➢ The appliance needs some time to for a while. reach the preset temperature. Too much or too hot food in the ➢ Remove any hot food. appliance. ➢ Do not open the door too Doors opened too often or too often/too long. long. Strong formation of encrusted ice. The door is not properly closed. ➢ Close the door. The door seal is damaged or soiled. ➢ Clean/replace the door seal.
Hum is caused by the compressor while running. Knocking/snapping may be generated by sequential expansion and shrinkage of the components of the cooling system. It is caused by variation of temperature before and after the compressor is activated or deactivated. 7. Decommissioning Decommissioning, temporarily ❖ If 1. 2. 3. the appliance is not used for a longer period of time: Draw the plug out of the socket. Remove all food stored in the appliance.
8. Technical data Model Climatic class Energy efficiency class* Annual energy consumption in kW/h** Voltage/frequency Volume net Noise emission Stars Freezing capacity/24 h Max. storage time/malfunction Adjustable thermostat Compressor Refrigerant Changeable hinge position Adjustable feet Defrosting cooling comp.
9. Waste management 1. Dispose of the appliance relevant to the current legislation in view of explosive gases. The cooling systems and insulation of refrigerators and freezers contain refrigerants and gases which have to be deposed of properly. Do not damage the cooling fins and tubes. If refrigerants escape there is FIRE HAZARD! 2. While unpacking, the packaging materials (polythene bags, polystyrene pieces, etc.) should be kept away from children. CHOKING HAZARD! 3.
10. Guarantee conditions for large electric appliances; PKM GmbH & Co. KG, Neuer Wall 2, 47441 Moers. This appliance includes a 24-month guarantee for the consumer given by the manufacturer, dated from the day of purchase, referring to its flawless materialcomponents and its faultless fabrication. The consumer is accredited with both the dues of the guarantee given by the manufacturer and the vendor's guarantees. These are not restricted to the manufacturer's guarantee.
TECHNOLOGIE FÜR DEN HAUSHALT SERVICE INFORMATION TECHNOLOGY FOR DOMESTIC USE Bitte kontaktieren Sie das Geschäft, in dem Sie das Gerät erworben haben. Please contact the shop you purchased the appliance at. Änderungen vorbehalten Subject to alterations Stand 21.01.2022 Updated 01/21/2022 © PKM GmbH & Co.