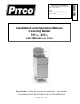
Model #: ___________________________ Serial #: ___________________________ Date Purchased: ____________________ Installation and Operation Manual Covering Model 35C+, 45C+ with Millivolt Gas Valve Pitco Frialator, PO Box 501 Concord, NH 03302-0501 603-225-6684 THIS MANUAL MUST BE RETAINED FOR FUTURE REFERENCE L20-275 Rev.
TO THE PURCHASER, OWNER AND STORE MANAGER Please review these warnings prior to posting them in a prominent location for reference. TO THE PURCHASER Post in a prominent location the instructions to be followed in the event that an operator smells gas. Obtain this information from your local gas supplier. FOR YOUR PROTECTION DO NOT store or use gasoline or other flammable vapors and liquids in the vicinity of this or any other appliance.
TABLE OF CONTENTS INSTALLATION ...................................................................................................................... 1 Checking Your New Appliance ............................................................................................................................................. 1 Assembly and Leveling ........................................................................................................................................................
INSTALLATION/OPERATION INSTALLATION Checking Your New Appliance Your new appliance has been carefully packed into one crate. Every effort has been made to ensure that you it is delivered to you in perfect condition. As you unpack your new appliance, inspect each of the pieces for damage. If something is damaged, DO NOT sign the bill of lading. Contact the shipper immediately; the shipper is only responsible for 15 days after delivery.
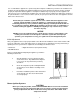
INSTALLATION/OPERATION Heat Deflector Installation If the appliance requires a heat deflector, you will find a removable label at the rear top edge of the unit. This label has instructions for positioning and installation of the heat deflector. Refer to the label and the instructions below to install the deflector. a. Remove the two self-drilling screws from the top, back area of the appliance. b.
INSTALLATION/OPERATION WARNING NEVER supply the appliance with a gas other than the one that is indicated on the data plate. Using the incorrect gas type will cause improper operation and could result in serious injury or death. If you need to convert the appliance to another type of fuel, contact the dealer you purchased it from. NOTICE NEVER use an adaptor to make a smaller gas supply line fit the appliance connection.
INSTALLATION/OPERATION It is essential that the appliance be operated only when adequate ventilation is provided. Your ventilation hood should be properly maintained. A qualified installation professional should ensure that the hood is operating properly in conjunction with the appliance. Inadequate ventilation may not properly evacuate appliance all emissions. Excessive or unbalanced ventilation may cause drafts, which could interfere with proper operation of the pilot and burners.
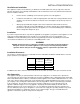
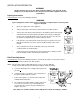
INSTALLATION/OPERATION WARNING During operation there is an open flame inside this appliance. The unit may get hot enough to set near by materials on fire. Keep the area around the appliance free from combustibles. Lighting Instructions For manual pilots, refer to the following instructions. WARNING If pilot extinguishes, wait 5 minutes before attempting to relight the pilot to allow any built up gas to dissipate. a. Open gas supply valves to the appliance. b.
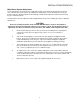
INSTALLATION/OPERATION Main Burner System Adjustment For the main burners to operate the gas supply valve must be open and the thermostat must be turned on. For models with electric controls, the main power switch must be on. The main burners receive gas from the main gas supply through the thermostatically controlled valve. When the thermostat is turned up the gas control valve opens. The main burners must be adjusted to deliver optimum flame. Refer to the following procedure to adjust the main burners.
INSTALLATION/OPERATION Initial Cleaning When your appliance is shipped, many of its parts are covered with a thin coat of shortening/oil for protection. Before the appliance is ready for cooking it must be cleaned. This will remove the shortening/oil coating and any foreign matter that may have accumulated during storage and shipment. Refer to the following procedure to clean the appliance. a. Fill the tank with water. Light the pilot, turn the appliance on and set the thermostat to 200°F (93 °C). b.
INSTALLATION/OPERATION OPERATION Filling the Tank Both liquid and solid shortening/oil can be used in this appliance, but liquid is preferred. If solid shortening/oil is used it is recommended that you melt the shortening/oil before adding it to the appliance. You can melt solid shortening/oil in the appliance, but you must be very careful not to scorch the shortening/oil.
INSTALLATION/OPERATION WARNING Water and shortening/oil DO NOT mix. Keep liquids away from hot shortening/oil. Dropping liquid frozen foods into the hot shortening/oil will cause violent boiling. Appliance Start-Up WARNING DO NOT start the appliance without filling the tank with shortening/oil first! To start up the appliance refer to the following instructions. a. Light the pilot as previously described in this manual b. Turn the temperature control knob (thermostat) to the desired temperature setting.
CLEANING AND MAINTENANCE MAINTENANCE AND ADJUSTMENTS Daily Cleaning Your appliance should be cleaned every day to maintain peak performance, proper sanitation and appearance. Perform the following procedures daily. a. Wipe up any shortening/oil that spills onto the exterior of the appliance. This should be done with a clean soft cloth while the shortening/oil is still warm. b. Use warm water with a mild detergent to clean surfaces.
CLEANING AND MAINTENANCE Thermostat Calibration For Millivolt Thermostats refer to the following procedure. a. Remove the tube rack from the tank and place the tip of a digital thermometer in the shortening/oil approximately one inch above the temperature sensor. Light the pilot as described in this manual, set the thermostat to 325°F (163 °C) and allow the shortening/oil to come up to temperature; let the appliance cycle 4-6 times to insure that the shortening/oil temperature has stabilized.
CLEANING AND MAINTENANCE WARNING At operating temperatures, the shortening/oil in the appliance is VERY HOT and can cause severe burns. Do not let the hot shortening/oil touch your skin or clothing. ALWAYS wear insulated, oil proof gloves, protective clothing and eyewear when working on a hot appliance. a. Drain the shortening/oil from the appliance and discard or save for reuse. Remove the tube rack Close the drain valve and fill the tank with warm water and non-caustic detergent b.
TROUBLESHOOTING Basic Troubleshooting Flow Chart Refer to this section to correct common problems that may be encountered during the course of normal operation. If applicable, a schematic is provided on the inside door.
WIRE DIAGRAM WIRING DIAGRAM 14
THIS PAGE LEFT INTENTIONALLY BLANK 15
Pitco Frialator, PO Box 501 Concord, NH 03302-0501 603-225-6684 THIS MANUAL MUST BE RETAINED FOR FUTURE REFERENCE L20-275 Rev 1