
Operating Guide


ENGLISH
9
9
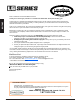
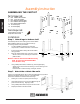
ASSEMBLING THE CART KIT
Step 3 Attach rear cabinet wall
The vented rear cabinet panel, #15, is pre-drilled with four (4)
holes to match the hole pattern found on the legs. The
finished face should face outwards and should be flush to the legs.
Hand start each of the four (4) screws (BB) through the
panel and into each leg.
Using a Phillips head driver, firmly secure each screw.
Step 4 Attach the bottom cabinet door
stopper
This 90 degree metal bracket has the bottom plate with a metal
wedge, #12.
This wedge is designed to lift, straighten and aid in securing the
cabinet doors.
Line up the bracket, #12 with the two (2) holes found in the
bottom cabinet shelf #10.
Hand start each of the two (2) screws (BB) through the
bracket and into the shelf.
Using a Phillips head driver, firmly secure each screw.
Assembly Instruction
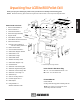
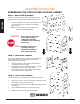
ASSEMBLING THE CART KIT AND COOKING CABINET
Installation:
Step 1 Secure the bottom cabinet
To prepare for the installation of the upper cooking cabinet
to the bottom cart kit, place the bottom cabinet on a flat,
level surface, preferably at ground level..
Lock the two (2) locking casters in place, to aid in making
the cabinet stationary.
Tools Required:
Parts Required:
1 x Assembled Bottom Cart
1 x Upper Cooking Cabinet
2 x #27 Lifting Handles
16 X Screws (AA)
Large Phillips Screwdriver or
Phillips Drive Bit and Drill