
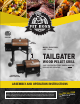
User Manual


7
Parts are located throughout the shipping carton, including underneath the grill. Inspect the grill, parts, and hardware blister
pack after removing from the protective shipping carton. Before assembly of product, review all parts and reference the parts
list. If any part is missing or damaged, do not attempt to assemble. Shipping damage is not covered under warranty. Contact your
dealer or Pit Boss Customer Service for parts.
IMPORTANT: To ease installation, using two people is helpful (but not necessary) when assembling this unit.
Tools required for assembly: screwdriver and level.
Tools not included.
NOTE: For all of the following steps, do not tighten any screws completely until all screws for that step have been
installed. Once all screws have been installed, then tighten them securely.
1.
Parts Required:
1 x Main Barrel
(#13)
Installation:
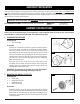
• Place a piece of cardboard on the floor to prevent scratching the unit.
Lay the main barrel on its back on the cardboard, lid facing upward.
Open the right side of the cart first by pressing down firmly on the
right folding bar (A), then swing open the right side cart legs. Once
the legs are extended, the right folding bar will spring back into the
locked position. Ensure the diagonal support bar extends completely
and locks into a brace position, then tighten the two folding bar
knobs. Note illustration 1.
• Next, open the left side of the cart by press down firmly on the
left folding bar (to unlock) and pull out the left side cart legs until
extended. Once open, the left folding bar will spring back into the
locked position. Note illustration 1.
IMPORTANT: The folding bar on each pair of cart legs should always
be in a locking position (raised up) when the grill is in use.
2.
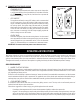
Parts Required:
2 x Wheel
(#12)
2 x Wheel Cotter Pin (xD)
2 x Wheel Washer (xE)
2 x Wheel Axle Pin (xF)
Installation:
• Attach the wheel to the leg by inserting the wheel axle pin through
the wheel, then the leg hole, wheel washer, and finally secure using the
wheel cotter pin. Note illustration for order. Repeat installation for the
other wheel. Once installed, from the rear of the grill, lift the grill into
an upright position.
2
1
1