Document Rev.3.0.1 Mar-11 COPYRIGHT & TRADEMARKS Specifications are subject to change without notice. Copyright © 2011 Pepwave Ltd. All Rights Reserved. Pepwave and the Pepwave logo are trademarks of Pepwave Ltd. Other brands or products mentioned may be trademarks or registered trademarks of their respective owners.
User Manual Table of Contents 1 INTRODUCTION AND SCOPE ................................................................................. 3 2 PRODUCT FEATURES ............................................................................................. 4 3 PACKAGE CONTENTS ............................................................................................ 5 4 PEPWAVE AP ONE OVERVIEW .............................................................................. 6 4.1 4.2 FRONT VIEW .................
User Manual 1 Introduction and Scope Pepwave AP One is an enterprise grade 802.11b/g/n Wi-Fi access point with centralized management system. It is a powerful solution for building wireless networks for all business needs. Each Pepwave AP One is loaded with essential features such as Multiple SSID, VLAN, WDS and Guest Protect. One Pepwave AP One can masquerade up to 4 different access points. Each virtual access point can have its own security policy (e.g. WPA, WPA2, etc.
User Manual 2 Product Features Key features of Pepwave AP One: • High-power output enhances coverage and lowers cost of ownership • Independent security policies and encryption mechanisms per virtual AP • Centralized management via InControl • WDS Support for secure and fast network expansion • Guest Protect Support • WMM (Wi-Fi Multimedia) and QoS (Quality of Service) Support http://www.pepwave.
User Manual 3 Package Contents The following items are the contents of a Pepwave AP One package: • 1 x Pepwave AP One unit • 1 x Omni-directional Antenna • 1 x Power Supply Unit • 1 x Instruction Sheet http://www.pepwave.
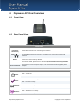
User Manual 4 Pepwave AP One Overview 4.1 Front View 4.2 Rear Panel View Connectors Antenna (Left-most Connector) A RP-SMA connector for connecting the antenna. WAN A 10/100BaseT Ethernet connector, normally to be connected to back haul network. Reset Power Connector A reset button to be depressed with a pin. Depress and hold for at least 5 seconds to restore factory defaults. For further details, please refer to Section 10, Restoration of Factory Defaults.
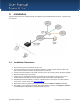
User Manual 5 Installation Pepwave AP One acts as a bridge between the wireless and the wired Ethernet interface. A typical setup is as follows: 5.1 Installation Procedures 1. Attach the antenna to the Pepwave AP One unit. 2. Connect the Ethernet port on the unit with the backbone network using an Ethernet cable. The port could auto sense the cable is straight-through or cross-over. 3. Connect the power adapter to the power connector of the unit, and then plug in the power adapter. 4.
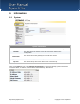
User Manual 6 Information 6.1 System System Information AP Name This field shows the name of the AP One device defined in the configuration. Location This field shows the location of the AP One device defined in the configuration. Network IP Information System Time Up Time This shows the current gateway IP of the AP One device. This shows the system time in respect to the time zone selected. This shows the up time of the device since it is booted up.
User Manual 6.2 6.2.1 Wireless AP Info Wireless Information – AP Info Number of Wireless Networks This indicates the number of wireless networks. Number of Connected Clients This indicates the number of associated clients. Current Channel This shows which 802.11 channel the system is using. Wireless Network SSID This shows which SSID the client is associated. Broadcast SSID This setting shows whether or not the ESSID of this wireless network profile can be scanned by Wi-Fi clients.
User Manual 6.2.2 Connected Clients Wireless Information – Connected Clients Manufacturer This shows the manufacturer based on the MAC prefix. MAC address This shows the client MAC address. Signal This shows the signal strength. Network SSID This shows which SSID the client is associated. Authentication Status This shows the client authentication method(s). Type Connection Length This shows the radio mode of the client. This shows the associated duration.
User Manual Wireless Information – Connected Clients - Details Vendor MAC Address Protocol This shows the manufacturer based on the MAC prefix. This shows the client MAC address. This shows the radio mode of the client. IP Address This shows the IP address of connected client. Network SSID This shows which SSID the client is associated. Connection Length Authentication Status Username This shows the associated duration. This shows the client authentication method(s).
User Manual 6.2.3 Nearby Networks Wireless Information – Nearby Networks Network Discovery Scanning Interval Scanning Time Manufacturer This shows if the AP would scan and discover nearby network. This shows how often the AP goes to other channels to discover nearby AP. This shows how long the AP stays on the other channels to discover a nearby AP. This shows the manufacturer based on the MAC prefix. SSID This shows which SSID the client is associated.
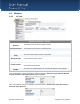
User Manual 7 Configuration 7.1 System Upon selecting System under Configure section from the navigation bar on the left, the following page shows the configuration options: 7.1.1 Basic System Settings - Basic AP Name A user-specified name for this access point. This value can be retrieved via SNMP. Location A user-specified name for the location of the access point. This value can be retrieved via SNMP.
User Manual Subnet Mask Default Gateway DNS Server This setting specifies the subnet mask of the Pepwave AP One unit. This setting specifies the default gateway of the Pepwave AP One unit. This is the DNS server address to be used by the Pepwave AP One unit for resolving host names. IP Address Mode – PPPoE PPPoE Username This specifies the username required in order to connect via PPPoE to acquire Internet connectivity. The information is typically determined by and can be obtained from the ISP.
User Manual 7.1.3 Manual Router Settings Manual Router Settings will only be available when the AP Mode in the previous section had been selected as Router mode. You can use the AP One as a DHCP server for other devices behind. DHCP Server Parameters LAN IP LAN Subnet Mask DHCP Server This setting specifies the DHCP server IP address. This setting specifies the subnet mask of the DHCP server. Checked the box to enable the DHCP Server of this device.
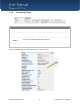
User Manual 7.2 Wireless Networks Upon selecting Wireless Networks under Configure section from the navigation bar on the left, the following shows the configured SSID available on the system: General Wireless Networks Settings Wireless Network SSID The SSID of the virtual Access Point (AP). Security Policy Shows the configured wireless authentication and encryption methods. Default VLAN ID This setting specifies the VLAN ID to be tagged on all outgoing packets generated from the virtual AP (i.e.
User Manual 7.2.1 Wireless Network Details - Basic Wireless Networks Details - Basic Enable Select Yes to enable the virtual AP, or No to disable the virtual AP. By default, the virtual AP is enabled. Wireless Network SSID This setting specifies the SSID of the virtual AP to be scanned by Wi-Fi clients. Broadcast SSID This setting specifies whether or not the ESSID of the virtual AP can be scanned by Wi-Fi clients. Note that the BSSID (i.e.
User Manual 7.2.1.1 Static WEP The configuration of Static WEP parameters enables pre-shared WEP key encryption. Authentication is not supported by this method. The security level of this method is known to be weak. Static WEP parameters are entered via the following screen upon selection: Static WEP Parameters Key Size The setting can be configured as either 40 bits (64-bit WEP) or 104 bits (128bit WEP). (For WDS setting, 128 bits will also be available.
User Manual 7.2.1.2 802.1X Parameters The configuration of 802.1X parameters enables Radius-based 802.1X authentication with a dynamic WEP key. Once selected, Radius Server Setting will be available. The configuration screen is as follows: 802.1x Parameters 802.1X Version This setting selects between v1 or v2 of the 802.1x EAPOL. When v1 is selected, both v1 and v2 clients can associate with the access point. However, when v2 is selected, only v2 clients can associate with the access point.
User Manual 7.2.1.4 Radius Server Settings Radius Server Settings Primary Host Secret When 802.1x authentication is configured, the Radius server specified by this setting will be used for authentication and accounting. This is the secret for accessing the Radius server. Authentication Port This specifies the UDP port number for the Authentication port of the Radius server. Accounting Port This specifies the UDP port number for the Accounting port of the Radius server.
User Manual 7.2.2 Web Portal Login Simply registering the devices with Pepwave InControl, users can apply configurations, firmware, and monitor network activity remotely through this centralized management system. For more details, you can refer to Pepwave website at: http://www.pepwave.com/products/incontrol/. Tip: How to Set Up AP One Guest Portal in InControl To set up Guest Portal, you need to (1) enable guest portal function and (2) create guest accounts and set up portal page.
User Manual (Note: If you have not added a wireless network, you can click "New wireless network..." to set up a new one.) 5. On the "Edit a wireless network" screen, click "Web Portal Login" tab. Click "Enable" to enable the Web Portal Login function. Click "OK" to continue. 6. Click "Save" button to save the changes. http://www.pepwave.
User Manual 7. Click the "Web Admin" tag, and setup the web access as follows: Web Access Protocol: HTTPS Management Port: 443 HTTP to HTTPS Redirection: Enable Click Save button to save the settings. Step Two: Create Guest Accounts and Set Up Portal Page 8. Go to "Guest Portal and Accounts" by clicking on the link at the left panel. 9. You can generate more than one account at one time. Change the parameters in the fields No.
User Manual today" or "Not generated today" links. 12. A standard portal page will be generated automatically after guest accounts are generated (http://guest.pepwave.com). You can customize the portal page by clicking on the "Portal Page Customization" tab. In the screen upload your logo image and enter message for guests. You can preview your portal page and then publish the portal page. Your guest accounts and portal page are now ready for use. http://www.pepwave.
User Manual 7.2.3 Guest Protect Wireless Networks Details - Guest Protect Block LAN Access Bandwidth Management Maximum Number of Clients This option enables the settings to Block all private IPs / Custom Subnet / Block Exception. If you have selected Block all private IPs or Custom Subnet, these IPs / Subnets will be blocked no matter what "Firewall Mode" selected. When Block Exception is selected, IPs entered will be excluded from the blocking list. 1.
User Manual 7.2.4 MAC Filter The settings allow administrator to control the access through Mac address filtering. Available options are: None, Deny all except listed, Accept all except listed. 7.2.5 Advanced http://www.pepwave.
User Manual Wireless Networks Details -Advanced Data Rate There are two options on data rate: Fixed, Auto Fixed will forced all data packets to be transmitted into the selected transmit rate. Auto will automatically select the best transmit rate with a condition to use the selected transmit rate as the minimum auto transmit rate. The rate options and values will be affected by selected Protocol and Channel Bonding in section 7.3.1.
User Manual 7.3 Advanced Wireless Settings Advanced Wireless Settings provides more options to fine tune the parameters on the system to achieve the optimal performance. 7.3.1 Radio Settings Radio Settings Protocol Four options are available: 802.11bgn: Pepwave AP One accepts 802.11b, 802.11g and 802.11n client association requests. 802.11b/g: Pepwave AP One accepts both 802.11b and 802.11g client association requests. 802.11b Only: Pepwave AP One accepts only 802.11b client association requests.
User Manual 7.3.3 Performance Tuning Advanced Wireless Settings – Performance Tuning Beacon Rate This setting provides the option to send beacon in different transmit bit rate and the bit rates are: 1Mbps, 2Mbps, 5.5Mbps, 6Mbps, 11Mbps. Beacon Interval This setting provides the option to set the time between each beacon send. Available options are: 100ms, 250ms and 500ms. DTIM Period This setting provides the option to set the frequency for beacon to include Delivery Traffic Indication Message, DTIM.
User Manual 7.4 WDS Wireless Distributed System - WDS provides a way to link APs together when wired cabling is not preferable. This also extends the wireless coverage of the wireless network for the wireless clients. Click Add to add and configure a new WDS peer connection. WDS Settings Enable MAC Address Security Policy This option enables this entry. This setting gives the MAC address of the other AP to form a WDS link. For more details, please refer to section 7.2.1.1 Static WEP http://www.
User Manual 7.5 SNMP 7.5.1 SNMP Settings Upon selecting SNMP from the navigation bar on the left-hand-side of the Main Menu, the following page is displayed to enable the configuration of SNMP server settings: SNMP Settings Server Name This setting specifies the name that identifies the SNMP server. SNMPv1 This setting specifies whether to enable or disable the support for Version 1 of SNMP. SNMPv2 This setting specifies whether to enable or disable the support for Version 2 of SNMP.
User Manual 7.5.2 SNMPv1 / SNMPv2 Communities By adding SNMPv1/v2 Communities, access rights can be controlled. Click on the New button to add one. SNMPv1 / SNMPv2 Communities Community Name The password for getting or setting SNMP values. IP Address and IP Mask The allowed IP and subnet address which can access the SNMP server. Access Mode Status Choose either Read Only or Read & Write. Enable or Disable this community. http://www.pepwave.
User Manual 7.5.3 SNMPv3 Users By adding SNMPv3 users, access rights can be controlled. Click on the New button to add one. SNMPv3 User Setting SNMPv3 User Name The user ID to be allowed to access the SNMP agent. Authentication Protocol The protocol for authenticating the user. Available options are: HMAC-MD5 and HMAC-SHA. Authentication Password Users provided with a correct password will be granted the right to access the SNMP agent.
User Manual 7.6 Web Administration Upon selecting Web Administration from the navigation bar on the left-hand-side of the Main Menu, the tabs of configuring the management interface are displayed. 7.6.1 Web Access Settings The selection Web Access Settings configures the protocol and TCP port number of the web server. If HTTPS is enabled, HTTP to HTTPS Redirection option will be provided. 7.6.
User Manual 7.6.3 Admin Password The selection Admin Password configures the administrator password for entering Web Admin Interface. To change to the password, enter the same new password into the New Password and New Password (Retype) input fields. 7.6.4 Web Administration The selection Disable Web Administration turns off the access to Web Administration Interface. After being turned off, Web Administration Interface can be re-enabled using SNMP. http://www.pepwave.
User Manual 8 Tools - Diagnostic Tools This provides three useful tools for diagnosing the network. The three available options are: Ping, Traceroute and Nslookup. http://www.pepwave.
User Manual 9 Commands Upon selecting Commands from the navigation bar on the left-hand-side of the Main Menu, a list of commands is displayed, as follows: 9.1 Activate Changes Click on Activate Changes and a prompt will ask and confirm to save configuration and activate the AP One unit. http://www.pepwave.
User Manual 9.2 Firmware Commands - Firmware Firmware Version Flash Status Boot from Firmware Upgrade Target Firmware Image File This shows the firmware version loaded into the flash partitions. This shows the firmware status on the flash partitions. This indicates which flash partition boots up the system. This shows which flash partition is used for firmware upgrade. Upload a firmware file for upgrading the unit’s software. A reboot is required after upgrading the firmware. http://www.pepwave.
User Manual 9.3 Configuration Commands - Configuration Restore Factory Default This command is for restoring factory default settings of the AP One. Preserve the network settings by checking the box next to Preserve Settings and select Proceed. Settings including Server IP, Subnet Mask, Default Gateway, DNS Server and Management VLAN ID will be preserved. Download Active Configuration To File Select this command to download the active configuration for backup purposes.
User Manual 9.4 Misc Commands - Misc Download Debug Information Select this comment to download debugging information from the Pepwave AP One unit. In the event of technical issues, to facilitate prompt resolution by technical support from Pepwave, please send along with a debug file with the support request. This option is for rebooting the Pepwave AP One unit. The Boot up firmware from Flash 1 or 2 can be selected and changed in here. Reboot AP http://www.pepwave.
User Manual 10 Restoration of Factory Defaults 10.1 AP One The following procedure restores the settings of Pepwave AP One device to factory defaults: 1. Power on the unit, wait for 1 minute until the Status LED turns green. 2. Press and hold the reset button on the rear panel for at least 5 seconds, then release. 3. The Status LED will blink, and then the unit will automatically reboot. 4.
User Manual Appendix A. Federal Communication Commission Interference Statement This equipment has been tested and found to comply with the limits for a Class B digital device, pursuant to Part 15 of the FCC Rules. These limits are designed to provide reasonable protection against harmful interference in a residential installation.
www.pepwave.com Contact Us: Sales http://www.pepwave.com/contact/sales/ Support http://www.pepwave.com/contact/ Business Development and Partnerships http://www.pepwave.