User Manual PePWave Mesh Connector Series: Mesh Connector 225-DX Document Rev. 1.0 July 08 COPYRIGHT & TRADEMARKS Specifications are subject to change without notice. Copyright © 2008 PePWave Ltd. All Rights Reserved. PePWave and the PePWave logo are trademarks of PePWave Ltd. Other brands or products mentioned may be trademarks or registered trademarks of their respective owners.
PePWave Mesh Connector Series User Manual Table of Contents 1 COPYRIGHT ..................................................................................................................................... 3 2 DISCLAIMER..................................................................................................................................... 3 3 PRODUCT DESCRIPTION ................................................................................................................. 4 3.1 3.2 3.
PePWave Mesh Connector Series User Manual 1 Copyright Copyright © 2008 by PePWave Ltd. The content of this documentation may not be reproduced in any part or as a whole without the prior written permission of PePWave Ltd. 2 Disclaimer PePWave does not assume any liability arising out of the application or use of any products, or software described herein. Neither does it convey any license under its patent right nor the patent rights of others.
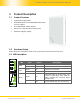
PePWave Mesh Connector Series User Manual 3 Product Description 3.1 Product Features Transparent Bridge Mode WPA/WPA2-Personal and WPA/WPA2-Enterprise security support Wi-Fi Multimedia (WMM) support Always-on, integrated Wi-Fi access point PolePoint bridging support 3.2 Hardware Setup Please follow the installation guide to set up the Mesh Connector 225-DX devices. 3.
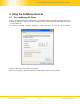
PePWave Mesh Connector Series User Manual 4 Using the PePWave Devices 4.1 Pre-configuring PC Setup Prior to the Mesh Connector configuration, a computer with its Local Area Connection set to a static IP address is required to pre-configure to the same subnet as the Mesh Connector (i.e. 192.168.2.X). An ‘Internet Protocol (TCP/IP) Properties’ screen will pop up and set it as follows: Click the “OK” button to confirm the change.
PePWave Mesh Connector Series User Manual 4.2 First Time Setup On your PC, start a web browser, e.g. Internet Explorer, Mozilla Firefox, etc. Visit an Internet web site. If you are not associated to an access point, you should be redirected to a logon page. Or you can go also go to this URL http://192.168.2.
PePWave Mesh Connector Series User Manual Click the “Advanced Config” button to enter the parameters of the access point to associate to.
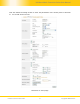
PePWave Mesh Connector Series User Manual In the field “SSID” under Wireless Settings, input the access point’s SSID (sometimes it is called the “network name”). According to the setting of the Access Point you are associating to, you may choose a different “Authentication setting”. If “Static WEP key” or “WPA/WPA2-Personal” is selected for Authentication, input the Encryption Key field as well. (There are also options of “802.1x with dynamic WEP key” and “WPA/WPA2-Enterprise”.
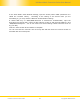
PePWave Mesh Connector Series User Manual Illustration 3: Establishing Connection to the Internet At this point, you are associated with the access point. You may now close the web browser and open a new one to start web browsing.
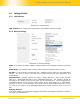
PePWave Mesh Connector Series User Manual 4.3 Settings Details 4.3.1 LAN Interface Illustration 4: LAN Interface LAN Interface: To configure the LAN interface’s IP address and subnet mask. 4.3.2 Wireless Settings Illustration 5: Wireless Settings SSID: To configure the SSID / ESSID / Network Name of the wireless network to associate to. Radio Mode: The available radio mode for Mesh Connector 225-DX is 802.11a only. Bit Rate: To fix the 802.11 transmit bit rate.
PePWave Mesh Connector Series User Manual Preferred AP: The MAC address of a preferred access point can be entered here. When the preferred access point is found and its signal strength is higher than the “Min Signal Strength”, it will connect to this preferred access point, no matter the other access points are found even they have higher signal strength or the same SSID. 4.3.
PePWave Mesh Connector Series User Manual 4.3.5 Restore and Reboot Illustration 8: Restore and Reboot WAI redirection: If the device is not connected to an access point, and the user is accessing an Internet web site, the settings control whether to redirect the web access to the web admin interface page or not. If this is disabled and the device is not connected, the browser will show a web access error message.
PePWave Mesh Connector Series User Manual 4.4 Integrated Wi-Fi Access Point Configuration Integrated Wi-Fi Access Point is configured via the CPE Setup tab. The following sections will provide information as a guide through the configuration.
PePWave Mesh Connector Series User Manual 4.4.2 Access Point configure Manually Illustration 10: Access Point Configure Manually In Manual Configuration mode, the SSID is manually entered. Authentication can be one of three configurable values: Open For Open Authentication Mode, no Encryption Key is necessary. Static WEP Key For Static WEP Key Authentication Mode, a 64- or 128-bit Encryption Key is required, and can be entered in either an ASCII or HEX representation.
PePWave Mesh Connector Series User Manual 4.4.3 Access Point Configure Automatically Illustration 11: Access Point Configure Automatically Broadcast SSID: With this option enabled, the configured SSID will be broadcast such that it can be detected by an SSID scan. Otherwise, the configured SSID will not be broadcast such that it cannot be detected by an SSID scan. In order to connect with the access point, the SSID needs to be known by the client.
PePWave Mesh Connector Series User Manual 4.5 Test the Setup To test to setup, you can now go to the unit’s main page, enter the user name and password. The realm (the text box next to the “@” sign) value can be left empty. Then click the Connect button.
PePWave Mesh Connector Series User Manual 4.6 Post-configuring PC Setup At this point an Internet connection should have been successfully established between the access point and the PePWave Mesh Connector. The PC that was previously pre-configured to administrate the unit has to reconfigure its Local Area Connection and be set to ‘Obtain an IP address automatically’. An ‘Internet Protocol (TCP/IP) Properties’ screen will appear. Please set as follows: Click the “OK” button to confirm the change.
PePWave Mesh Connector Series User Manual 4.8 Restore to Default Settings There are two ways to restore the Mesh Connector 225-DX to default settings. If you are able to access the web admin interface, go to the “CPE Setup” page, and click the Restore and Reboot button. Otherwise, you can also power up the unit and wait for about 1 min. Then push the Reset Button at the panel side of the unit and then hold it for 5 seconds. The unit will restore the settings to factory default and reboot.
PePWave Mesh Connector Series User Manual Appendix: Federal Communication Commission Interference Statement This equipment has been tested and found to comply with the limits for a Class B digital device, pursuant to Part 15 of the FCC Rules. These limits are designed to provide reasonable protection against harmful interference in a residential installation.
www.pepwave.com Contact Us: Address: Sales sales@pepwave.com United States Office 800 West El Camino Real, Mountain View CA 94040 United States Tel: +1 (650) 331 0641 Fax: +1 (650) 625 4664 Support support@pepwave.com Business Development and Partnerships partners@pepwave.com Hong Kong Office 17/F, Park Building, 476 Castle Peak Road Cheung Sha Wan Hong Kong Tel: +852 2990 7600 Fax: +852 3007 0588 .