
User's Manual

Pepwave MAX and Surf User Manual
http://www.pepwave.com
41
Copyright @ 2015 Pepwave
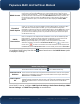
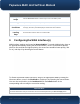
Layer 2 PepVPN Bridging
PepVPN
Profiles to
Bridge
The remote network of the selected PepVPN profiles will be bridged with this local LAN,
creating a Layer 2 PepVPN, they will be connected and operate like a single LAN, and any
broadcast or multicast packets will be sent over the VPN.
Spanning Tree
Protocol
Click the box will enable STP for this layer 2 profile bridge.
Override IP
Address when
bridge
connected
Select "Do not override" if the LAN IP address and local DHCP server should remain
unchanged after the Layer 2 PepVPN is up.
If you choose to override IP address when the VPN is connected, the device will not act as a
router, and most Layer 3 routing functions will cease to work.
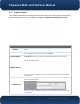
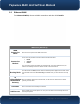
DHCP Server Settings
DHCP Server
When this setting is enabled, the Pepwave router’s DHCP server automatically assigns an
IP address to each computer that is connected via LAN and configured to obtain an IP
address via DHCP. The Pepwave router’s DHCP server can prevent IP address collisions
on the LAN.
To enable DHCP bridge relay, please click the icon on this menu item.
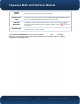
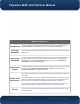
IP Range &
Subnet Mask
These settings allocate a range of IP address that will be assigned to LAN computers by the
Pepwave router’s DHCP server.
Lease Time
This setting specifies the length of time throughout which an IP address of a DHCP client
remains valid. Upon expiration of Lease Time, the assigned IP address will no longer be
valid and the IP address assignment must be renewed.
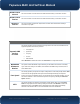
DNS Servers
This option allows you to input the DNS server addresses to be offered to DHCP clients. If
Assign DNS server automatically is selected, the Pepwave router’s built-in DNS server
address (i.e., LAN IP address) will be offered.