DIGITAL SOUND PROJECTOR PDSP-1 Operating Instructions
Safety Precautions Contents Features Confirm All Accessories Specifications Thank you for buying this Pioneer product. Please read through these operating instructions so you will know how to operate your model properly. After you have finished reading the instructions, put them away in a safe place for future reference.
Safety Precautions Contents Features Confirm All Accessories Specifications 13) Unplug this apparatus during lightning storms or when unused for long periods of time. 14) Refer all servicing to qualified service personnel. Servicing is required when the apparatus has been damaged in any way, such as power-supply cord or plug is damaged, liquid has been spilled or objects have fallen into the apparatus, the apparatus has been exposed to rain or moisture, does not operate normally, or has been dropped.
Safety Precautions Contents Features Maintenance of External Surfaces • Use a polishing cloth or dry cloth to wipe off dust and dirt. • When the surfaces are dirty, wipe with a soft cloth dipped in some neutral cleanser diluted five or six times with water, and wrung out well, and then wipe again with a dry cloth. Do not use furniture wax or cleaners. • Never use thinners, benzine, insecticide sprays or other chemicals on or near this unit, since K023En these will corrode the surfaces.
Safety Precautions Contents Features Confirm All Accessories Specifications Contents Preface Safety Precautions ......................................................................................... 2 Features .......................................................................................................... 6 Confirm All Accessories ............................................................................... 8 Specifications ................................................................
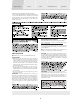
Safety Precautions Contents Features Confirm All Accessories Specifications Features This digital sound projector is a totally new product unlike conventional home theater systems. It produces multichannel surround sound from a single speaker array, without the need for numerous speaker settings and wiring hassles. The following section introduces the features that enable the PDSP-1 to produce its remarkable new sound. 1.
Safety Precautions Contents Features Confirm All Accessories Specifications 2. Sound settings to match your room’s characteristics The professional installation technician uses a special metering microphone and computer to set up the unit with the optimum sound response and characteristics for your room. Since multiple sound settings are possible for any room, this unit makes it possible for you to call up preset sound environments to change the sound field in accordance with listening conditions. 3.
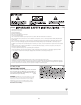
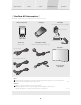
Safety Precautions Contents Features Confirm All Accessories Specifications Confirm All Accessories The digital sound projector is provided with the following accessories: Remote control unit Recharger AC adapter (for remote control unit recharger) For U.S. model For European model Power cord (for main unit) AC adapter cord (x2) (furnished with European model only) Front grille For U.S.
Safety Precautions Contents Features Confirm All Accessories Specifications Specifications Audio Section Video Section Power Section Rated output (RMS, 80 Hz – 20 kHz) Maximum output (80 Hz – 20 kHz, 1 m) Tone control: BASS (40 Hz – 320 Hz) TREBLE (6.
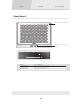
Front Panel Rear Panel Remote Control Unit Front Panel Indicators for power and volume level, and the remote control unit sensor are located on the lower part of the panel.
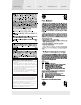
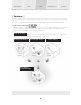
Front Panel Rear Panel Remote Control Unit Attaching the Front Grille Align the grille with the four attachment tabs on the front panel, then push into place. Range of the Remote Control Unit 7m 30° Caution: Do not expose the remote control sensor to direct sunlight or other strong light sources. 11 Parts and their Functions Operate the remote control unit while pointing it toward the Digital Sound Projector’s remote control sensor within the range shown.
Front Panel Rear Panel Remote Control Unit Rear Panel The main power switch, power cord socket, and input/output connectors are located on the rear panel.
Front Panel Remote Control Unit Rear Panel About the Input/Output Connectors Caution: Before making or changing the connections, switch off the power and disconnect the power cord from the AC outlet. Audio output (OUTPUT OPTICAL connector) Use to connect MD recorders, CD recorders and other digital recording components. These connectors output the digital signals from inputs 1 to 4. Video outputs (MONITOR OUTPUT connectors) Use to connect a television monitor or other video component.
Front Panel Remote Control Unit Rear Panel Remote Control Unit The touch panel appears when the LCD touch panel is touched or a remote control unit button (hard key) is pressed.
Front Panel Remote Control Unit Rear Panel Setting the Basic Information on the Remote Control Unit Seven items, including current time display and beep volume can be set on the remote control unit. 1 Set the touch panel to the HOME menu. If the touch panel shows any display other than the HOME menu, press the mark at the bottom. HOME menu 2 Press the “ ” mark at the top left. The setting menu will be displayed. Use the arrows on the touch panel to switch between the two menu screens.
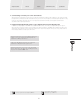
Front Panel Remote Control Unit Rear Panel Recharging the Remote Control Unit 1 Connect the accessory AC adapter to the recharger and a household AC outlet. Note: Illustration depicts U.S. model. 2 Place the remote control unit on the recharger, aligning the indents on the remote control unit with the tabs on the recharger. Note: During recharging, the indicator shown below will appear on the upper right corner of the display.
Using the Remote Control Unit Watching Television Watching a DVD Using a Pioneer DVD Recorder Selecting the Audio Mode Using the Remote Control Unit The remote control unit’s buttons and touch panel can be used to control components connected to the digital sound projector. Component Operation Menu Display When using the remote control unit to control the digital sound projector and video components, menu displays are provided for the current component being used.
Using the Remote Control Unit Watching Television Watching a DVD Using a Pioneer DVD Recorder Selecting the Audio Mode About the HOME Menu This is the basic touch panel menu. From this menu screen, the operating menus for various connected components can be selected.
Using the Remote Control Unit Watching Television Watching a DVD Using a Pioneer DVD Recorder Selecting the Audio Mode About the PDSP (digital sound projector) menu When using the digital sound projector with other components, this menu screen is used to select operation of other components. This menu is also used to select signal inputs (input 1 to 5).
Using the Remote Control Unit Watching Television Watching a DVD Using a Pioneer DVD Recorder Selecting the Audio Mode Operating Menus for Other Components Use the operating menus for connected components (DVD player, television, etc.) according to the typical functions and operations of the respective component.
Using the Remote Control Unit Watching Television Using a Pioneer DVD Recorder Watching a DVD Selecting the Audio Mode Watching Television Use this menu to operate a connected television. 1 Turn on power to digital sound projector. 2 Turn on power to television. – 3 , Select input connected to television sound. Change to television operating menu. 5 TV VOLUME Reduce television’s built-in speakers so as not to affect sound from digital sound projector. 6 To next operation.
Using the Remote Control Unit Watching Television Using a Pioneer DVD Recorder Watching a DVD Selecting the Audio Mode Watching a DVD Use this menu to operate a connected DVD player. 1 Turn on the power to the digital sound projector. 2 Turn on the power to the television monitor. 3 Set television input to digital sound projector. – 4 , Select the input connected to the DVD player. 5 Change to DVD player operating menu. 6 The accompanying three menus are used to operate the DVD player.
Using the Remote Control Unit Watching Television Watching a DVD Using a Pioneer DVD Recorder Selecting the Audio Mode Using a Pioneer DVD Recorder Use this menu to operate a connected Pioneer DVD Recorder. Recording To record the program currently playing on the television, follow the steps listed below. Steps 1 – 6 are the same as steps 1 – 6 on P21 “Watching Television”. 1/2 7 Change to recording menu on DVD recorder.
Using the Remote Control Unit Watching Television Watching a DVD Using a Pioneer DVD Recorder Selecting the Audio Mode Playback/Editing 1 Change to digital sound projector menu. 2 Turn on TV power. 3 Set television video input to digital surround projector. 4 – , Select input connected to DVD recorder. 5 Change to DVD recorder operation menu. 6 The following four menus are used to operate the DVD recorder. Use the arrows on the touch panel to change between the menu screens.
Using the Remote Control Unit Watching Television Watching a DVD Using a Pioneer DVD Recorder Selecting the Audio Mode Selecting the Audio Mode Listening to Stereo Sound in Surround Mode Stereo broadcasts, CD playback and other 2-channel sounds can be enjoyed in surround sound mode. 1 Set the touch panel to the PDSP menu. From the HOME menu, press ; from other menus, press . PDSP menu Press . The television screen will display the audio mode.
Using the Remote Control Unit Watching Television Watching a DVD Using a Pioneer DVD Recorder Selecting the Audio Mode Enhancing Monaural Sources When listening to older movies and CDs, and other sources recorded in monaural sound, the sound will seem more natural when heard from the center channel alone, rather from the front two channels (right and left). 1 Set the touch panel to the From the HOME menu, press 2 PDSP menu. ; from other operation menus, press .
Changing Surround Sound Adjusting the Tone Video and Audio Timing Compensations Calling Up a Room Sound Setting Adjusting Surround Effects Displaying the Data Screen Caution: When adjusting the digital sound projector’s sound, the menu screen is displayed on the connected television monitor. To see the display, turn on the television’s power and set the television’s video input to the digital sound projector.
Changing Surround Sound 3 Adjusting the Tone Video and Audio Timing Compensations Calling Up a Room Sound Setting Adjusting Surround Effects Displaying the Data Screen Using the buttons, select “Surround Setup”, and press the ENTER button. The following screen appears: Front left channel Surround Setup 1 Left 0.0dB 2 Right 0.0dB 3 Surround L 0.0dB 4 Surround R 0.0dB 5 Center 0.
Changing Surround Sound Video and Audio Timing Compensations Calling Up a Room Sound Setting Adjusting the Tone Adjusting Surround Effects Displaying the Data Screen Changing Each Channel’s Output Level 1 - 3 (Same as steps 1 - 3 on P27, “Test Signal”) The following screen appears: Front left channel Surround Setup 1 Left 0.0dB 2 Right 0.0dB 3 Surround L 0.0dB 4 Surround R 0.0dB 5 Center 0.
Changing Surround Sound Adjusting the Tone Video and Audio Timing Compensations Calling Up a Room Sound Setting Adjusting Surround Effects Displaying the Data Screen Sub Woofer / Bass Management This menu allows you to set the unit for a sub-woofer, and LFE channel ON/OFF. 1 - 3 (Same as steps 4 1 - 3 on P27, “Test Signal”) Using the buttons, select “Bass Management”, and press the ENTER button. The following screen appears: Bass Management 1 Sub Woofer 2 LFE Level Yes 0.
Changing Surround Sound Adjusting the Tone Video and Audio Timing Compensations Calling Up a Room Sound Setting Adjusting Surround Effects Displaying the Data Screen Adjusting the Tone You can adjust the overall tone for all audio channels. 1 Use the touch panel to select the From the HOME menu press 2 PDSP menu. ; from other menus, press . Press the MENU button. The “System Setup” menu screen appears. 3 Using the buttons, select “All Ch Tone Control”, and press the ENTER button.
Changing Surround Sound Adjusting the Tone Video and Audio Timing Compensations Calling Up a Room Sound Setting Adjusting Surround Effects Displaying the Data Screen Calling Up a Room Sound Setting Multiple sound settings can be recorded in accordance with measured room characteristics. Select the setting that produces the optimum listening environment. 1 Use the touch panel to select the From the HOME menu press 2 PDSP menu. ; from other menus, press . Press the MENU button.
Changing Surround Sound Adjusting the Tone Video and Audio Timing Compensations Calling Up a Room Sound Setting Adjusting Surround Effects Displaying the Data Screen Video and Audio Timing Compensations (Lipsync delay) The video playback from some components may appear somewhat delayed from the audio channel. If actors’ mouth movements appear to be out of sync with the audible soundtrack, use this adjustment to delay (compensate) the audio timing.
Changing Surround Sound Adjusting the Tone Video and Audio Timing Compensations Calling Up a Room Sound Setting Adjusting Surround Effects Displaying the Data Screen Adjusting Surround Effects Narrowing the audio width of the front right-left channels (Image width) As a characteristic of the digital sound projector, when the room’s right and left walls are far apart, some playback sources may sound overly separated.
Changing Surround Sound Adjusting the Tone Video and Audio Timing Compensations Calling Up a Room Sound Setting Adjusting Surround Effects Displaying the Data Screen Fine Tuning the PLII Music Mode When listening to a two-channel source in surround sound using the PLII Music mode, you can fine tune the effect from the “Stereo Mode Menu”. 1 Use the touch panel to select the From the HOME menu press 2 PDSP menu. ; from other menus, press . Press the MENU button.
Changing Surround Sound Adjusting the Tone Video and Audio Timing Compensations Calling Up a Room Sound Setting Adjusting Surround Effects Displaying the Data Screen 5 Using the buttons, select “Music”, then press the ENTER button. 6 Using the buttons, select “Panorama”, “Center width”, or “Dimension”, then use the buttons to set the effect as desired. Stereo Mode Menu 1 Image width On 2 Image width value 1.
Changing Surround Sound Adjusting the Tone Video and Audio Timing Compensations Calling Up a Room Sound Setting Adjusting Surround Effects Displaying the Data Screen Displaying the Data Screen Use this function to confirm information about the currently playing audio and video source, and room sound settings. 1 Use the touch panel to select the From the HOME menu press 2 PDSP menu. ; from other menus, press . Press the ENTER button. The “Status” menu screen appears as shown below.
Table of Remote Control Unit Menu Displays Troubleshooting Index Troubleshooting Many malfunctions can be the result of operating errors. If you experience trouble with the digital sound projector, use this troubleshooting guide together with thorough checks of the other components in your system. If the problem is not corrected after doing so, consult your authorized service center.
Table of Remote Control Unit Menu Displays Troubleshooting Problems with Use or Operation? ? Index Can’t recharge remote control unit Check the recharge indicator in the upper right corner of the remote control unit’s touch panel to confirm whether the remote control unit is sitting on the recharger and recharging correctly.
[TV] Volume setting, VOLUME, MUTE Mute Enter [PDSP] Menu [TV] Channel select ENTER MENU CHANNEL HOME Menu 1/4 1/3 1/2 2/4 2/3 1/2 2/2 3/4 3/3 2/2 VOLUME, MUTE ENTER 40 4/4 VOLUME, MUTE ENTER MENU CHANNEL Menu VOLUME, MUTE ENTER MENU CHANNEL [TV] Volume setting, Mute Enter [DVD RECORDER] Menu [DVD RECORDER] Channel select DVD RECORDER Menus 1/4-4/4 [TV] Volume setting, Mute Enter [DVD PLAYER] – [TV] Volume setting, Mute Enter [DVD
Mute Enter [PDSP] Volume setting, ENTER [PDSP] VOLUME, MUTE – Menu MENU PDSP menu 1/4 1/3 2/4 2/3 3/4 3/3 2/2 41 2/2 Enter ENTER MENU CHANNEL 4/4 Menu [PDSP] Volume setting, Mute VOLUME, MUTE ENTER MENU [PDSP] Volume setting, Mute Enter [DVD RECORDER] Menu [DVD RECORDER] Channel select DVD RECORDER Menus 1/4-4/4 CHANNEL Enter [DVD RECORDER] Menu [DVD RECORDER] Channel select [PDSP] Volume setting, Mute Enter [DVD PLAYER] – VOLU
Troubleshooting Table of Remote Control Unit Menu Displays Index Index The following index of keywords has been collected based on the four following item categories: 1. Terms displayed in menus 2. Terms on front panel / rear panel 3. Symbols and terms on remote control unit / touch panel 4. Terminology in these operating instructions Terms displayed in menus Terms on front panel / rear panel page page All Ch Tone Control ......................................................... 31 COAXIAL .........
Troubleshooting Table of Remote Control Unit Menu Displays Index Symbols and terms on remote control unit / touch panel Terminology in these operating instructions page Beam control technology ................................................ 6 CHANNEL ........................................................................ 14 Composite connector (video input) .............................. 13 CONTRAST ...................................................................... 14 Dolby Digital .........
Published by Pioneer Corporation. Copyright © 2003 Pioneer Corporation. All rights reserved. PIONEER CORPORATION 4-1, Meguro 1-Chome, Meguro-ku, Tokyo 153-8654, Japan PIONEER ELECTRONICS (USA) INC. P.O. BOX 1540, Long Beach, California 90810-1540, U.S.A. TEL: (800) 421-1404 PIONEER ELECTRONICS OF CANADA, INC. 300 Allstate Parkway, Markham, Ontario L3R OP2, Canada TEL: (905) 479-4411 PIONEER EUROPE NV Haven 1087, Keetberglaan 1, B-9120 Melsele, Belgium TEL: 03/570.05.11 PIONEER ELECTRONICS ASIACENTRE PTE.