Speaker System Enceintes acoustiques Lautsprechersystem Sistema di diffusori Luidsprekersysteem Sistema de altavoces PDP-S13-LR Operating Instructions Mode d'emploi Bedienungsanleitung Istruzioni per l'uso Gebruiksaanwijzing Manual de instrucciones PDPS13LR.01-06/En 1 2003.5.
English Thank you for buying this Pioneer product. Please read through these operating instructions before using your speaker system so you will know how to make the most of its performance. After you have finished reading the instructions, put them away in a safe place for future reference.
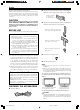
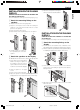
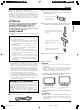
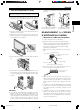
English 5 Attach the left speaker following the same procedure as described above. English INSTALLATION ON THE PLASMA DISPLAY (WHEN INSTALLING THE SPEAKERS ON THE RIGHT AND LEFT SIDES OF THE DISPLAY) Perform installation according to the following steps 1 to 2. 1 Attach the mounting fittings to the speakers. The illustration below shows the right speaker. 1 Align the convex portion of the holder for installing the speakers on the right and left sides with the concave portion of the speakers.
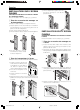
English 2 Attach the speakers to the display. Take care to ensure that the display does not hit the speakers in steps 1 and 2 when speakers are installed on the display. the speaker system. Do not hold the speakers and raise the display. This may cause the deformation or damage of products. 1 Place it below the display while inclining one speaker and insert it into the bracket on the right side.
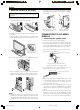
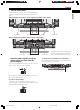
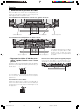
English 2 How to route cables English Speed clamps are included with the plasma display for tidying your cables and keeping extra cable length out of the way. When installing the speakers on the right and left sides of the display Wiring clamp Speaker cable Speed clamps Speaker cable When installing the speakers at the bottom of the display Speaker cable Wiring clamp • Organize cables together using the speed clamps provided with the plasma display.
English CABINET MAINTENANCE ÷ Use a polishing cloth or dry cloth to wipe off dust and dirt. ÷ When the cabinet is very dirty, wipe with a soft cloth moistened with water-diluted cleanser; then wipe again with a dry cloth. Do not use furniture wax or cleaners. They may damage the surface of the cabinet. ÷ Never use thinner, benzine, insecticide sprays and other chemicals on or near the cabinets, since these will corrode the surfaces.
Françias ATTENTION Ce produit est conçu exclusivement pour l’utilisation avec un écran d’affichage au plasma Pioneer PDP4340HD,PDP-434HDE,PDP-434HDG. Pour plus d’informations sur la compatibilité, merci de vous renseigner auprès de votre concessionnaire ou centre de services Pioneer le plus proche. AVANT USAGE ÷ L’impédance nominale de cette enceinte acoustique est de 8 Ω.
Françias INSTALLATION SUR L’ECRAN PLASMA 5 Fixez le haut-parleur de gauche selon une procédure identique à celle décrite précédemment. (POUR INSTALLATION DES HAUT-PARLEURS À DROITE ET À GAUCHE DE L’ÉCRAN) Effectuez l’installation selon les étapes 1 à 2 suivantes. 1 Fixez les accessoires de montage sur les haut-parleurs. L’illustration ci-dessous désigne le haut-parleur de droite.
Françias 2 Fixez les haut-parleurs à l’écran. s’ensuivre une déformation ou un endommagement des produits. Prenez garde que l’écran ne cogne pas contre les hautparleurs aux étapes 1 et 2 de leur installation sur l’écran. Pour installation des haut-parleurs à droite et à gauche de l’écran 2 De façon similaire, insérez l’autre haut-parleur dans le support sur le côté gauche.
Françias 2 Comment fixer le parcours des câbles Des serre-câbles sont fournis avec l’écran plasma pour mettre de l’ordre dans vos câbles et tenir la longueur de câble supplémentaire non-utilisé à l’écart.
Françias ENTRETIEN DU COFFRET Françias ÷ Utiliser un chiffon à polir ou un chiffon sec pour essuyer la poussière et éliminer les salissures. ÷ Si le coffret est très sale, le frotter avec un chiffon doux imbibé de liquide à nettoyer dilué d’eau. Ensuite, essuyer à nouveau avec un chiffon sec. Ne pas utiliser de cire à meuble ou de produits de nettoyage corrosifs. Ils risqueraient d’endommager la surface du coffret.
Deutsch Wir danken Ihnen dafür, daß Sie sich für ein Produkt von Pioneer entschieden haben. Bitte lesen Sie vor der Verwendung Ihrer Lautsprecheranlage diese Anleitung aufmerksam durch, um die Vorzüge des Systems optimal ausnützen zu können. Nachdem Sie die Bedienungsanleitung durchgelesen haben, bewahren Sie sie sorgfältig auf, um sich im Bedarfsfall jederzeit darauf beziehen zu können.
Deutsch INSTALLATION AM PLASMABILDSCHIRM 5 Den linken Lautsprecher entsprechend der obigen Ausführungen auf die gleiche Weise anbringen. (WENN DIE LAUTSPRECHER AN DEN SEITEN DES BILDSCHIRMS INSTALLIERT WERDEN) Führen Sie die Installation entsprechend der folgenden Schritte 1 und 2 durch. 1 Befestigen Sie die Aufhängungen an den Lautsprechern.
Deutsch 2 Die Lautsprecher am Bildschirm befestigen. Achten Sie darauf, dass der Bildschirm bei den Schritten 1 und 2 nicht an die Lautsprecher stößt, wenn diese am Bildschirm angebracht werden. an dessen Griffen und an der Seite oder an dessen Boden, wenn das Lautsprechersystem umgestellt werden soll. Bitte versuchen Sie nicht, den Bildschirm an den Lautsprechern hochzuheben. Dies könnte zu einer Verformung oder Beschädigung des Produktes führen.
Deutsch 2 Verlegung der Kabel Der Plasmabildschirm wird mit Schnellklemmen geliefert, um die Kabel zu bündeln und zu verhindern, dass zu lange Kabel stören.
Deutsch PFLEGE DES GEHÄUSES ÷ Zum Abwischen von Staub und Verschmutzung kann ein Poliertuch oder ein trockener Lappen verwendet werden. ÷ Wenn das Gehäuse stark verschmutzt ist, kann es mit einem weichen, mit verdünntem Haushaltsreiniger angefeuchteten Lappen gesäubert und dann mit einem trockenen Lappen abgewischt werden. Keine Möbelpolitur oder Reinigungsmittel verwenden, da diese Mittel die Oberfläche des Gehäuses beschädigen können.
Italiano Grazie per avere acquistato questo prodotto Pioneer. Si prega di leggere completamente queste istruzioni per l’uso prima di utilizzare il sistema di altoparlanti per avvalersi al massimo delle sue prestazioni. Terminata la lettura delle istruzioni per l’uso, conservarle in un luogo sicuro. Sapendo dove sono sarà possibile consultarle in caso di problemi durante l’uso del sistema di altoparlanti.
Italiano INSTALLAZIONE SUL DISPLAY AL PLASMA 5 Installare l’altoparlante sinistro osservando la stessa procedura sopra descritta. (IN CASO DI INSTALLAZIONE DEGLI ALTOPARLANTI SUI LATI DESTRO E SINISTRO DEL DISPLAY) Eseguire l’installazione osservando i passi 1 e 2 di seguito illustrati. 1 Fissaggio degli accessori di montaggio agli altoparlanti. L’illustrazione qui sotto mostra l’altoparlante destro.
Italiano 2 Montaggio degli altoparlanti al display. il display per gli altoparlanti. Ciò potrebbe, infatti, causarne la deformazione o il danneggiamento. Durante l’installazione del display, ai passi 1 e 2prestare attenzione a ché gli altoparlanti non urtino il display stesso. 1 A cominciare dall’altoparlante destro, collocarlo al di sotto del display e quindi inserirlo nella relativa staffa mantenendolo inclinato.
Italiano 2 Posa dei cavi Il display al plasma ha in dotazione fascette fermacavo ad uso rapido per mantenere uniti i cavi in modo che la loro lunghezza residua non risulti d’ingombro.
Italiano MANUTENZIONE DELLA CASSA ESTERNA ÷ Per togliere sporco e polvere utilizzare un panno per lucidare o un normale panno asciutto. ÷ Se la cassa esterna è molto sporca, pulirla con un panno morbido bagnato con acqua e detergente, quindi passare di nuovo un panno asciutto. Non utilizzare cera per mobili o detersivi. Potrebbero danneggiare la superficie della cassa esterna.
Nederlands Dank u voor de aanschaf van dit Pioneer product. Lees alvorens het luidsprekersysteem in gebruik te nemen eerst deze gebruiksaanwijzing door zodat u volledig op de hoogte bent van de bediening en werking. Bewaar de gebruiksaanwijzing op een veilige plaats voor het geval u later nog het een en ander wilt nalezen bijvoorbeeld na een verhuizing of dergelijk. LET OP Dit product is ontworpen om uitsluitend te worden gebruikt met het plasmascherm PDP-4340HD,PDP434HDE,PDP-434HDG van Pioneer.
Nederlands MONTAGE TEGEN HET PLASMABEELDSCHERM 5 Bevestig de linkerluidspreker ook op de hiervoor beschreven manier. (MONTAGE VAN DE LUIDSPREKERS AAN DE LINKER- EN RECHTERKANT VAN HET SCHERM) Voer de montage uit volgens de onderstaande stappen 1 en 2. 1 Bevestig de montagebeugels aan de luidsprekers. In de afbeelding hieronder ziet u de rechterluidspreker. 1 Lijn het holle deel van de houder voor montage van de luidsprekers aan de rechter- en linkerkant op met het bolle deel van de luidsprekers.
Nederlands 2 Bevestig de luidsprekers aan het scherm. aan de luidsprekers op. Dit kan vervorming en beschadiging van producten veroorzaken. Let op dat het beeldscherm in stap 1 en 2 bij de montage van de luidsprekers niet tegen de luidsprekers slaat. 1 Plaats hem onder het scherm terwijl u één luidspreker schuin houdt en steek hem in de beugel aan de rechterkant. 2 Plaats de andere luidspreker op dezelfde manier in de beugel aan de linkerkant.
Nederlands 2 Leiden van de bedrading Bij het plasmabeeldscherm worden snelklemmen geleverd waarmee u de kabels netjes kunt leiden en overbodige kabellengten kunt bundelen. Montage van de luidsprekers aan de linker- en rechterkant van het scherm Luidsprekerkabel Bedradingsklem Snelklemmen Luidsprekerkabel Montage van de luidsprekers aan de onderkant van het scherm Bedradingsklem • Bevestig de kabels in bundels met behulp van de bij het plasmabeeldscherm geleverde snelklemmen.
Nederlands ONDERHOUD VAN DE BEHUIZING ÷ Veeg stof en vuil met een poetsdoek of droge, schone doek van de behuizing. ÷ Bevochtig een zachte doek in een oplossing van water en een neutraal reinigingsmiddel en wring de doek goed uit voor het verwijderen van hardnekkige vlekken. Veeg na met een droge doek. Gebruik geen meubelwas of andere reinigingsmiddelen daar deze de behuizing aan kunnen tasten.
Español Muchas gracias por comprar este producto Pioneer. Lea completamente estas instrucciones de operación antes de usar su sistema de altavoces de modo que sepa cómo obtener el máximo rendimiento. Luego de haber finalizado la lectura del manual de instrucciones de operación, guárdelo en un lugar seguro. De esta manera podrá saber dónde está, en caso de que desee referirse al mismo si algo no está claro mientras el sistema de altavoces se está usando.
Español INSTALACIÓN EN LA PANTALLA DE PLASMA 5 Para conectar el altavoz izquierdo, siga el mismo procedimiento descrito anteriormente. (CUANDO LOS ALTAVOCES SE INSTALAN EN LOS LADOS DERECHO E IZQUIERDO DE LA PANTALLA) Lleve a cabo la instalación siguiendo los pasos 1 y 2 siguientes. 1 Instale los accesorios de montaje en los altavoces. La ilustración de abajo muestra el altavoz derecho.
Español 2 Acople los portavoces a la pantalla. Tenga cuidado para asegurarse de que la pantalla no golpee los altavoces en los pasos 1 y 2 cuando los altavoces se instalan en la pantalla. se muestran en las figuras de abajo. No levante la pantalla sujetándola por los altavoces, ya que esto puede causar deformación o daño a los productos. 1 Coloque uno de los dos altavoces debajo de la pantalla inclinándolo e insertándolo en la ménsula del lado derecho.
Español 2 Cómo direccionar los cables La pantalla de plasma viene acompañada de abrazaderas rápidas que permiten mantener los cables ordenados y guardar la longitud de cable sobrante.
Español MANTENIMIENTO DEL GABINETE ÷ Para quitar la suciedad y tierra utilice un paño de limpieza o paño seco. ÷ Cuando la superficie está muy sucia, limpie con un paño embebido en algún agente limpiador neutro diluido cinco o seis veces en agua, exprima bien, y luego vuelva a limpiar con un paño seco. No utilice ceras o agentes limpiadores para muebles.
中文 感謝惠購先鋒產品。 在使用該揚聲器系統之前,請通讀使用說明書,以獲知如 何使本揚聲器系統發揮最佳性能。閱讀完畢後,請將其妥 善保管以備日後參考。 小心 本產品經設計專用於PDP-4340HD,PDP-434HDE,PDP-434HDG 先鋒等離子顯示器。有關兼容性的詳細資訊,請向您鄰近 的先鋒授權經銷商或服務中心咨詢。 7 揚聲器安裝配件(揚聲器安裝在顯示器底部時使用) 底部安裝揚聲器用托架×2,用於左右側 部位。 使用之前 ÷ 本揚聲器系統的標稱阻抗為8歐。 ÷ 為防止因輸入過載而導致揚聲器系統損壞,請務必遵 循以下注意事項: ÷ 請勿對揚聲器系統使用超過其最大容許輸入的電 源。否則,會導致損壞或可能產生火災。 ÷ 當插拔芯插頭時,請確保放大器電源已關閉。 ÷ 當使用圖形等化器來加強某高頻帶的響聲時,請勿 使用過大的放大器音量。 ÷ 請勿強制低功率放大器產生高音量(放大器的諧波 失真將會增加,您可能會損壞揚聲器)。 ÷ 結合使用自動恢復型保護裝置可保護揚聲器不受過高輸入 信號或異常信號的損害。當過高的輸入信號發送至揚聲器 時,保護裝置即會啟動防止發出響亮的高音。此時,請將 等離子顯示屏的音量調
中文 冰等離几顯示器上名裝 5 按照上述相同步驟來安裝左置揚聲 器。 (當揚篾器名裝冰顯示器的仕側和左側時) 請遵照下列步驟 1 至 2 進行安裝。 1 將安裝配件安裝到揚聲器上。 下圖顯示的是右置揚聲器。 1 將用於安裝左右側揚聲器的支座的凸面部分對準揚聲器的 凹入部位。 2 用螺絲固定兩個安裝點。 3 將支座安裝到一個揚聲器的頂部和底部。 1 2 3 在等離子顯示器上安裝 (當揚篾器名裝冰顯示器的底部時) 請遵照下列步驟 1 至 2 進行安裝。 1 將安裝配件安裝到顯示器上。 1 將鉚釘推入支架(位於左右側)各外側孔A以在底部安裝揚 聲器。 2 用螺絲固定支架(位於左右側)各外側孔B以在底部安裝 揚聲器。 4 同樣,將其餘兩個支座安裝到另 一個揚聲器的頂部和底部。 2 將揚聲器安裝到顯示器上。 下圖以右置揚聲器的安裝為例。 B 1 在將揚聲器掛在顯示器上之前,先 暫時固定上部螺絲(此時,螺絲頭 與 顯 示 器 之 間 應 有 約5 m m 的 空 間)。 B 5mm 2 將揚聲器掛在上部螺絲上。 3 暫時固定下部螺絲。 4 調節位置,使揚聲器與顯示器平行,然後再緊固上部和下
中文 2 將揚聲器安裝到顯示器上。 當揚聲器安裝在顯示屏上時,請務必確保顯示屏未 與步驟1和步驟2中的揚聲器碰撞。 1 將一台揚聲器傾斜地放到顯示器下,然後將其插入右側的 托架。 當揚聲器安裝在左側和右側時 當揚聲器安裝在底部時 連接等離子顯示器 2 同樣,將另一個揚聲器插入左側的托架。 3 調節位置,使揚聲器之間的間隙消失,並使揚聲器不會向 右或向左移位。 1 連接揚聲器電纜 1 關閉等離子顯示器的電源。 2 用附帶的揚聲器電纜連接揚聲器系統的輸入端子和等離子 顯示器的揚聲器輸出端子。進行連接時,請確保正極 (ª)和負極(·)端子匹配。 1. 按壓鎖桿,將電纜插入孔中,然後再鬆開鎖桿。 · 端子(黑色) ª 端子(紅色) 揚聲器的輸入端子 紅色 黑色 4 用螺絲固定顯示器中間部位的兩個安裝點。 至 · 端子 至 ª 端子 (揚聲器系統的揚聲器輸入端子) 2.
中文 2 如何布線 等離子顯示器隨機附帶有快接式線夾,以便整理您的電纜, 並使過長的電纜不會妨礙他人。 當揚聲器安裝在顯示器的左側和右側時 揚聲器電纜 線夾 快接式線夾 揚聲器電纜 當揚聲器安裝在顯示器底部時 揚聲器電纜 線夾 • 使用隨等離子顯示器附帶的快接式線夾來 整理電纜。 揚聲器電纜 用附帶的線夾將揚聲器電纜或系統電纜放置 在機架中,以使電纜不會從前面看到。 要將快接式線夾安裝到主機上 根據安裝情況,請使用下方標有•的孔1來連接快接式線夾。 將 1 插入本機後部相應的孔中,然後將 2 扣入 1 的後部 以固定線夾。 1 2 快接式線夾一旦扣上便很難解開。請謹慎安裝。 要卸除快接式線夾 中文 使用鉗子,旋轉90°擰絞線夾,然後將其向外拉。 在某些情況下,線夾可能已老化,所以可能會在卸除時被損 壞。 35
中文 機殼維護 ÷ 使用拋光布或乾布來擦拭灰塵和污垢。 ÷ 當機殼很髒時,用軟布蘸取經水稀釋後的清潔劑進行擦 拭,然後再用乾布擦淨。請勿使用家具蠟或清潔劑。否則 會損壞機殼表面。 ÷ 切勿對機殼或在機殼附近使用稀釋劑,苯,殺蟲劑以及其 它化學製品,因為它們會腐蝕本機表面。 ÷ 當使用含化學製品的拭布時,請仔細閱讀該拭布的注意事 項。 規格 機殼:低音反射型 所用揚聲器(兩路系統): 低音喇叭(用於低音) ...................... 橢圓型 高音喇叭(用於高音) ................ 2.5cm 球頂型 標稱阻抗 ...................................... 8 Ω 頻率範圍 ........................... 60 to 20,000 Hz 靈敏度 ........................... 82 dB/W(1m距離時) 容許輸入功率: 最大輸入功率 ................................ 12 W 額定輸入功率 ................................
PDPS13LR.27-32/Sp-2 37 03.5.
PDPS13LR.27-32/Sp-2 38 03.5.
PDPS13LR.27-32/Sp-2 39 03.5.
Published by Pioneer Corporation Copyright © 2003 Pioneer Corporation All rights reserved PIONEER CORPORATION 4-1, Meguro 1-Chome, Meguro-ku, Tokyo 153-8654, Japan PIONEER ELECTRONICS (USA) INC. P.O. BOX 1540, Long Beach, California 90801-1540, U.S.A. PIONEER ELECTRONICS OF CANADA, INC. 300 Allstate Parkway, Markham, Ontario L3R OP2, Canada PIONEER EUROPE NV Haven 1087, Keetberglaan 1, B-9120 Melsele, Belgium TEL: 03/570.05.11 PIONEER ELECTRONICS ASIACENTRE PTE. LTD.