Multi-CD control DSP High power CD/MD player with FM/AM tuner ENGLISH FRANÇAIS DEH-P9100R FH-P8900MD DEUTSCH OperationManual Owner’s Manual Manual de Operación ITALIANO NEDERLANDS This product conforms to new cord colors.
Contents Key Finder .................................. 3 About this manual .............................................. 4 Precaution .......................................................... 4 Playback of MDs featuring long recordings ...... 4 Resetting the microprocessor ............................ 5 About the demo mode ........................................ 5 About basic displays .......................................... 5 Remote controller and care ................................
Initial settings menu ........................................ 40 Using reverse mode ........................................ 40 Using the feature demo .................................... 40 Switching the auxiliary setting .......................... 40 Switching the telephone muting/attenuation setting ...................................................... 41 Setting preout output ...................................... 41 Setting the FM tuning step ..............................
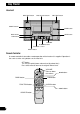
Key Finder Head unit MD EJECT button Multi-function buttons CD EJECT button ANGLE buttons BAND button NEXT button BACK button PGM button VOLUME 5/∞/2/3 buttons SOURCE selector RESET button Remote Controller A remote controller that enables remote operation of the head unit is supplied. Operation is the same as when using buttons on the head unit. ATT button This lets you quickly lower volume level (by about 90%). Press once more to return to the original volume level.
Before Using This Product CAUTION: CAUTION: USE OF CONTROL OR ADJUSTMENT OR PERFORMANCE OF PROCEDURES OTHER THAN THOSE SPECIFIED HEREIN MAY RESULT IN HAZARDOUS RADIATION EXPOSURE. THE USE OF OPTICAL INSTRUMENTS WITH THIS PRODUCT WILL INCREASE EYE HAZARD. ESPAÑOL This product features a number of sophisticated functions ensuring superior reception and operation. All are designed for the easiest possible use, but many are not self-explanatory.
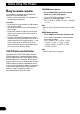
Before Using This Product Resetting the microprocessor The microprocessor must be reset under the following conditions: When using this product for the first time after installation. When the machine fails to operate properly. When strange (incorrect) messages appear on the display. Note: • The red lead (ACC) of this product should be connected to a terminal coupled with ignition switch ON or OFF operations. If this is not done, the vehicle battery may be drained.
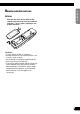
ENGLISH Remote controller and care Batteries • Remove the cover on the back of the remote controller and insert the batteries with the (+) and (–) poles pointing in the proper direction. ESPAÑOL DEUTSCH FRANÇAIS Precaution: • Use only AAA or IEC R03 1.5 V batteries. • Remove the batteries if the remote controller is not used for a month or longer. • Do not attempt to recharge the supplied batteries. • Do not mix new and used batteries.
Before Using This Product Using the remote controller This product is equipped with a remote controller for convenient operation. • Point the remote controller in the direction of the front panel to operate. Precaution: • Do not store the remote controller in high temperatures or direct sunlight. • The remote controller may not function properly in direct sunlight. • Do not let the remote controller fall onto the floor, where it may become jammed under the brake or accelerator pedal.
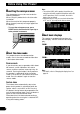
Basic Operation You can select the source you want to listen to. To switch to built-in CD/MD player, load a CD/MD in this product. (Refer to “Basic operation” on page 15 and 19.) 1. Press (up or down) SOURCE to select the desired source (e.g., tuner). Setting the display angle You can adjust front panel angle for easier operation.
Basic Operation SOFT KEY operation SOFT KEY operation means that the function of a button changes as indicated on the display. The multi-function buttons provide SOFT KEY operation; the functions performed by the buttons change according to the function or setting that has been selected. Function names “3” Multi-function buttons The explanations given in this manual are based on FORM 1 display.
3. Press RDM to select the random mode. ENGLISH Example of multi-function button operation Here the “random play” function of the built-in CD player is used as an example to illustrate operation of the multi-function buttons. 1. Press NEXT to display “FUNC”. Press NEXT repeatedly until “FUNC” appears. 4. Press RDM to turn random play on. ESPAÑOL 2. Press FUNC to enter the function menu. With the switch to the function menu, the functions of the multi-function buttons also change simultaneously.
Basic Operation Key guidance indicator This product’s display features key guidance indicators. These light to indicate which of the 5/∞/2/3 buttons you can use. When you are in the function menu, audio menu or the other menus, they also make it easy to see which 5/∞/2/3 buttons you can use to switch functions on/off, switch repeat selections and perform other operations. Key guidance indicators Note: • In this manual, operation for each mode is given mainly in terms of the multi-function buttons.
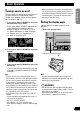
Tuner Basic operation FORM 1 q w e ENGLISH Display and indicators Reset the AM tuning step from 9 kHz (the factory preset step) to 10 kHz when using the tuner in North, Central or South America. (Refer to page 41.) 1. Press (up or down) SOURCE to select the tuner. t FORM 2 q e wt ESPAÑOL r Press (up or down) SOURCE until “Tuner” appears. 2. Press (up or down) VOLUME to adjust the volume. 3. Press BAND to select the desired band.
Tuner Storing and recalling broadcast Tuner function menu stations The tuner function menu has the following functions: If you press any of the buttons 1 – 6, you can easily store up to six broadcast stations for later recall. Storing broadcast stations 1. Press NEXT to display “1” – “6”. Press NEXT until “1” – “6” appears. 2. When you find a station that you want to store in memory, press and hold any of the buttons 1 – 6 until the preset number stops flashing.
ENGLISH Selecting stations from the preset channel list The preset channel list lets you see the list of preset stations and select one of them to receive. 1. Press FUNC and then press chLIST to select the preset channel list mode. ESPAÑOL 2. Press any of the buttons 1 – 6 to recall the desired station. DEUTSCH Note: • You can also use 2 , 3 and 5 to select and recall the desired station.
Built-in CD Player Display and indicators 3. Press (up or down) VOLUME to adjust the volume. FORM 1 4. Press 2 or 3 to select a track. q w e r Pressing 3 skips to the start of the next track. Pressing 2 once skips to the start of the current track. Pressing again will skip to the previous track. • If you press and hold 2 or 3, you can perform fast forward or reverse. 5. Press CD EJECT to eject the CD.
Built-in CD player function menu When playing a CD TEXT disc, you can switch text display such as artist name and track title. With text longer than 32 letters, you can scroll to see the rest of the text. The built-in CD player function menu has the following functions: ENGLISH Switching and scrolling the title 1. Press TITLE to switch the title mode. FORM 1 Button Operation D.TTL Displays disc title. D.ART Displays disc artist name.
Built-in CD Player Playing tracks in random order Selecting tracks from the track Random play lets you play back tracks on the CD in random order. title list 1. Press FUNC and then press RDM to select the random mode. The track title list lets you see the list of track titles on a CD TEXT disc and select one of them for playback. 2. Press RDM to turn random play on. 1. Press FUNC and then press T.LIST to select the track title list mode. The light illuminates. Tracks will play in random order.
ENGLISH Pausing CD playback Pause lets you temporarily stop playback of the CD. 1. Press FUNC and then press PAUSE to select the pause mode. 2. Press PAUSE to turn the pause on. ESPAÑOL The light illuminates. Play of the current track pauses. • Press PAUSE again to turn the pause off. • When the pause mode is exited while pause is on, “PAUSE” is displayed in the basic display. Note: • You can also turn pause on or off by pressing PAUSE in the following display.
Built-in MD Player Display and indicators 3. Press (up or down) VOLUME to adjust the volume. 4. Press 2 or 3 to select a track. FORM 1 q w e r t Pressing 3 skips to the start of the next track. Pressing 2 once skips to the start of the current track. Pressing again will skip to the previous track. • If you press and hold 2 or 3, you can perform fast forward or reverse. 5. Press MD EJECT to eject the MD. FORM 2 q w r The front panel opens and the MD is ejected.
Built-in MD player function menu When playing an MD, you can switch text display such as disc title and track title. With text longer than 32 letters, you can scroll to see the rest of the text. The built-in MD player function menu has the following functions: 1. Press TITLE to switch the title mode. Note: • If you do not operate the function within about 30 seconds, the display is automatically returned. Repeating play FORM 1 Button Operation D.TTL Displays disc title.
Built-in MD Player Playing tracks in random order Selecting tracks from the track Random play lets you play back tracks on the MD in random order. title list 1. Press FUNC and then press RDM to select the random mode. The track title list lets you see the list of track titles on the MD and select one of them for playback. 2. Press RDM to turn random play on. 1. Press FUNC and then press T.LIST to select the track title list mode. The light illuminates. Tracks will play in random order.
ENGLISH Pausing MD playback Pause lets you temporarily stop playback of the MD. 1. Press FUNC and then press PAUSE to select the pause mode. 2. Press PAUSE to turn the pause on. ESPAÑOL The light illuminates. Play of the current track pauses. • Press PAUSE again to turn the pause off. • When the pause mode is exited while pause is on, “PAUSE” is displayed in the basic display. Note: • You can also turn pause on or off by pressing PAUSE in the following display.
Multi-CD Player Display and indicators FORM 1 q w r e t FORM 2 q w e r t y qSource name wDisc number eTrack number rDisc title tPlay time yTrack title 50-disc multi-CD player Only those functions described in this manual are supported for 50-disc multi-CD players. Pressing 3 skips to the start of the next track. Pressing 2 once skips to the start of the current track. Pressing again will skip to the previous track. • If you press and hold 2 or 3, you can perform fast forward or reverse.
Multi-CD player function menu When playing a CD TEXT disc on a CD TEXT compatible multi-CD player, you can switch text display such as artist name and track title. With text longer than 32 letters, you can scroll to see the rest of the text. The multi-CD player function menu has the following functions: ENGLISH Switching and scrolling the title 1. Press TITLE to switch the title mode. FORM 1 Button Operation D.TTL Displays disc title. D.ART Displays disc artist name. Displays track title. T.
Multi-CD Player Playing tracks in random order Random play lets you play back tracks in random order within the repeat range: multi-CD player repeat and disc repeat. 1. Select the repeat range. Refer to “Repeating play” on page 24. 2. Press FUNC and then press RDM to select the random mode. 3. Press RDM to turn random play on. The light illuminates. Tracks will play in random order within the selected repeat range. • Press RDM again to turn random play off.
title list The disc title list lets you see the list of disc titles and select one of them for playback. Displayed disc titles are those which have been entered into the multi-CD player or recorded on a CD TEXT disc. 2. Press PAUSE to turn pause on. ENGLISH Selecting discs from the disc The light illuminates. Play of the current track pauses. • Press PAUSE again to turn pause off. • When the pause mode is exited while pause is on, “PAUSE” is displayed in the basic display.
Multi-CD Player 5. Press 3 to move the cursor to the next character position. • Press 2 to move backwards in the display. 6. Press 3 to move the cursor to the last position and then press 3 one more time after entering the title. 7. Press BAND to cancel the disc title input mode. Note: • When playing a CD TEXT disc on a CD TEXT compatible multi-CD player, if you switch to this mode, “No title input” is displayed and you cannot input the title.
Playback from ITS memory 5. Press BAND to cancel the ITS memory mode. ENGLISH ITS play lets you listen to the tracks that you have entered into ITS memory. When you turn on ITS play, tracks from ITS memory in the multi-CD player will begin to play. Note: • In this mode, you can also use ∞ to erase the currently playing track from ITS memory. 1. Select the repeat range. Refer to “Repeating play” on page 24.
TV Tuner The following explains how to use this product to control a TV tuner, which is sold separately. For details of TV tuner-specific operation/features, see your TV tuner’s manual. • With this product, you can operate preset channel list as one additional function. 1. Press SOURCE to select the TV tuner. Press SOURCE until “Television” appears. 2. Press (up or down) VOLUME to adjust the volume. 3. Press 2 or 3 to tune in to a station.
Selecting channels from the pre- 1. Press NEXT to display “1” – “6” (or “7” – “12”. set channel list Press NEXT until “1” – “6” (or “7” – “12”) appears. 2. Press any of the buttons 1 – 6 (or 7 – 12) to recall the station preset under that button. The preset channel list lets you see the list of preset channels and select one of them to receive. 1. Press FUNC and then press chLIST to select the preset channel list mode.
Audio Adjustments Adjusting the audio easily Recalling equalizer curves The following functions let you easily adjust your audio system to match the car interior acoustic characteristics which vary depending on the type of car. • Recalling equalizer curves (EEQ) • Using position selector (POSI) • Using time alignment (T.AL1) • Adjusting equalizer curves (EQ1) The graphic equalizer lets you adjust equalization to match the car interior acoustic characteristics as desired.
The audio menu has the following functions: 3. Press 2 or 3 to adjust left/right speaker balance. ENGLISH Audio menu Each press of 2 or 3 moves the left/right speaker balance towards the left or the right. • “BALANCE L25” – “BALANCE R25” is displayed as the left/right speaker balance moves from left to right. Using loudness 1. Press AUDIO to select the fader/balance mode. 2. Press LOUD to turn the loudness on. “LOUDNESS ON” appears in the display. • Press LOUD again to turn loudness off.
Audio Adjustments Recalling sound field programs Adjusting equalizer curves 1. Press AUDIO and then press SFC to select the sound field control mode. The factory supplied equalizer curves, with the exception of “FLAT”, can be adjusted to a fine degree (nuance control). 2. Press the corresponding button to select the desired sound field program.
Refer to “Recalling equalizer curves” on page 31. 2. Press AUDIO and then press EQ2 to select the 13-band graphic equalizer mode. Each press of 2 or 3 selects equalizer bands in the following order: 50 Ô 80 Ô 125 Ô 200 Ô 315 Ô 500 Ô 800 Ô 1.25k Ô 2k Ô 3.15k Ô 5k Ô 8k Ô 12.5k (Hz) 4. Press 5 or ∞ to adjust the level of the equalizer band. 1. Press AUDIO and NEXT and then press POSI to select the position selector mode. 2. Press the corresponding button to select a listening position.
Audio Adjustments Using time alignment The time alignment lets you adjust the distance between each speaker and the listening position to match the type of car. There are five types of car stored which you can easily recall at any time. 1. Press AUDIO and NEXT and then press T.AL1 to select the time alignment mode. 2. Press the corresponding button to select the type of car. Button Type of car SEDAN Sedan WAGON Wagon M.
Adjusting subwoofer settings 1. Press AUDIO and NEXT and then press SW2 to select the subwoofer setting mode. Each press of 2 or 3 selects cut-off frequencies in the following order: 50 Ô 63 Ô 80 Ô 100 Ô 125 (Hz) Each press of 2 or 3 selects frequencies in the following order: 50 Ô 63 Ô 80 Ô 100 Ô 125 (Hz) Setting the high pass filter for rear speakers 1. Press AUDIO and then press NEXT twice. 2. Press HPF R to select the high pass filter mode. 3. Press HPF R to turn the high pass filter on.
Audio Adjustments Adjusting source levels SLA (source level adjustment) lets you adjust the volume level of each source to prevent radical changes in volume when switching between sources. • Settings are based on the FM tuner volume level, which remains unchanged. 1. Compare the FM tuner volume level with the level of the source you want to adjust (e.g., built-in CD player). 2. Press AUDIO and then press NEXT twice. 3. Press SLA to select the SLA mode. 4. Press 5 or ∞ to adjust the source volume.
1. Stop the car in a place that is as quiet as possible, close all doors, windows and the sun roof, and then turn the engine off. If the engine is left running, engine noise may prevent correct auto-equalizing. 2. Fix the supplied microphone in the center of the headrest of the driver’s seat, facing forward, using the belt (sold separately). FRANÇAIS The auto-equalizer curve may differ depending on where you place the microphone.
Audio Adjustments 3. Turn the ignition switch to ON or ACC. If the car’s air conditioner or heater is turned on, turn it off. Noise from the fan in the air conditioner or heater may prevent correct auto-equalizing. • Press (up or down) SOURCE to turn the source on if this product is turned off. 4. Select the position for the seat on which the microphone is placed. Refer to “Using position selector” on page 34. • If no position is selected before you start auto-equalizing, “FL” is selected automatically. 5.
Initial Settings Using the feature demo The initial settings menu has the following functions: The feature demo automatically starts when power to this product is switched off while the ignition switch is set to ACC or ON. You can turn the feature demo on or off. ENGLISH Initial settings menu 1. With the source turned off, press and hold 1. You can operate the initial settings menu only when the source is off. 1. Press (up or down) SOURCE to turn the source off. 2. Press and hold settings menu.
Initial Settings Switching the telephone Setting the FM tuning step muting/attenuation setting The FM tuning step employed by seek tuning can be switched between 100 kHz, the preset step, and 50 kHz. Sound from this product is muted or attenuated automatically when a call is made or received using a connected cellular telephone. 1. With the source turned off, press and hold 1. 2. Press MUTE.S to select the telephone muting/attenuation mode. 3. Press MUTE.S to select the desired setting. Press MUTE.
Initial Functions Other Settings The attenuator lets you lower the volume level quickly (by about 90%). • Press ATT to turn the attenuator on. “ATT” appears in the display. • Press ATT again to turn the attenuator off and return to the original volume level. You can turn the time display on or off and set the time. Setting the time display on or off 1. Press NEXT to display “CLK”. The calender display adjusted in this mode appears only when sources and the feature demo are off. 1.
Other Functions Changing the display form 1. Press NEXT to display “C.MENU”. This product is equipped with two basic displays. You can select the desired display. 2. Press C.MENU and then press PTRN to select the wall paper pattern mode. 1. Press NEXT to display “C.MENU”. Press NEXT until “C.MENU” appears. 2. Press C.MENU and then press D.FORM to select the display form mode. 3. Press either FORM 1 or FORM 2 to select the desired display form.
2. Press any of the buttons BGV1 – BGV5 to select the desired visual. Setting the background still picture Refer to “Entering disc titles” on page 26, and perform procedures 3 to 7 in the same way. Note: • Even if you do not press TTLin you can enter the title, but you will not be able to change the character types. ESPAÑOL The background still pictures are only for the display form 1 “FORM 1”. There are three stored background still pictures to select from.
Additional Information CD player and care • Use only CDs that carry either of the two Compact Disc Digital Audio marks shown below. • Use only normal, round CDs. If you insert irregular, non-round, shaped CDs they may jam in the CD player or not play properly. • Check all CDs for cracks, scratches or warping before playing. CDs that are cracked, scratched or warped may not play properly. Do not use such discs. • Avoid touching the recorded (non-printed side) surface when handling the disc.
• Use MDs bearing this mark. Using a disc other than a music MD may result in damage to this product. Shutter ESPAÑOL • Do not open the MD shutter by hand. Forcing it open may result in damage. • Keep MDs out of direct sunlight and high temperatures. • If the surface of an MD cartridge is dirty, wipe it gently with a clean, soft cloth. • Do not apply benzene, thinner or other volatile liquids to MDs. • When using an MD cleaning disc, be sure to read the disc’s instructions carefully.
Additional Information Understanding built-in CD player error messages When problems occur during CD play, an error message may appear on the display. If an error message appears on the display, refer to the table below to see what the problem is and the suggested method of correcting the problem. If the error cannot be corrected, contact your dealer or your nearest Pioneer service center. Display Cause Remedy ERROR- 11, 12, 17, 30 Dirty disc. Clean disc. ERROR- 11, 12, 17, 30 Scratched disc.
ENGLISH Understanding auto-equalizing error messages When correct measurement of car interior acoustic characteristics is not possible using the autoequalizer, an error message may appear on the display. If an error message appears on the display, refer to the table below to see what the problem is and the suggested method of correcting the problem. After checking, try again. Cause Remedy ERROR CHECK MIC Microphone is not connected. Plug the supplied microphone securely into the jack.
Additional Information Connecting the units Note: • This unit is for vehicles with a 12-volt battery and negative grounding. Before installing it in a recreational vehicle, truck or bus, check the battery voltage. • To avoid shorts in the electrical system, be sure to disconnect the ≠ battery cable before beginning installation. • Refer to the owner’s manual for details on connecting the power amp and other units, then make connections correctly. • Secure the wiring with cable clamps or adhesive tape.
ENGLISH OF O STAR STAR DEUTSCH T ACC position F N OF O T ACC N F ESPAÑOL • If this unit is installed in a vehicle that does not have an ACC (accessory) position on the ignition switch, the red lead of the unit should be connected to a terminal coupled with ignition switch ON/OFF operations. If this is not done, the vehicle battery may be drained when you are away from the vehicle for several hours. (Fig. 1) No ACC position Fig.
Additional Information Connection Diagram This Product Antenna jack Multi-CD player (sold separately) 15 cm 15 cm IP-BUS input (Blue) Subwoofer output or Rear output IP-BUS cable Yellow/black If you use a cellular telephone, connect it via the Audio Mute lead on the cellular telephone. If not, keep the Audio Mute lead free of any connections. Blue/white When the source is switched ON, a control signal is output. To system control terminal of the power amp (max. 300 mA 12 V DC).
ENGLISH Power amp (sold separately) Connecting cords with RCA pin plugs (sold separately) ESPAÑOL DEUTSCH System remote control FRANÇAIS White Gray + + ≠ ≠ Front speaker White/black Green Gray/black Right Violet + + ≠ ≠ Green/black ITALIANO Rear speaker Violet/black + ≠ ≠ Subwoofer or Rear speaker NEDERLANDS + Fig.
Additional Information Installation Note: • Before finally installing the unit, connect the wiring temporarily, making sure it is all connected up properly, and the unit and the system work properly. • Use only the parts included with the unit to ensure proper installation. The use of unauthorized parts can cause malfunctions. • Consult with your nearest dealer if installation requires the drilling of holes or other modifications of the vehicle.
Installation using the screw holes on the side of the unit ENGLISH Fastening the unit to the factory radio mounting bracket. (Fig. 5) (Fig. 6) ESPAÑOL Select a position where the screw holes of the bracket and the screw holes of the head unit become aligned (are fitted), and tighten the screws at 3 or 4 places on each side. Use either binding screws (5 × 6 mm) or flush surface screws (5 × 6 mm), depending on the shape of the screw holes in the bracket. DEUTSCH Fig.
Additional Information Specifications General Power source .............. 14.4 V DC (10.8 – 15.1 V allowable) Grounding system .......................................... Negative type Max. current consumption ........................................ 10.0 A Dimensions (mounting size) ...... 178 (W) × 100 (H) × 160 (D) mm (front face) ................ 170 (W) × 95 (H) × 16 (D) mm Weight ...................................................................... 2.
ENGLISH ESPAÑOL DEUTSCH FRANÇAIS ITALIANO NEDERLANDS 57
PIONEER CORPORATION 4-1, MEGURO 1-CHOME, MEGURO-KU, TOKYO 153-8654, JAPAN PIONEER ELECTRONICS (USA) INC. P.O. Box 1760, Long Beach, California 90801, U.S.A. TEL: (800) 421-1404 PIONEER EUROPE NV Haven 1087, Keetberglaan 1, B-9120 Melsele, Belgium TEL: (0) 3/570.05.11 PIONEER ELECTRONICS AUSTRALIA PTY. LTD. 178-184 Boundary Road, Braeside, Victoria 3195, Australia TEL: (03) 9586-6300 PIONEER ELECTRONICS OF CANADA, INC.