Operating Instructions – Advanced MCACC PC Display Application Software – audio/video multi-channel receiver
About this manual These are the Operating Instructions for an application which displays on your computer screen the listening room reverberation frequency characteristics and the MCACC parameters measured by the Advanced MCACC function of your VSX-23TXH, VSX-21TXH, VSX-9140TXH or VSX-9040TXH. It explains everything you need to know to use the application, from installation to troubleshooting.
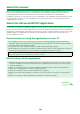
About the Advanced MCACC Application (Continued) Things you can accomplish with this application 1. Advanced EQ Setup, which you can do with the receiver (see page 84 of the receiver’s Operating Instructions), allows you to choose the optimum time period for auto EQ setup. You can use this application’s reverberation characteristics (Reverb) as a guide in choosing the best time period for your room. For details, see Deciding the time period for Advanced EQ Setup calibration (page 19). 2.
Installing the Application Install this application on your PC by using the downloaded installer. You will find the installer in the folder that you specified when you downloaded the application. If a previous version of the Advanced MCACC application (“Ver. 1.1”, “Ver. 1.4”, “Ver. 2.0” or “Ver. 2.1”) is installed on your computer, please update the application. For details, see Updating the application (page 26). 1 Double click the “PioneerAdvancedMCACC_e_ver_*_*.exe” file .
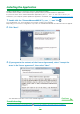
Installing the Application (Continued) 4 Input the Customer Information, then select “Next”. 5 Click “Next”. The application is installed in the folder indicated at “Destination Folder”. The destination folder can be changed by clicking “Change...”.
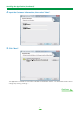
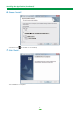
Installing the Application (Continued) 6 Choose “Install”. A shortcut icon 7 is created on the desktop. Click “Finish”. The installation is complete.
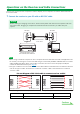
Operations on the Receiver and Cable Connections Connect the receiver and the computer in order to display on the computer the various data measured on the receiver itself. 1 Connect the receiver to your PC with an RS-232C cable. Caution Before making or changing connections, switch off the power and disconnect the power cord from the power outlet. Plugging in components should be the last connection you make with your system.
Operations on the Receiver and Cable Connections (Continued) 2 Perform the “Full Auto MCACC” operation on the receiver. (See page 41 of the receiver’s Operating Instructions.) The measurements here are not required if the “Full Auto MCACC” operation has already been performed before connecting the RS-232C cable. Proceed to step 3. 3 Select “Output PC” from “MCACC Data Check”. (See page 88 of the receiver’s Operating Instructions.
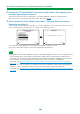
Applications Operations This section explains operations that you do in the application, from receiving measurement data to displaying graphs and saving the data. Receiving measurement data 1 Double click the application shortcut icon on the PC desktop. You can also start the application by selecting “Program” “Pioneer Corporation” “Advanced MCACC” from the “Start” menu. The application starts. 2 Select “Receive” under “File” on the menu bar.
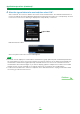
Application Operations (Continued) 4 Select the type of data to be received, then select “OK”. Select “Reverb” to receive the data for the room’s reverb characteristics, and “MCACC Parameters” to receive the data for the various MCACC parameters (measurements results). The “Group Delay” function is not used on this receiver. Nothing is displayed if “Group Delay” is selected. Type of data Data transmission starts. When reception finishes the received data appear.
Application Operations (Continued) Graph and parameter displays (names and functions of parts) When measurement data is received, the graphs and parameters display window appears. The display window is divided into two items, “Reverb” and “Parameters”. Select the desired tab to switch to that window and display the respective details. The “Group Delay” function is not used on this receiver. Nothing is displayed if “Group Delay” tab is selected.
Application Operations (Continued) MCACC Parameters (list display of MCACC parameters) A list of the measurements in all the MCACC memories is displayed. It is also possible to display the measurements in the individual MCACC memories.
Application Operations (Continued) 1 Menu bar and menu icons You can choose the following commands from the application menus. File Open Opens a file that has been saved on the PC (see page 17). Close Closes a file. Save Save measurement data in a file (see page 16).a Save As Receive Receives measurement data (see page 9). Print Prints the current individual graph.b Preview Displays a preview screen to show how the printed page will appear.b Exit Exits the application. a.
Application Operations (Continued) Window Cascade Cascades files.a Tile Tiles files.a Minimize Minimizes the window. Arrange Arranges minimized icons.a a. Available when two or more files are open. Help Glossary Displays definitions of terms related to the MCACC function and this application. Version Info Displays the version of the application. 2 Display item selection tab A graph for the reverberation frequency characteristics or the MCACC parameter list is displayed.
Application Operations (Continued) 11 Bar Graph Changes the type of graph display. The display switches between the band graph and bar graph by pressing this button. Move the viewpoint of the time axis. 12 File memo Memos concerning the file (conditions at the time of measurement, etc.) can be stored for the different items. 13 Reverb type Indicates whether the reverb characteristics are before calibration (EQ OFF) or after calibration (EQ ON).
Application Operations (Continued) Saving graphs in data files You can save measurement data received from the receiver on your PC. Data received at one time is saved in one file. 1 To save measure data, choose “Save” from the “File” menu. If you have data that has already been saved and want to save it under a new name, choose “Save As”. 2 Check the save location, assign a file name, then click “Save”. The data is saved in a CSV format file (the file extension is “.csv”).
Application Operations (Continued) Opening data files You can open and display two or more data files to compare the data in the files. 1 Select “Open” from the “File” menu in the menu bar. 2 Select a file to display and click “Open”. The previously saved measurement data is displayed. Exiting the application 1 Select “Exit” from the “File” menu. The application closes.
How to Interpret the Graphs As indicated in Things you can accomplish with this application (page 3), the reverb characteristics graph can be used as reference when determining the calibration time position with the receiver’s “Advanced EQ Setup” function. It is also a valuable means for checking the effect of measures taken to improve the acoustics of the room. The display can be switched between the reverb characteristics graphs before and after calibration.
How to Interpret the Graphs (Continued) Deciding the time period for Advanced EQ Setup calibration With conventional MCACC EQ calibration, the microphone input’s data acquisition time was fixed at between 80 and 160 [ms] (red part of Figure 1). By contrast, with the receiver’s Advanced EQ Setup function allowing more professional equalization, the customer can select individual points between 0 and 80 [ms] (with a 20 ms width) (blue part of Figure 1).
How to Interpret the Graphs (Continued) Pattern 2: Different reverb characteristics for different channels If the reverb characteristics differ for the different channels as shown in Figure 3, equalization using the conventional Acoustic Cal EQ acquired data between 80 and 160 [ms] (red part of Figure 3), so equalization was performed to gradually equalize the tone of the different channels for 80 ms from the time the sound was emitted from the speakers and after (it was not possible to equalize the respon
How to Interpret the Graphs (Continued) Checking steps to improve your room’s reverb characteristics The reverb characteristics of your listening room graphs are evident from the graphs. For your reference, the following four examples explain how different types of rooms appear in the graphs. Case 1: Graph rises to right across all frequencies This is probably a room with a good deal of reverberation.
How to Interpret the Graphs (Continued) Case 3: Specific frequency shows unusual reverb characteristics There is probably something in the room that affects the reproduction of that frequency. If possible, try to find an arrangement that reduces the effect. Case 4: A specific channel is slow to start This can happen when a speaker is unstable. If possible, we recommend that you try to stabilize the speaker stand, to bring the characteristics of that channel into line with the other channels.
How to Interpret the Graphs (Continued) About the display of the reverb characteristics graphs before and after calibration By comparing the reverberation characteristics graphs before and after calibration, you can check how the reverb characteristics have been calibrated. Select “Before” to display the graph of the reverberation characteristics before EQ calibration, “After” to display the graph of the reverb characteristics after EQ calibration.
About the types of displays of the graph for the reverb characteristics after EQ calibration For “SYMMETRY” or “FRONT ALIGN” • The display type is set to “Pair Ch” (page 13). For reasons of the properties of the different EQ curves, when the “Each Ch” display type is set, the reverb characteristics for the different channels do not line up properly.
Display of the MCACC parameters In addition to the reverberation frequency characteristics data measured with the Advanced MCACC function, all the parameters (results of measurements) set in the MCACC memories can be checked on the computer. Parameters that can be displayed 1. Speaker Setting (Speaker system and crossover frequency) 2. Channel Level (Speaker output level) 3. Speaker Distance (Distance to the speaker) 4. Standing Wave Control (Standing wave control filter) 5.
Updating, Deleting and Repairing the Application Updating the application A new installer is made available on the download site whenever the Advanced MCACC application is updated. You can download the new installer and use it to overwrite (update) the application on your PC. Note To check the version of your application, choose “Help” “Version Info” from the menu bar. A window showing the version (Version 2.2, etc.) appears. 1 Double click the new downloaded installer .
Updating, Deleting and Repairing the Application (Continued) Deleting the application You can use either of the following methods to uninstall (delete) the application from your PC. Method 1: Delete from the Control Panel of the PC From the Start menu, click “Setting” “Control Panel” “Add/Remove Programs”.
Updating, Deleting and Repairing the Application (Continued) 4 Select “Remove”. 5 Click “Finish”. This completes the deletion of the application.
Updating, Deleting and Repairing the Application (Continued) Repairing the application The repair function can be used for example if desktop shortcuts have been deleted, etc., to restore the application to the same conditions as when it was first installed. Note The application cannot be repaired by launching the installer file of a version different from the installed version. To do so, launch the installer file for the same version.
Updating, Deleting and Repairing the Application (Continued) 4 Select “Install”. 5 Click “Finish”. This completes the repairing of the application. Modifying the application With the application for the VSX-23TXH, VSX-21TXH, VSX-9140TXH or VSX-9040TXH, “Modify” cannot be used.
Troubleshooting As you use the Advanced MCACC application, errors can occur for a variety of reasons, such as incompatibilities with other applications and the current configuration of your PC. If an error occurs, refer to the troubleshooting points below. If the trouble cannot be rectified even after checking the points listed below, ask the Pioneer Customer Support Division (USA) or Customer Satisfaction Department (Canada). Pioneer Electronics Service Inc.
Troubleshooting (Continued) Cannot send measurement data to PC Cause 1: Random transmission errors sometimes occur. Even if an error occurred on your first attempt, try sending the data again. Sometimes the transmission succeeds when you try again. Cause 2: Messages like the following may appear if a transmission error occurs. Timeout occurred. Command error occurred. Please try again. Send failed. Try the following, in the order indicated.
Troubleshooting (Continued) Advanced MCACC cannot be updated Cause 1: An error message may appear if there are not enough system resources available. If an error message appears (like the one explained above in Cause 1) of Advanced MCACC cannot be installed (page 31), restart your PC and start the installer (PioneerAdvancedMCACC_e_ver_*_*.exe) with no other applications active. Cause 2: Updating of Advanced MCACC may fail because of incompatibilities with other applications.
Troubleshooting (Continued) The receiver causes a malfunction when it is connected to the PC with an RS-232C cable Cause: When the receiver is connected to your PC with an RS-232C cable, the power of the receiver may be automatically switched on when you operate the PC. Unplug the cable when not in use. EQ response in the graph (following calibration) does not appear flat Cause 1: The slope of the graph indicates the reverb characteristics.
PIONEER CORPORATION 4-1, Meguro 1-Chome, Meguro-ku, Tokyo 153-8654, Japan PIONEER ELECTRONICS (USA) INC. P.O. BOX 1540, Long Beach, California 90801-1540, U.S.A. TEL: (800) 421-1404 PIONEER ELECTRONICS OF CANADA, INC. 300 Allstate Parkway, Markham, Ontario L3R 0P2, Canada TEL: 1-877-283-5901, 905-479-4411 PIONEER EUROPE NV Haven 1087, Keetberglaan 1, B-9120 Melsele, Belgium TEL: 03/570.05.11 PIONEER ELECTRONICS ASIACENTRE PTE. LTD.