Hardware Manual HDD MULTIMEDIA AV NAVIGATION SERVER AVIC-Z1
Table of Contents Manual Overview 1 How to use this manual 1 Terminology 1 About the definition of terminology 1 Precautions Important Safety Information 2 Additional Safety Information 3 To avoid battery exhaustion 3 To ensure safe driving 3 Chapter 1 Notes Before Using the System After-sales service for Pioneer products 5 Product Registration 5 Features 5 About the SAT RADIO READY Logo 6 About the XM NAVTRAFFIC Logo 7 Dolby Digital sounds 7 About DTS sounds 7 Notes for Hard disk drive 7 Recording equipm
Manual Overview This manual mainly describes information related to the hardware, such as the names of parts for the navigation system or precautions for use. Please read this manual and all other enclosed manuals before using your navigation system. The following issues are described in each chapter: How to use this manual Precautions This chapter describes precautions for the safety use of the navigation system. Please read all descriptions in this section before using your navigation system.
Precautions Important Safety Information Before using your navigation system, be sure to read and fully understand the following safety information: Information to User Alteration or modifications carried out without appropriate authorization may invalidate the user’s right to operate the equipment. For Canadian model This Class B digital apparatus complies with Canadian ICES-003.
❒ The navigation features of this product (and rear view camera option if purchased) is intended solely as an aid to you in the operation of your vehicle. It is not a substitute for your attentiveness, judgment, and care when driving. ❒ Do not operate this navigation system (or the rear view camera option if purchased) if doing so in any way will divert your attention from the safe operation of your vehicle. Always observe safe driving rules and follow all existing traffic regulations.
➲ Setting the source for rear source ➞ Operation Manual • THE LIGHT GREEN LEAD AT POWER CONNECTOR IS DESIGNED TO DETECT PARKED STATUS AND MUST BE CONNECTED TO THE POWER SUPPLY SIDE OF THE PARKING BRAKE SWITCH. IMPROPER CONNECTION OR USE OF THIS LEAD MAY VIOLATE APPLICABLE LAW AND MAY RESULT IN SERIOUS INJURY OR DAMAGE. • To avoid the risk of accident and the potential violation of applicable laws, this product should never be used while the vehicle is being driven except for navigation purposes.
Chapter 1 Notes Before Using the System Features Please contact the dealer or distributor from where you purchased the product for its aftersales service (including warranty conditions) or any other information. In case the necessary information is not available, please contact the companies listed below: Please do not ship your product to the companies at the addresses listed below for repair without making advance contact. U.S.A CANADA Pioneer Electronics Pioneer Electronics of Canada, Inc. (USA) Inc.
Chapter 1 Notes Before Using the System DVD-Video playback NTSC compatibility It is possible to play back DVD-Video, DVD-R (video mode) and DVD-RW (video mode). Remember that use of this navigation system for commercial or public viewing purposes may constitute an infringement on the author’s rights protected by the Copyright Law. This navigation system is NTSC system compatible.
Dolby Digital sounds Note: The system will use direct satellite-to-receiver broadcasting technology to provide listeners in their cars and at home with crystal-clear sound seamlessly from coast to coast. Satellite radio will create and package over 100 channels of digital-quality music, news, sports, talk and children’s programming. ❒ Manufactured under license from Dolby Laboratories. “Dolby” and the double-D symbol are trademarks of Dolby Laboratories.
Chapter 1 Notes Before Using the System When recording please pay attention to these points; ➲ For details about handing the LCD panel ➞ Page 21 • Pioneer does not compensate for the contents that could not be recorded or any loss of recorded data due to a malfunction or failure of the navigation system. • The data recorded on the navigation system is not allowed to be used without a permission from its right holder under copyright law except for personal entertainment.
• When changing the combination of the equipment. • When adding/removing additional products that connect to the navigation system. Turn the ignition switch OFF. 2 Press the RESET button with a pen tip or other pointed instrument. Chapter 1 1 Notes Before Using the System RESET button ❒ If you have connected other equipment (for example, a TV tuner) to this navigation system, be sure to reset that equipment too.
10 Notes Before Using the System Chapter 1
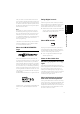
Chapter 2 How to Use the Navigation System and Names of the Parts Checking Part Names and Functions This section gives information about the names of the parts and main features using the buttons. Chapter 2 ❒ For more detail on operation, function limitations please refer to the Operation Manual. 1 23 4 5 6 7 8 9 a How to Use the Navigation System and Names of the Parts c d b e f 1 OPEN CLOSE button Press to open or close the LCD panel and access the disc loading slot.
3 V button Press to enter the PICTURE ADJUSTMENT mode. ➲ Operating the Picture Adjustment ➞ Operation Manual How to Use the Navigation System and Names of the Parts Chapter 2 Press and hold to turn off the back light of the LCD panel. To turn on the back light, press this button again. 4 Signal receptor This area receives signals from a remote control (sold separately).
When Using the Navigation System for the First Time Selecting a Source by the AV button 1 Turn the ignition switch (ACC) ON. The navigation system’s power supply comes on. 2 After the navigation system starts, press the AV button to switch the screen. Navigation map screen changes to audio source screen. 3 Press the AV button to turn the audio source on. 4 Press the AV button to select a source.
Turning the Source Off • Press the AV button and hold until the source turns off. ❒ This navigation system also can be switched off by turning the ACC (ignition) OFF. Inserting a disc 1 Press the OPEN CLOSE button. The LCD panel opens, and the disc loading slot appears. Disc loading slot EJECT button How to Use the Navigation System and Names of the Parts Chapter 2 Inserting/Ejecting a Disc • When opening, closing and adjusting the angle of the LCD panel, be careful not to get your finger caught.
❒ The built-in DVD drive plays one, standard, 12cm or 8-cm (single) disc at a time. Do not use an adapter when playing 8-cm discs. 3 Touch [Back]. ➲ For details, refer to “Playable discs” ➞ Page 17 ❒ If the built-in DVD drive does not operate properly, an error message may be displayed. ❒ The adjusted angle of the LCD panel will be memorized and the LCD panel will automatically return to that angle the next time when opening or closing the LCD panel.
16 How to Use the Navigation System and Names of the Parts Chapter 2
Appendix Troubleshooting ➲ Troubleshooting ➞ Appendix of the Operation Manual Handling and Care of the Disc Some basic precautions are necessary when handling your discs. Playable discs DVD and CD discs that display the logos shown below generally can be played back on this builtin DVD drive. The marks below may be found on DVD disc labels and packages. They indicate the type of images and audio recorded on the disc, and the functions you can use. Mark Meaning Indicates the number of audio systems.
❒ When the number of discs exceeds 30, settings for the new disc replace those for the oldest disc. DVD drive and care Appendix • Use only normal, round discs. If you insert irregular, non-round shaped discs they may jam in the DVD drive or not play properly. • Check all discs for cracks, scratches or warpage before playing. Discs that have cracks or scratches, or those that are warped may not play properly. Do not use such discs.
• Playback of discs recorded on a personal computer may not be possible, depending on the application settings and the environment. Please record with the correct format. (For details, contact the manufacturer of the application.) • Playback of CD-R/CD-RW discs may become impossible with direct exposure to sunlight, high temperatures, or depending on the storage conditions in the vehicle.
Ambient conditions for playing disc • At extremely high temperatures, a temperature cutoff protects this product by switching it off automatically. • Despite our careful design of the navigation system, as a result of mechanical wear, ambient conditions for use, or handling of the disc, small scratches that do not affect actual operation may appear on the disc surface. This is not a sign of the malfunction of this navigation system. Consider it to be normal wear and tear.
USE OF THE GRACENOTE COMPONENT OR ANY GRACENOTE SERVER. IN NO CASE WILL GRACENOTE BE LIABLE FOR ANY CONSEQUENTIAL OR INCIDENTAL DAMAGES OR FOR ANY LOST PROFITS OR LOST REVENUES. Other Precautions • Part of the data cannot be acquired. The contents of the data in the Gracenote® Database included in the hard disk drive are not 100% guaranteed. • The Gracenote® Database included in the hard disk drive contains the titles for the 300 000 most frequently accessed albums worldwide as of 2005 November.
• Do not push the LCD screen with much force as this may scratch it. • Never touch the LCD screen with anything besides your finger when operating the Touch Panel functions. The LCD screen can scratch easily. (The stylus is supplied for special calibrations. Do not use the stylus for normal operation.) • Be careful not to place anything between the LCD panel and the main body when the LCD panel is closing. If an object gets between the LCD panel and main body, the LCD panel may stop working.
Glossary Specifications ➲ Glossary ➞ Appendix of the Operation Manual General Rated power source ............ 14.4 V DC (10.8 V to 15.1 V allowable) Grounding system ............... Negative type Maximum current consumption ................................... 10.0 A Dimensions (W ✕ H ✕ D): DIN Chassis......................... 178 ✕ 100 ✕ 165 mm (7 ✕ 3-7/8 ✕ 6-1/2 in.) Nose ............................. 170 ✕ 96 ✕ 16 mm (6-3/4 ✕ 3-3/4 ✕ 5/8 in.) Weight .................................. 2.9 kg (6.
Appendix Equalizer (3-Band Parametric Equalizer): Low Frequency ............. 40/80/100/160 Hz Q Factor ................ 0.35/0.59/0.95/1.15 (+6 dB when boosted) Gain....................... ±12dB Mid Frequency ............. 200/500/1k/2k Hz Q Factor ................ 0.35/0.59/0.95/1.15 (+6 dB when boosted) Gain....................... ±12dB High Frequency ............. 3.15k/8k/10k/12.5k Hz Q Factor ................ 0.35/0.59/0.95/1.15 (+6 dB when boosted) Gain.......................
PIONEER CORPORATION 4-1, MEGURO 1-CHOME, MEGURO-KU, TOKYO 153-8654, JAPAN PIONEER ELECTRONICS (USA) INC. P.O. Box 1540, Long Beach, California 90801-1540, U.S.A. TEL: (800) 421-1404 PIONEER EUROPE NV Haven 1087, Keetberglaan 1, B-9120 Melsele, Belgium TEL: (0) 3/570.05.11 PIONEER ELECTRONICS ASIACENTRE PTE. LTD. 253 Alexandra Road, #04-01, Singapore 159936 TEL: 65-6472-7555 PIONEER ELECTRONICS AUSTRALIA PTY. LTD.