
Instructions / Assembly
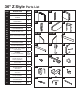

PVC Barn Door Assembly and Track Installation Z Style 36”
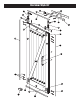
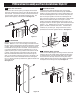
7. Attach Remaining Stile
Secure the remaining stile (A). Make sure the side with the large holes is
facing outward. Insert one of the Reinforcement plates (B) into the bottom
of the Stile into the innermost chamber of the Stile.
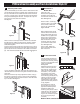
Place 2 of the 4” screws (Z) into the 2 holes in the outside of the channel.
Make sure they are fully inserted. Slide a Reinforcement clip (D) into the
channel and over the screw shafts.
Place the end of the Bottom rail (C) against the screws, lining up the holes
in the extrusion. Once in place, tighten screws until stile and bottom rail
are ush and secure.
Insert U bracket (G) into the Top of the stile into the outside channel and
the innermost channel. The side of the U clip with the larger holes should
be facing the outside edge of the door. The top of the U clip will rest on
the top of the stile once inserted.
Place 2 of the 4” screws (Z) into the 2 holes in the outside of the Stile
channel. Make sure they are fully inserted. Slide a reinforcement clip (D)
into the channel and over the screws shafts.
Insert two small screws (Q) into the oval holes on the top of the U bracket
and secure to the top of the stile. Take 2 small screws (Q) and secure into
the oval holes in the outside of U bracket (G). This will be the outside
channel of the stile.
Make sure the holes in the extrusion on the Top rail (C) line up against the
screws. Once in place, continue tightening screws until stile and rail are
ush and secure. See Figure 9.
Take one of the long screws (Z) and insert into the pre-drilled hole on the
outer channel of the stile. Using the drill, secure the screw until it catches
the Z cross bar. Be sure not to over-tighten the screw. Repeat on the
other stile to fully secure the Z cross bar in the door frame. Again, do not
over-tighten the screw. See Figure 9A.
8. Install Roller Brackets
Line up the holes on the Roller Bracket (O)
with the U bracket (G) and secure with the 2
allen screws (Y). Repeat with the other Roller
bracket (O). See Figure 10.
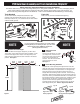
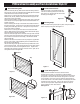
9. Finishing Strips
Snap the 2 side nishing strips (M) into place. Snap the top and
bottom strips (N) into place. See Figure 11.
Figure 10
Figure 9
Figure 11
Bottom
Top
10. Install Safety Spacers
Once the Roller brackets have been secured and the
nishing strips in place, it is important to install the Safety
spacers (W). These spacers help to protect the door from being
bumped o of the track. With the door laying at in a safe and
secure position, place one of the two spacers approximately 2”
to the inside of one of the roller brackets. Place slightly o center
towards the front of the door. Using a drill, secure the spacer
with the screw provided. Repeat steps to install the second
spacer inside the other roller bracket.
See Figure 12.
Figure 12
2
INCH
2
INCH
1-1/2”
Figure 9A