
Instructions / Assembly
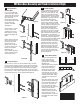
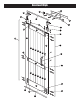

12. Place door onto Track
Position the door over the opening and slightly tilt the bottom
of the door outward away from the wall. Set the rollers securely
onto the track. Once the door is safely mounted and is secure,
turn the 2 safety spacers 180 degrees towards the wall. This
positions them properly under the track. See Figure 16.
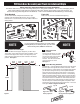
PVC Barn Door Assembly and Track Installation H Style
2
INCH
2
INCH
1-1/2”
Figure 16
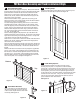
13. Install Handle
Measure up 52” from the bottom of the door and mark that
location. Measure in 2 ¾” in from the edge of the stile and mark
this spot. Drill a hole through the stile at the intersection of these
2 marks. Place the handle (P) on the door and insert one of the
handle bolts into the top hole in the handle. Put the washer and
nut onto the backside of the door and tighten the nut. Do not
tighten fully at this point. Using a level to make sure the handle
is plumb, mark the location of the bottom hole in the handle.
Move the handle aside and drill the second hole through the
stile. Put the remaining bolt through the hole in the handle. Put
the washer and nut onto the backside of the door and tighten
the nut. Use the wrench provided the fully tighten the bolts and
secure the handle.
See Figure 17.
2
INCH
2
INCH
1-1/2”
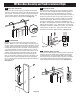
14. Install Floor Guide
The Bottom Door glide keeps the door from swinging outward
away from the wall. To locate the proper installation position in
the oor, slide the door into the closed position to where it is
ush with the opening and mark the outside edge of the door on
the oor. Now place the door into the open position and mark
the inside edge of the door on the oor. Make sure your glide
location is well marked. Make sure that whether the door is in
the open or closed position, that the door NEVER leaves the
Door glide. This is the proper location for the Door glide. Set the
width of the oor guide to 1 1/2”. Slide the door out of the way
and place it on the oor in between the 2 marks. Pre-drill holes
if necessary for your oor type. Using a drill and the screws
provided, secure the Door glide to the oor. See Figure 18.
2
INCH
2
INCH
1-1/2”
15. Set Door Stops on Track
Make sure the rubber stoppers are facing inward on each side.
Move the door to the closed position and slide the Door stop
to desired location. Using the provided Allen wrench, tighten
the screws in the top of the door stop to secure it in into place.
Then carefully glide the door into the full open position and
repeat the steps for the remaining Door stop. See gure 19.
2
INCH
2
INCH
1-1/2”
Figure 17
Figure 18
Figure 19