
Instructions / Assembly


PVC Barn Door Assembly and Track Installation G Style 36”
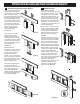
8. Attach Remaining Door Stile
Secure the remaining stile (A). Make sure the side with the large holes
are facing outward. Insert one of the Reinforcement plates (B) into the
bottom of the Stile into the innermost chamber of the Stile.
Place 2 of the 4” screws into the 2 holes in the outside of the channel.
Make sure they are fully inserted. Slide a Reinforcement clip (D) into the
channel and over the screw shafts. Place the end of the Bottom rail (C)
against the screws, lining up the holes in the extrusion. Once in place,
tighten screws until stile and bottom rail are about ½” apart. Do not
tighten full at this point.
Insert U bracket (G) into the Top of the stile into the outside channel
and the innermost channel. The side of the U clip with the larger holes
should be facing the outside edge of the door. The top of the U clip will
rest on the top of the stile once inserted. Place 2 of the 4” screws into
the 2 holes in the outside of the Stile channel. Make sure they are fully
inserted. Slide a reinforcement clip (D) into the channel and over the
screws shafts.
Insert two small screws into the oval holes on the top of the U bracket
and secure to the top of the stile. Take 2 small screws and secure into
the oval holes in the outside of U bracket (G). This will be the outside
channel of the stile. Place the remaining side gasket
onto this glass panel.
Place 2 of the 4” screws into the 2 holes in the outside of the Stile
channel at the bottom of the window section. Make sur
e they are fully
inserted. Slide a small r
einforcement clip (F) into the channel and over
the screw shafts. See Figure 9.
Line up the 4 screws inserted through the Stile with the extrusion holes
in the top rail and the bottom transom rail and tighten all 4 screws until
ush and secure. Go back and tighten the screws in the bottom door
rail. See Figure 9.
Figure 9
Bottom
Top
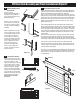
6. Attach Bottom Door
Rail to Stile
Insert one of the
Reinforcement plates (B) into
the bottom of the Stile into
the innermost chamber of the
Stile. See Figure 7.
Place 2 of the 4” screws into
the 2 holes in the outside of
the channel. Make sure they
are fully inserted. See Figure
7A & 7B.
Slide a reinforcement clip (D)
into the channel and over the
screw shafts. Make sure side
of the bottom rail with the
thinner channel is facing up
towards the inside of the door.
Place the end of the Bottom
rail ( C ) against the screws,
lining up the holes in the
extrusion. See Figure 7B
Once in place, tighten the
screws until stile and rail are
ush and secure.
Figure 7
Figure 7A
Figure 7B
Fig. 2A
Fig. 2B
Fig. 2C
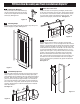
7. Insert Door Panels
Take the starter panel (L1) and
slide into the door frame below
the transom section. See
Figure 8. Make sure it ts snug
into the stile channel. Gently
tap into place with the rubber
mallet if necessary. Repeat
with the remaining panels (H),
making sure the tongue sides
of the panels are inserted rst.
Make sure the panels t snugly
and gently tap if necessary.
Refer to Door overview
for layout.
Bottom
Rail
TopRail
Side Stile
Starter Panel
Bottom
Rail
TopRail
Side Stile
Starter Panel
Bottom
Rail
TopRail
Side Stile
Starter Panel
Figure 8
Bottom
Rail
Middle
Rail
TopRail
Side Stile
Starter Panel
Starter Panel