
Instructions / Assembly
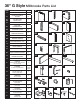

PVC Barn Door Assembly and Track Installation G Style 36”
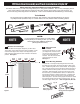
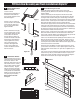
4. Assemble Top Rail
and Transom Section
Take the Top Rail (C1), making
sure the side with the large
holes is facing to the outside.
Place 2 of the 4” screws (Z)
through the outside channel of
the Top rail until fully inserted.
Place reinforcement clip (F)
onto screw shafts. Take one of
the vertical transom stiles (E2)
and line up the extrusion holes
with the screws. Tighten until
ush and secure. Do not over
tighten. Repeat with the other
transom stile (E2).
See Figure 3.
Snap the top (E3) and 2 side
gaskets (E4) into the center
transom channels. Take one of
the window panels (E5),
remove the protective paper,
and slide panel into the center
transom. Place bottom gasket
(E3) onto the center glass
panel. See Figure 4.
Attach the Bottom Transom
Rail (E1). Insert 2 of the 4”
screws (Z) into the large holes
in the rail until fully inserted.
Repeat with the other 2 screws
(Z). Line up the extrusion holes
in the transom stiles with the
screws and tighten until ush
and secure. Do not over
tighten. See Figure 5A.
Insert inner side gasket (E4)
and then the top and bottom
gaskets (E3) into the next
transom area. Slide a window
panel (E5) (paper removed) into
the gasket channels. Repeat
steps to insert the remaining
window panel. See Figure 5B.
Fig. 2A
Fig. 2B
Fig. 2C
Figure 3
Figure 4
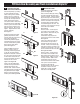
Figure 5A
Figure 5B
Figure 6
Figure 6A
Figure 6B
Figure 6C
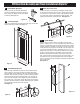
5. Attach Door Stile
Place side gasket onto window
panel. See Figure 5B.
Take one of the Stiles (A), making
sure the side with the large holes
is facing outward. Insert U bracket
(G) into the Top of the stile into the
outside channel and the innermost
channel. The side of the U clip with
the larger holes should be facing
the outside edge of the door. The
top of the U clip will rest on the top
of the stile once inserted.
See Figure 6.
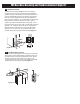
Place 2 of the 4” screws (Z) into
the 2 holes in the outside of the
Stile channel. Make sure they are
fully inserted. Slide a
reinforcement clip (D) into the
channel and over the screw shafts.
See Figure 6.
Insert two smalls crews (Q) into
the oval holes on top of the U
bracket and secure to the top of
the stile. Take 2 small screws (Q)
and secure into the oval hole in the
outside of U bracket (G). This will
be the outside channel of the stile.
See Figure 6A & 6B
Place 2 of the 4” screws (Z) into
the 2 holes in the outside of the
Stile channel at the bottom of the
window section. Make sure they
are fully inserted. Slide a small
reinforcement clip (F) into the
channel and over the screw shafts.
Line up the 4 screws inserted
through the Stile with the
extrusion holes in the top rail and
the bottom transom rail and
tighten all 4 screws until ush
and secure. See Figure 6C
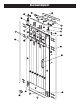
E3
E3
E4
E4
E5
E1
A
C1
E2
E2