
Instructions / Assembly

4.
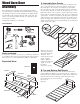
Secure Top and Bottom Rail Boards
Once all panels and boards are flush and square, secure the
top and bottom rail boards with the screws provided. Using the
clamps, secure all 4 corners. With the pre-drilled holes as your
guide, drill (1/8” bit) a shallow pilot hole into the 4 corner holes.
Do not drill completely through the door panel. Using
a screwdriver insert screws into the 4 corner pre-drilled holes.
Continue process with the remaining screws. Make sure all screws
are installed and secure but do not over tighten. Over tightening
can cause splintering in the wood. It is important to check that all
panels are still flush and square as you go.
5.
Secure Side Rail Boards
Once the top and bottom rail boards are installed, drill shallow
pilot holes in door panels through the side boards (using the pre-
drilled holes as a guide) and then with a screwdriver, secure with
the screws provided. Do not drill completely through the
door panel. Do not over tighten. Over tightening can cause
splintering in the wood. It is important to check that the board is
still flush as you go.
6.
Install Track Brackets
The door is now ready for the installation of the track brackets.
Note: If using the Wood Barn Door Track included in this kit,
please refer to the provided instructions prior to installing.
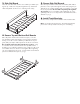
3.
Side Rail Board
Place the side rail boards onto the door with the pre-drilled open-
ing side up. Make sure it lays flush against the top and bottom
rail boards (Make sure there is no overhang on the sides).