Pigtronix Echolution User’s Guide All contents © Pigtronix 2006 tm
Index: Welcome………………………………………………………………..… Anatomy of the Echolution………………………………………. Getting Started…………..……………………………………………. Guided Tour…………..…….…………………………………………… Sample Settings……………………………………………………….. Limited Warranty…………………………………………….…….… Safety Precautions…………………………..………………………..
Welcome! Thank you for entering the realm of Pigtronix. Your Echolution pedal is a unique hybrid of analog and digital circuit design. Our goal in putting together this musical device was to provide the tonal richness of the finest analog echo machines with the flexibility of a programmable digital delay line. In keeping with Pigtronix tradition. The controls on the Echolution have been tuned to provide the fattest possible tone and widest range of musical possibilities.
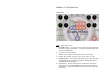
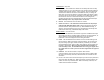
Anatomy of the Echolution: The Interface: Jacks: – Plug In and Turn On! 1. DC POWER 15VOLTS – Use only the 15-Volt, negative tip power supply that came with your Pigtronix Echolution. Using the wrong power supply could result in a damaged pedal. 2. IN – Plug in your instrument here. 3. STEREO – This is a phase inverted output for use in stereo setups. 4. OUTPUT – Effect output – Plug in your amp, mixer, DI box, etc. here. 5.
Footswitches - Step On It 7. TAP TEMPO – This footswitch is used to set the delay time when the Tap Tempo function is in use. The Echolution’s Tap Tempo function employs a complex math algorithm called a “rolling average” to set the delay time. This allows the musician to achieve remarkable accuracy in setting the delay time, as well as the ability to change the delay time quickly.
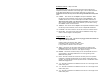
Modulation Controls – Warp Your Mind The modulation section of the Echolution allows both pitch (chorus) and amplitude (tremolo) modulation of the delay signal. This can add a beautiful, three-dimensional ambience to your sound, particularly in stereo. The modulation controls are only active when the green Modulation Delay LED is on. 14. CHORUS – - This control sets the depth of the pitch modulation. When turned fully counterclockwise, there will be no pitch modulation.
25. 1/3 - This switch introduces an additional echo at 1/3 of the length of the master delay time. 26. 2/3 - This switch introduces an additional echo at 2/3 of the length of the master delay time. 27. Phi – This switch realigns each fraction to a value that is derived from the Golden Ratio. More on this later. LEDs – Lighting the Way 28. – This LED indicates when the Tap Tempo delay mode is active, providing a visual representation of the delay time. 29. - This LED indicates when the effect is engaged. 30.
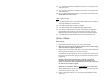
Guided Tour: The following steps guide you through the sonic palette of Echolution and show you how to get at the range of tones that it has to offer. Global Controls – Get a grip 1. Set all of the Echolution’s controls fully counterclockwise and set all of the toggle switches to the down (off) position. The Tap Tempo light should be blinking, but the other LEDs should be off. The Echolution is in bypass mode. Play your instrument and make sure your hear your clean sound. 2.
Modulation Delay (M) – Classic Analog Delay 11. Turn all of the modulation controls fully counterclockwise, put the BLEND control back to 12:00 and flip the “Delay Time Rage” switch to the M (medium) mode. Explore the range of the DELAY TIME control in this mode (100ms – 1.2sec). 12. Bring the DELAY TIME, LFO SPEED and CHORUS controls up to 12:00. You will now hear a modulated delay effect. Experiment with various LFO SPEED, DELAY TIME and CHORUS settings to grasp the range of available textures.
of music, then these multi-taps are quarter notes. Turn up the BLEND and DRIVE controls slightly and play another note. 19. Flip the 1/4, 1/2, 3/4 switches back down into the off position. Flip the toggle switches marked 1/3 and 2/3 to the on position. Play a single note. You will now hear three distinct echoes, the master delay at 1 second as well as the 1/3 and 2/3 taps. If you set the tap tempo to cycle once for each bar of music, then these multi-taps are triplets. 20.
LOOP – Come Again 29. Set the Modulation Delay Range switch to the long (L) setting. Put the Echolution in Modulation Delay mode by clicking the Modulation Delay footswitch. Bring the BLEND control back to 12:00 and turn off the reverse switch. 30. With the 3/4 tap turned on, play something and then flip the LOOP switch. Whatever was going through the delay line is now captured as a sample. 31. Turn on the other multi tap switches to change the rhythmic content of the loop. 32.
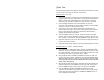
Sample Settings: Tap Tempo Analog DelAy Tap Tempo Golden DelAy
Spiral Delay Edge DelAy
Rhythm Delay (3 over 2) Deluxe Memory… Man
MXR Analog Delay Tape Echo SlapBack
Echo-plexi Stereo Chorus
Tremolo Delay Rotary Speaker Simulation
Tape Reverse Runaway Oscillation
Limited Warranty: Your Pigtronix effect pedal comes with a 1 year limited warranty on parts and workmanship. During the warranty period we will repair or replace, at our option, defective parts or pedals free of charge, and return them to the owner. Warranty service does not include damaged, modified, or misused pedals and such pedals will be subject to a standard repair charge. What we will not do: Pay for shipping or transportation charges from you to us, or pay for any international shipping charges.
Safety Precautions: Please be sure to observe these precautions. The safety precautions listed below are intended to ensure your safety whenever you use the equipment. NEVER OPEN THE CASE – Never try to separate the two pieces of the chassis from one another and/or modify the equipment. Opening this device will effectively void the warranty. STOP USE IN CASE OF PROBLEM – Stop using the equipment if ever you should notice smoke or a strange odor coming from it.