
User Manual


OPERATION OF THE IPROBE
1
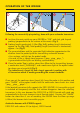
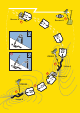
Following the successfully pin pointing, done with your avalanche transceiver:
■ Just turn the main switch on your iPROBE to “ON” and start grid shaped
probing (perpendicular to the surface of the snow). (Fig.1)
■ Probing length mechanical: 2,25m (Fig. 2-A), probing length electronical:
approx. to 2m (Fig. 2-B); Total probing length (mechanical + electronical):
approx. 4 m (Fig.2)
■ The generated tone and the generated light indication approximates the
distance from the probe tip to the transmitting avalanche beacon:
>2m: no tone, not light on the probe handle
<2m and >0,5m: a steady tone sequence (“piep__piep__piep_”)
is generated and the lights are blinking synchronously
■ Once the probe Tipp is getting closer than 50cm to the transmitting beacon,
a continuous tone („Piiiiiiiiiiiiiip”) and a continuous light of the optical indica
tor shows you a target hit! (Fig.3)
The indication of a target hit and a target approach is working with
all transceiver which is working according the current standards.
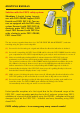
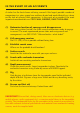
Once you get the continous tone (target hit), keep the probe in this position and
press “MARK” at the probes handle until the continuous tone chanes to a short
“piep___piep___pieps…”.
If the located transceiver fully supports the PIEPS iPROBE, it’s transmitting signal
is switched off temporarly and the first victime disappears from the searching
transceiver. In this case beacons like PIEPS DSP or PIEPS Freeride will guide you
automatically to the next strongest signal (buried victim). Pressing the “MARK”
button for more than 2 sec. or removing the iPROBE from the close-up range
(>50cm) the beacon starts transmitting again.
Avalanche beacons with iPROBE support:
PIEPS DSP with release 5.0 (or higher), PIEPS Freeride
2 3