User Manual PIEGA P SUB 4 Version 1.
“Music. That‘s really the only important issue when it comes to loudspeakers....“ In our view, the superior loudspeaker is the one that does not interfere. One that adds no sound of its own. That accurately and naturally conveys what was played in the concert or recording studio. Since 1986 we have been working to perfect this ideal – with a pioneering spirit, inventiveness and exacting craftsmanship. You will now be able to hear for yourself how far we have succeeded.
Contents PIEGA P SUB 4 User Manual This user manual describes how to connect the PIEGA P SUB 4 active subwoofer to different loudspeaker configurations and the appropriate setting options for optimum operation in stereo and home cinema mode. It also contains instructions for unpacking and setting up the P SUB 4. 4 Precautions Before unpacking... 5 Unpacking the P SUB 4 Instructions for unpacking... 6 Installation Instructions Recommendations for ideal positioning...
Precautions PIEGA P SUB 4 Before unpacking... Please read this user manual carefully and pay special attention to the following precautions and warnings. In your own interest, we advise you to strictly observe the following procedure when installing your new PIEGA P SUB 4.
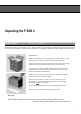
Unpacking the P SUB 4 PIEGA P SUB 4 Instructions for unpacking... Special care was taken in the packaging of your P SUB 4 in order to ensure that this new PIEGA quality product reaches your living room safely and undamaged. In order to avoid any damage when unpacking the loudspeaker, follow closely the instructions below. Procedure: >Before unpacking, remove any jewelry such as watches, rings, bracelets etc.
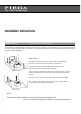
Installation Instructions PIEGA P SUB 4 Recommendations for ideal positioning... The P SUB 4 can be installed flexibly and easily. Due to its relatively small size, it can be integrated in any unit and can be positioned as required virtually anywhere in the room. However, to ensure the most natural sound, the P SUB 4 should be placed on the floor near the two front loudspeakers.
Connection Options PIEGA P SUB 4 Connection terminal for different applications... Its large range of connection options offers the P SUB 4 a large number of configurations both for stereo and for surround mode. Refer to the appropriate user manual supplied for specific information on the loudspeakers used and components of your stereo or surround system.
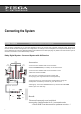
Connecting the System PIEGA P SUB 4 Configuration example for surround mode This connection configuration for 5.1 surround applications uses an AV receiver with a separate subwoofer output. Since the AV receiver handles the bass management in this configuration, the settings for each loudspeaker can be adjusted individually via the menu. Note that in this case, the LOW PASS setting of the P SUB 4 has no effect (see page 13).
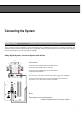
Connecting the System PIEGA P SUB 4 Configuration example for stereo and surround mode The 5.1 receivers and power amplifiers of some manufacturers have a separate NF Out socket for connecting a subwoofer. This enables the signal to reach the subwoofer without any amplification. Refer to the appropriate manual for information about operation and connection options for your AV receiver/power amplifier.
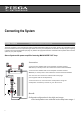
Connecting the System PIEGA P SUB 4 Configuration example for stereo mode The power amplifiers of some manufacturers feature separate MAIN IN and PRE OUT terminals, allowing the preamplified signal to reach the subwoofer and to be looped back again filtered. In this way the loudspeakers are relieved in the deep range, thus gaining in precision and sound characteristics (see page 13). Refer to the appropriate manual for information about operation and connection options for your power amplifier.
Connecting the System PIEGA P SUB 4 Configuration example for stereo mode This is a widely used configuration for stereo mode, although it is not recommended for surround mode since there is a risk of overloading with small satellite loudspeakers. With this configuration, the connection is made to the amplifier. Refer to the appropriate manual for information about operation and connection options for your power amplifier.
Connecting the System PIEGA P SUB 4 Configuration example for stereo mode Commonly used configuration in stereo mode with the loudspeakers (parallel) connected to the subwoofer. Refer to the appropriate manual for information about operation and connection options for your stereo amplifier.
Settings of the Sound Characteristics PIEGA P SUB 4 Setting options for individual requirements... Thanks to the use of the most advanced active electronics, your new P SUB 4 is a cutting edge product in the field of subwoofers. The connection and setting options provided on the P SUB 4 allow the best possible connection to your stereo or surround sound system and can be adapted to your individual audio requirements. LEVEL MIN. MAX.
Daily Use PIEGA P SUB 4 Care and maintenance From development to production, right down to quality testing, PIEGA only uses materials and components of the highest quality. Your new P SUB 4 has a polished aluminum surface. As this material is very sensitive, it should be treated with due care.
Warranty Conditions PIEGA P SUB 4 Service- and warranty conditions The warranty is limited to six years on our loudspeakers and three years on our electronics in accordance with the conditions stated below. Read through the service and warranty conditions carefully, especially the warnings concerning the purchase of PIEGA loudspeakers from unauthorized dealers. Warranty conditions 1. Every Piega device leaves the factory in perfect condition.
CONFORMS TO UL STD. 6500 CERTIFIED TO CAN/CSA STD. E60065 Tel.: +41 44 725 90 42 Fax: +41 44 725 91 92 www.piega.ch mail@piega.ch Subject to modification, in particular technical modifications All specifications without guarantee © Copyright 2004 by PIEGA SA, Switzerland Design by Piega - All rights reserved v1.