
User manual


20
4. Starting of the Stars Projector
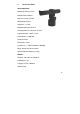
1.With the supplied Mounting accessories, you can attach the
mounting plate to a wall or wood panel. The star-projector can
be adjusted with the help of the base in any direction. (figure. 1)
2. Insert the jack into the appropriate socket of the star-projector.
Make sure that the plug is inserted in the socket of the star-
projector sits.
3. Put the power supply pack plug in a 110 - 230 V (50-60Hz)
power socket. The Stars Projector is now switched on.
4. Change the projection picture by hoisting the screen blades at
the lateral attached levers. (figure. 3)