ManyTronic® Dual-Sternenprojektor Micro-Stars Herzlichen Glückwunsch, dass Sie sich für den ManyTronic® DualSternenprojektor entschieden haben. Mit Ihrem patentierten Sternenprojektor lässt sich der nächtliche Sternenhimmel künstlich in einer bisher nicht erreichten Authentizität und Wirkungskraft auf jeder beliebigen Projektionsfläche im Innen- und Außenbereich abbilden.
1. Sicherheitshinweise Verwendungszweck: Der Dual-Sternenprojektor ist für die Projektion eines künstlichen Sternenhimmels auf Oberflächen bestimmt. Warnung: Bei diesem Sternenprojektor handelt es sich um ein Gerät der Laserklasse 1 nach DIN EN 60825-1:2008-05. Bei Beschädigung des Gehäuses oder der Optik kann unter Umständen Laserstrahlung einer höheren Laserklasse als 1 austreten, die für das Auge gefährlich ist.
Hinweise: • Betreiben Sie den Sternenprojektor nicht in explosionsgefährdeten Bereichen. • Betreiben Sie den Sternenprojektor nicht unter Wasser. Das Eindringen von Wasser kann zu Funktionsstörungen oder dauerhaften Schäden führen. • Lassen Sie Reparaturen an dem Sternenprojektor nur von einer autorisierten Fachwerkstatt oder dem ManyTronic® Kundendienst durchführen. • Nehmen Sie keine Veränderungen am Sternenprojektor vor.
2. Beschreibung / Funktionsweise Ihr ManyTronic® Dual-Sternenprojektor ist mit einer HochleistungsLaserdiode der neuesten Generation sowie einem diffraktiven optischen Element (DOE) ausgerüstet, welches es Ihnen ermöglicht, den nächtlichen Sternenhimmel in einer bisher nicht erreichten Authentizität, Brillanz und Wirkungskraft auf eine Oberfläche zu projizieren. In ungetrübter Luft sind die Laserstrahlen nicht erkennbar, sondern nur die Sternenpunkte auf der angestrahlten Oberfläche. Jedoch ist es z.B.
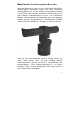
3. Abbildungen Drehbarer Standfuß Abbildung 1: Ausrichtung des Lasers auf dem Standfuß Für die Verstellung benötigen Sie einen INBUS Schlüssel der Größe 2 und 3. (Im Lieferumfang enthalten) - Lösen Sie die M3 INBUS Schraube im oberen Teil der Halterung - Spreizen Sie die Halterung mit der M2 INBUS Schraube, falls der Sternlaser nicht in die Halterung passt.
Abbildung 2: Befestigung des Standfuß - Sockels - Lösen Sie die 3 INBUS Schrauben im untern Bereich der Halterung. - Entfernen Sie den Sockel durch herausziehen und nutzen Sie das beiliegende Montagezubehör zur Befestigung. - Stecken Sie den Standfuß auf den Sockel. - Drehen Sie den Standfuß in die gewünschte Projektionsrichtung - Befestigen Sie diesen durch andrehen der 3 INBUS Schrauben.
4. Inbetriebnahme des Sternenprojektors 1. Mit dem mitgelieferten Befestigungszubehör können Sie die Montageplatte an einer Wand bzw. Holzplatte anbringen. Der Sternenprojektor kann mit Hilfe des Standfußes in jede beliebige Richtung ausgerichtet werden. (Abb. 1) 2. Stecken Sie den Klinkenstecker in die dafür vorgesehene Buchse des Sternenprojektors. Vergewissern Sie sich das der Stecker fest in der Buchse des Sternenprojektors sitzt. 3.
5.
6. Garantiebedingungen Dieses Gerät wurde mit modernsten Fertigungsverfahren hergestellt und sorgfältig geprüft. Alle ManyTronic® Produkte unterliegen einer strengen Qualitätskontrolle. Sollte dieses Produkt trotzdem nicht einwandfrei funktionieren, bedauern wir dies sehr und bitten Sie, sich an die auf der letzten Seite aufgeführte Serviceadresse zu wenden. Für die Geltendmachung von Garantieansprüchen gilt Folgendes: Die Garantiezeit beträgt 12 Monate ab dem Tag des Kaufdatums.
7. Entsorgung / Recycling Werfen Sie den Dual-Sternenprojektor keinesfalls in den normalen Hausmüll. Entsprechend der EU-Richtlinie 2006/95/EG über Elektround Elektronik-Altgeräte muss das Gerät einer geordneten Entsorgung zugeführt werden. Sie können das Produkt an jeder öffentlichen Sammelstelle Ihrer Stadt oder Gemeinde abgeben.
8. Technische Daten Sternenprojektor: Betriebsspannung: 3V DC Betriebsstrom: 300 mA Optische Leistung: 5 mW Wellenlänge: 532nm Anlaufzeit: < 15 min Betriebstemperatur:10-35°C Leistungstoleranz: ± 20% bei 15-30°C Lagertemperatur: -40 bis +70°C Lebensdauer: >5.000 Std.
ManyTronic® Dual-Sternenprojektor Micro-Stars Congratulations that you have decided in favor of the ManyTronic® Dual- Stars Projector. With your patented Stars Projector the nightly starry sky can be represent artificial in a so far not achieved authenticity and effective force on any projection screen in the interior and outskirt area. The Stars Projector captivates by its handy design, small energy consumption, extraordinary flexibility and easy handling: „Setting up, illuminate and ready“.
1. Safety Instructions End Use: The Dual- Stars Projector is intended for the projection of an artificial starry sky on surfaces. Warning: This Stars Projector is an apparatus of the laser class 1 according DIN EN 60825-1:2008-05. In the case of damage of the housing or the optics laser radiation of a higher laser class than 1 can possibly leak from, which is dangerous for the eye. Do not switch on the apparatus, if a damage at the housing or the optics exist.
Details: • Do not operate the Stars Projector in explosive areas. • Do not operate the Stars Projector under water. The penetration of water can lead to malfunction or permanent damage. • Leave repairs at the Stars Projector only from an authorized professional shop or from the ManyTronic® customer service. • Do not make changes at the Stars Projector. • From inappropriate operation or use as well as from changes at the Stars Projector substantial dangers can result.
2. Description / Functionality Your ManyTronic® Dual-Stars Projector is equipped with a highpower laser diode of the newest generation as well as one within the mµ-range optical element, which it makes possible for you to project the nightly starry sky in a so far not achieved authenticity, brilliance and effective force on a surface. In clear air the laser radiation are not recognizable, but only the stars dots on the floodlit surface.
3. Illustration Swivel stand Figure 4: Alignment of the laser on the base For the adjustment you need a Allen Key of size 2 and 3. (Included in delivery) - Loosen the M3 Allen screw in the upper part of the bracket - Spread the holder with the M2 Allen screw, if the star laser does not fit in the holder. - Put the star laser through the mount - Rotate the laser as desired and then loosen the M2 Allen screw to remove the spreading. - Fix the laser, by turning the M3 Allen screw.
Figure 5: Base Mounting - Remove the 3 Allen screws in the bottom of the Holder - Remove the base by pulling out and using the supplied Mounting accessories for fixing. - Put the foot on the base. - Turn the base in the desired direction of projection - Fixing the base by tightening the 3 Allen screws. Figure 6: Adjusting the Projected Image You can move the projected image of the laser set by the panel.
4. Starting of the Stars Projector 1.With the supplied Mounting accessories, you can attach the mounting plate to a wall or wood panel. The star-projector can be adjusted with the help of the base in any direction. (figure. 1) 2. Insert the jack into the appropriate socket of the star-projector. Make sure that the plug is inserted in the socket of the starprojector sits. 3. Put the power supply pack plug in a 110 - 230 V (50-60Hz) power socket. The Stars Projector is now switched on. 4.
5. Functional test/ Error Search Failure Possible cause Error Recovery No projection picture Power supply pack not connected Connect power supply pack Power supply pack plug is not attached correctly in the Stars Projector Push the plug further more in the Stars Projector Screen blades completely closed Open the screen blades still more Temperature outside not within the operating temperature range Ensure operating temperature (10-35°C) Too high or low temperatures.
6. Warranty conditions This apparatus was manufactured with most modern manufacturing methods and tested carefully. All ManyTronic® products are subject to a strict quality control. If this product should nevertheless operate not perfect, we regret this much and ask you to contact the service address mentioned on the last page. For the assertion of warranty claims the following is valid: The warranty period is 12 month from the day of purchase date.
7. Disposal / Recycling Do not at all throw the Dual- Stars Projector into the normal household waste. According to the European Union Directive 2002/96/EG about electric- and electronics –old devices the apparatus must be supplied to an orderly disposal. You can deliver the product at each public collecting point of your city or community.
8. Specifications Stars Projector: Operational voltage: 3V DC Operational current: 300 mA Optical power: 5 mW Roughness spacing: 532 nm Starting time: < 15 min Operating temperature:10-35°C Capacity tolerance: < 20% at 15-30°C Storage temperature: -40 to +70°C Life span: 5.