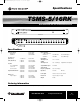
TSMS516RK Manual.qxd 4/12/05 2:56 PM Page 1 TSMS-5/16RK Rack-Mounted 14V/18V Satellite Multiswitch Installation and Operation Manual Ph: 800-421-6511 www.picomacom.com Operation Manual Rev.
TSMS516RK Manual.qxd 4/12/05 2:56 PM Page 2 Safeguards TSMS-5/16RK Product Inspection Inspect the equipment for shipping damage. Should any damage be discovered, immediately file a claim with the carrier. Important Safety Instructions To insure proper installation and operation, take a moment to read this guide before proceeding with the installation.
TSMS516RK Manual.qxd 4/12/05 2:57 PM Page 3 Safeguards TSMS-5/16RK 11. Power Sources: This product should be operated only from the type of power source indicated on the marking label. If you are not sure of the type of power supplied to your home, consult your appliance dealer or local power company. 12. Power-cord Protection: Power-supply cords should be routed so they are not likely to be walked on or pinched by items placed upon or against them.
TSMS516RK Manual.
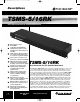
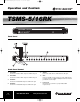
TSMS516RK Manual.qxd 4/12/05 2:57 PM Page 5 Specifications TSMS-5/16RK Rack-Mounted 14V/18V Satellite Multiswitch Front View Rear View Specifications Frequency Range Antenna In Satellite In Insertion Loss (Antenna In) Gain (Satellite In) Isolation Cross Polarization Out to Out Sat In to Sat In Stop Band Attenuation Return Loss Input / Output 40-2150 MHz 40-806 MHz 950-2150MHz Input Capability 1 dB Compression Antenna In Satellite In 106 dBuV min. 108 dBuV -1.5 dB max.
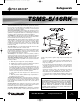
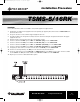
TSMS516RK Manual.qxd 4/12/05 2:57 PM Page 6 Operation and Controls TSMS-5/16RK Front Panel Back Panel Control 1. 18V 22KHz: Connect the 18Vdc 22 KHz output of a LNB to this port. 5. ANT IN: Connect the cable from a off-air antenna to this port. 2. 14V 22KHz: Connect the 14Vdc 22 KHz output of a LNB to this port. 6. 3. 18V 0KHz: Connect the 18Vdc 0KHz output of a LNB to this port. OUT: Connect a satellite receiver to this port.
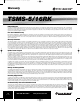
TSMS516RK Manual.qxd 4/12/05 2:58 PM Page 7 Installation Procedure TSMS-5/16RK Installation It is recommended that assistance be available to safely install equipment in equipment racks. 1. Install chassis in equipment rack (equipment rack sold separately) by supporting the bottom and rear of TSMS-5/16RK at the desired elevation in rack. 2. Line up the side holes of chassis with the tapped equipment rack holes. 3.
TSMS516RK Manual.qxd 4/12/05 2:58 PM Page 8 Warranty TSMS-5/16RK Limited Warranty Pico Macom warrants to the original purchaser that all of its new products are of sound design, quality materials and workmanship at the time of manufacture and will be free from related defects for one year from the original purchase date.