Chest Compression System Instructions for Use US version 100057-00 F, VALID FROM CO J2256
Important user information All users must read and fully understand the entire Instructions for Use before operating LUCAS™ Chest Compression System. The Instructions for Use should always be easily accessible to the users of LUCAS. Always follow local and/or international guidelines for CPR when using LUCAS. The use of other medical equipment or drugs in conjunction with external chest compressions may reduce the effect of compressions.
Table of Contents IMPORTANT USER INFORMATION .......................................................................................... 2 1 INTRODUCTION..............................................................................................................5 1.1 1.2 1.3 1.4 1.5 1.6 1.7 1.8 1.9 1.10 1.11 1.12 INTENDED USE ...............................................................................................................................5 CONTRAINDICATIONS ..................................
APPENDIX B - LUCAS STABILIZATION STRAP................................................................ 29 INSTRUCTIONS FOR USE ..................................................................................................................... 29 1 INTRODUCTION ........................................................................................................... 30 1.1 1.2 1.3 1.4 1.5 1.6 OVERVIEW .....................................................................................................
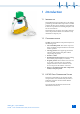
1 Introduction 1.1 INTENDED USE LUCAS Chest Compression System is to be used for performing external cardiac compressions on adult patients who have acute circulatory arrest defined as absence of spontaneous breathing and pulse, and loss of consciousness. LUCAS must only be used in cases where manual chest compression would be used. LUCAS is only intended for temporary use. 1.
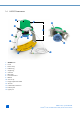
1.4 LUCAS COMPONENTS q w i e h r o s a t g f y u 1. 2. 3. 4. 5. 6. 7. 8. 9. 10. 11. 12. 13. 14. 15.
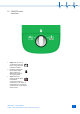
1.5 ON/OFF-KNOB, POSITIONS 1. Adjust: The suction cup can be adjusted to fit the patient, using the height adjustment handles. 2. Lock: The compression mechanism is locked. This is used during defibrillation and when moving the patient. 3. Active: This is the operating position. When LUCAS Chest Compression System is connected to an air supply of specified capacity, it performs compressions at a rate of about 100 per minute.
1.6 DESCRIPTION 1.6.1 h MAIN PARTS LUCAS consists of an upper part (h) and a back plate (u). The back plate is placed underneath the patient to form a support for the external chest compressions. The upper part contains a pneumatically driven piston rod, which acts on the patient’s chest via a pressure pad. The pressure pad is surrounded by a suction cup. t The support legs (t) of the upper part are fastened to the back plate prior to starting compressions. 1.6.
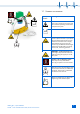
1.7 SYMBOLS ON THE DEVICE Symbol/ Location Meaning Caution – see instructions for use. All users must read the entire Instructions for Use before operating LUCAS Chest Compression System. Year of manufacture. WARNING – Crushing hazard. The pressure pad and suction cup are drawn into the bellows with high force when LUCAS is connected to an air supply. Keep all body parts away from the suction cup, the bellows and the height adjustment handles when connecting the air hose, and during operation.
1.8 DELIVERED ITEMS Before using LUCAS Chest Compression System, make sure that the following items are delivered: 1. 2. 3. 1.9 q LUCAS in carrying bag together with Instructions for Use. Pressure regulator. LUCAS Stabilization Strap (packed in carrying bag). THE LUCAS TEAM It is strongly recommended that qualified personnel work in teams of two. This enables one person to perform cardiopulmonary resuscitation (CPR) while the other person unpacks LUCAS Chest Compression System.
1.10 BACKGROUND 1.11 CHEST COMPRESSIONS USING LUCAS The single most common cause of death in western society is cardiovascular disease either on its own or as a contributory factor. In situations where it is possible to use LUCAS Chest Compression System, many of the problems with manual chest compressions can be eliminated. There is only a short space of time after the heart stops during which it is possible to reverse the situation and restore spontaneous circulation.
2 Warnings and precautions Important This section contains safety information. All users must read this section before using LUCAS Chest Compression System and observe the safety information at all times during use. Sections 2.1 to 2.5 summarize warnings and precautions during assembly and use of LUCAS Chest Compression System. Additional hazards are described in relevant sections of the Instructions for Use.
2.3 CONNECTION TO AIR SUPPLY WARNING – INTERRUPTING AIR SUPPLY TO LIFE SUPPORT DEVICES If other life support equipment is disconnected from the air supply, serious injury or death may result. Never remove attachments to air outlets without first checking that this will not put a patient at risk. WARNING – EMPTY AIR SUPPLY When the air in the cylinder runs out, the pressure falls and compressions delivered by LUCAS lose force. 2.
3 Using LUCAS w LUCAS Chest Compression System should be used to treat patients following the same routines as for manual CPR. This section describes the use of LUCAS. It is divided into nine steps: 1. 2. 3. 4. 5. 6. 7. 8. 9. e 3.
3.2.2 CONNECTING THE AIR WARNING – INTERRUPTING AIR SUPPLY TO LIFE SUPPORT DEVICES If other life support equipment is disconnected from the air supply, serious injury or death may result. Never remove attachments to air outlets without first checking that this will not put a patient at risk. WARNING – CRUSHING HAZARD The suction cup is drawn into the bellows with high force when the air hose is connected.
t 3.3 ASSEMBLY WARNING – LETHAL PINCH HAZARD If the air is connected during the assembly procedure, and the ON/OFF-knob is in the Active position, the compressions may seriously injure the patient or create conditions leading to death of the patient. Always follow the described sequence of air connection and assembly. 1. y u Take the back plate out of the bag and approach the patient (Figure t). 2. Instruct those carrying out CPR to interrupt chest compression. 3.
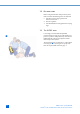
3.4 ADJUSTMENT o 3.4.1 INTRODUCTION To achieve effective compressions, it is very important that the suction cup is positioned correctly on the patient (Figure o). The lower edge of the suction cup should be positioned immediately above the end of the sternum. The suction cup should be centred over the sternum (Figure a). 3.4.
3.5 OPERATING LUCAS CHEST COMPRESSION SYSTEM 3.5.1 STARTING COMPRESSIONS When the position of the suction cup is correctly adjusted according to Section 3.4, LUCAS can be switched on: 1. ACTIVE Turn the ON/OFF knob to Active will now give chest compressions. . LUCAS WARNING – PATIENT INJURY OR DEATH Do not leave the patient or device unattended while LUCAS is active. 2. 3. LOCK Check that the device is working as it should regarding frequency and compression.
3.6 DEFIBRILLATION WARNING – INCORRECT ECG ANALYSIS Compressions interfere with ECG analysis. Switch off LUCAS before ECG analysis. Make the interruption as short as possible WARNING – INADEQUATE COMPRESSION Patient’s movements may change adjustment of suction cup. Verify position of suction cup after defibrillation, re-adjust if necessary. h Note: Self-adhesive electrodes should be used during defibrillation as these make it easier to work with LUCAS.
3.7.2 LIFTING THE PATIENT At least three people should lift the patient and LUCAS – one should support the patient’s head and there should be one person on each side. Plan carefully before lifting the patient. Consider which equipment needs to be moved and where to place the stretcher. k LOCK Those at the side should lift with one hand beneath the claw locks of the back plate. The other hand should be used to lift the patient’s belt, trouser or under the thigh.
3.7.4 MOVING PATIENT ON TILTED STRETCHER In situations where conditions do not allow the chest to remain horizontal: 1( LOCK 1. 2. 3. Turn the ON/OFF knob to Lock to pause compressions (Figure 1(). As soon as the patient is in horizontal position, check the position of the suction cup and adjust if necessary (see Section 3.4). Turn the ON/OFF knob to Active . 3.7.5 AMBULANCE TRANSPORT Make sure that the patient is fixed when using LUCAS Chest Compression System during ambulance transport.
3.9 REMOVING LUCAS FROM THE PATIENT To remove LUCAS Chest Compression System from the patient after treatment: 1. 2. 3. 4. 5. 6. Switch off the device by turning the ON/OFF knob to Adjust . Raise the suction cup and place the height adjustment handle in its uppermost position. If available, close the air valve, and disconnect the air hose from the air source. To detach LUCAS Stabilization Strap, disconnect the support cushion straps from the device straps.
4.1.3 DISINFECTION WARNING – HAZARDS DURING DISINFECTION Always wear appropriate protective clothing during disinfection of LUCAS. Follow the handling instructions from the manufacturer of the disinfectant. The normal cleaning procedure is sufficient after “normal” soiling. If LUCAS is blood-stained or if an infectious patient has been treated, the device should also be disinfected using 45% isopropyl alcohol with added detergent. 4.1.
5 Packing away the device 2) After cleaning and, if necessary, disinfection, pack LUCAS Chest Compression System into the carrying bag: 1. 2. 3. 4. 5. 24 Place the back plate in the larger pocket at the bottom of the bag. Lay the upper part in the bag with the hood towards the open end. Place the support cushion of LUCAS Stabilization Strap in front of the suction cup. Roll up the air hose and place it on top of the device (Figure 2)). Close the bag.
6 Technical specification 2! 6.1 OPERATION Power source Air Air consumption 13.7 gallons/minute (52 litres/minute) Air hose Permanently attached, 10.8 feet (3.3 m) in length, with unique male connector. Approved air Pressure regulators or wall outlets for air sources for use (medical grade/breathing quality) should with LUCAS meet the following specifications: 1. Nominal supply pressure: 46-87 PSI (3.17-6 bar). 2@ 2.
6.1.1 CHECKING A PRESSURE REGULATOR If a flow rate performance diagram exists: 1. 2$ 2. 3. 4. Check that the nominal output pressure for the pressure regulator is within 46-87 PSI (3.17-6 bar). Find the regulator output pressure (Bar) in Figure 2$ and obtain the minimum free flow rate (L/min) from the diagram. The example in Figure 2$ shows a regulator output pressure of 66.7 PSI (4.6 bar).
6.2 COMPRESSIONS Patients suitable for treatment Adult patients with a sternum height of 7.5 inches to 11.9 inches (190 to 303 mm) and a maximal width of 17.7 inches (449 mm) who fit into the device. The device is not suitable for use with children. Depth of compression Compresses the sternum by 2 inches (5 cm) Frequency 90-110 comp/min. with air at +59 °F to +95 °F (+15 ºC to +35ºC) 6.
Appendix A WEEKLY CHECK AND CHECK AFTER USE, LUCAS Use this protocol for the weekly check on the device and the check after use. Store the completed checklist. Copying of this sheet is permitted. Date: Action Approved signature Adjustments carried out Serious problem Check that the device is clean. Check that the air hose is not cracked and fits tightly to LUCAS. Check that the connector(s) is/are present and undamaged. Check that the ON/OFF knob is in the Adjust position.
Appendix B - LUCAS Stabilization Strap LUCAS Stabilization Strap Instructions for Use US version 100057-00 F, ©JOLIFE AB 2007 LUCASTM CHEST COMPRESSION SYSTEM, INSTRUCTIONS FOR USE—APPENDIX B, LUCAS STABILIZATION STRAP 29
1 Introduction 1.1 OVERVIEW LUCAS Stabilization Strap is intended to be used in conjunction with LUCAS Chest Compression System to provide means of stabilizing LUCAS relative to the patient when LUCAS is active. LUCAS Stabilization Strap will prevent downward movement of LUCAS during operation. LUCAS Stabilization Strap can be used in most situations where LUCAS Chest Compression System is used. 1.
1.5.2 USING LUCAS STABILIZATION STRAP When compressions with LUCAS Chest Compression System have been started, the support cushion is placed under the patient’s neck, and the support cushion straps are fastened to the device straps. See instructions in Section 4. 1.6 THE LUCAS TEAM Two persons are required when attaching LUCAS Stabilization Strap, and at the same time monitoring the operation of LUCAS.
2 Preparing LUCAS Stabilization Strap for use 3 Warnings and precautions Important This section contains safety information. All users must read this section before using LUCAS Stabilization Strap and observe the safety information at all times during use. Before the first use of LUCAS Stabilization Strap, attach both device straps to the support legs, using the following procedure: 1. 2. 3. Fold the device strap around the support leg.
4 Using LUCAS Stabilization Strap 4.1 INTRODUCTION This section gives instructions for attaching LUCAS Stabilization Strap to LUCAS Chest Compression System during treatment of a patient with LUCAS. Please refer to LUCAS Chest Compression System, Instructions for Use, for details on the use of LUCAS. Always work in a pair, one person on each side of the patient. Figure 5. The LUCAS team, working on each side of the patient. 4.
1. 2. 3. Lift the patient’s head carefully and place the support cushion under the patient’s neck, as close to the patient’s shoulders as possible. Move the buckles on the device straps towards the patient’s head. Connect the buckles on the support cushion straps to the device straps. Make sure that the straps are not twisted. WARNING – LIFTING THE PATIENT LUCAS Stabilization Strap must never replace a person supporting the patient’s head.
5 Care after use This section describes the routines that should be performed by the user after each use of LUCAS Stabilization Strap, before packing it into the carrying bag. 5.1 CLEANING ROUTINES 5.1.1 1. 2. 3. NORMAL CLEANING PROCEDURE Clean all surfaces of LUCAS Stabilization Strap using a soft cloth, wetted in warm water containing a mild cleaning agent. Wipe all surfaces with a clean moist cloth. If necessary, remove the device straps from LUCAS and clean separately as described in step 1.
6 Packing away the Stabilization Strap After cleaning and, if necessary, disinfection, pack LUCAS Stabilization Strap together with LUCAS in the bag: 1. 2. 3. 4. Pack LUCAS according to instructions in LUCAS Chest Compression System, Instructions for Use. To speed up the next application of LUCAS Stabilization Strap, extend the support cushion straps by pulling the buckles to the end positions of the straps. Lift the air hose and place LUCAS Stabilization Strap in front of the suction cup.
Appendix C WEEKLY CHECK AND CHECK AFTER USE, LUCAS STABILIZATION STRAP Use this protocol for the weekly check on LUCAS Stabilization Strap and the check after use. Store the completed checklist. Copying of this sheet is permitted. Date: Action Approved, signature Adjustments carried Serious problem out Check that all parts of the Stabilization Strap are clean. Verify that the device straps are fitted correctly as shown in Figure 2. Make sure that the support cushion straps are extended.
100057-00 F, ©JOLIFE AB 2007 LUCASTM CHEST COMPRESSION SYSTEM, INSTRUCTIONS FOR USE—APPENDIX B, LUCAS STABILIZATION STRAP