
Manual


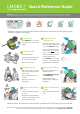

1 Activate (A)
• Push ON/OFF for 1 second to
start self-test and power up
LUCAS
2 Back Plate (B)
• Pause manual CPR
• Carefully put Back Plate under
the patient, below armpits
• Resume manual CPR
3 Compressor (C)
• Pull release rings once; claw
locks open. Then let go of the
release rings
• Attach to Back Plate; listen
for “click”
• Pull up once to ensure
attachment
4 Position the Suction
Cup
• Center the Suction Cup over
the chest
• The lower edge of Suction Cup
should be immediately above
the end of the sternum
5 Push down the
Suction Cup
• Push the Suction Cup down
with two ngers (make sure
it is in the ADJUST mode)
• Pressure pad inside Suction
Cup should touch patient’s
chest. If the pad does not
touch or t properly, continue
manual compressions
• Push PAUSE to lock Start
Position – then remove your
ngers from the Suction Cup
6 Start compressions
• Check for proper position.
Adjust if necessary
• Push ACTIVE (continuous)
or ACTIVE (30:2)
• LUCAS provides chest
compressions according to
guidelines.
7 LUCAS Stabilization
Strap
• Attach the LUCAS Stabilization
Strap
Quick Reference Guide
NOTE: This guide is not a complete Instructions for Use. Refer to the “Instructions for Use” for complete
directions for use, indications, contraindications, warnings, precautions, and potential adverse events.
Confirm cardiac arrest and start manual CPR with a minimum of interruptions until
LUCAS is applied and ready.
Always follow local and/or international guidelines for CPR when you use LUCAS.
ON/OFF
ON/OFF
ADJUST PAUSE
PAUS
E
ACTIVE
(continuous)
AC
TIVE
ACTIVE
(30:2)
AC
TIVE
JOLIFE AB, Scheelevägen 17, SE-223 70 Lund, Sweden, Tel: +46 (0) 46 286 50 00, Fax: +46 (0) 46 286 50 10, E-mail: info@jolife.com, jolife.com
LUCAS is a trademark of JOLIFE AB. Specications are subject to change without notice. CE 0434 © 2011 JOLIFE AB
ADJUST
•