
User's Manual Part 1

20
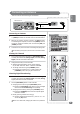
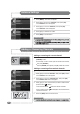
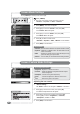
Press [P.MODE] to recall a pre-set screen type
Screen Mode Settings
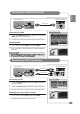
Screen Custom Mode Settings
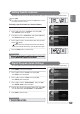
< Before Starting >
The <Mode> needs to be changed to <Manual> in the menu.
Press [
] and move to a menu, then press [OK].
-An additional adjustment bar will appear.
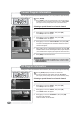
Press [
] and move to a location, then press [OK].
-Press [
] to move to <Brightness>, <Contrast>,
<Sharpness>, <Color> or <Tint>.
Press [EXIT] to exit the menu.
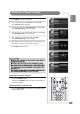
1
2
3
4
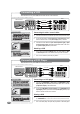
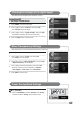
Adjusting the user screen
Press [MENU]. -The menu will appear.
Press [
] to move to <Picture>, then press [OK].
-The <Picture> Menu will appear.
Press [
] to move to <Mode>, then press [OK].
-The <Mode> Menu will appear.
Press [] to select a screen mode.
<Standard>, <Dynamic>, <Mild>, <Manual> can be selected
Press [EXIT] to exit the menu.
1
2
3
4
5
Press [P.MODE].
Each press of the button changes the picture mode from
<
Standard
>
➔
<
Dynamic
>
➔
<
Mild
>
➔
<
Manual
>
.
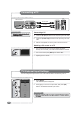
Screen Mode
■
Standard : The manufacturer default for the optimal conditions, status.
■
Dynamic : Select this for a brighter screen. You will be able to see the
screen more clearly.
■
Mild
:
Select this for a darker screen. It has the advantage of saving
power and making your eyes less tired.
■
Manual
: You can select your own defined screen setting conditions.
Screen Adjustment Menu
■
Brightness :
Brightens or darkens the screen
■
Contrast
:
Adjusts the difference in brightness between objects
and the background
■
Sharpness :
Controls blurring and transparency
■
Color
:
Controls the lightness or darkness of the colors
■
Tint
:
Adds red or green to the picture
Useful Tips
☛
Adjusted
values
will
be
save
as
a
<Manual>
mode
value.
☛
Screen
mode
and
custom
value
adjustments
will
be
saved
individually
(TV,
external
input
1,2,
S-Video
etc).