
Installation Instructions
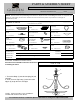

Canopy
Mounting
Screws
Top loop
1ea Φ153*32Hmm 2ea 8/32T*1-1/4"L 1ea Φ62*68Hmm
Chain
Wire connectors
Bottom cap
1ea 6ft*4.2mm 2ea Orange 1ea Φ70*11Hmm
Chain
connector
Canopy loop
and Canopy
loop collar
Nipple
2ea 23.8*59mm 1ea Φ25*45Hmm 2ea Φ12*55mm
Mounting Strap
Hex Nut
Finial
1ea 100mm*20mm 2ea Φ9mm*4mm 1ea Φ36*55Hmm
Part Needed Quantity
Part Needed Quantity
Reason why ( missing, scratched, broken glass, bent, bad finish)
Comments
F
IXTURE
A
SSEMBLY
I
NSTRUCTIONS
For Customer Service, contact the place of purchase to arrange for replacement parts.
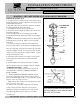
NOTE: INSTALL THE GLASS ASSEMBLY
AFTER THE FIXTURE IS HUNG.
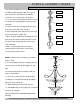
1. Thread the Body (L) onto the Coupling (M) and
until tight.
2. Then screw the Top Loop (J) to the threaded
Nipple (K) at top of Frame until tight.
8106-3P CDB
Read and review installation instruction sheet before
assembling the fixture.
Fig 1
Notice:
Please review the parts listing and check for all parts before assembling the fixture. If any parts are
missing or damaged, please note onthis sheet and contact the place of purchase to arrange for
replacement parts.
PARTS LIST
Company Name:_______________________Co. Account #:_____________
to be filled out by retailer
PARTS & ASSEMBLY SHEET
This fixture assembled PO:__________ Date: ________
Fixture Name: Torbellino 8106-3P CDB
K
L
M
N
J