
Manual

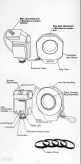


INSTALLING THE BATTERIES
Ensure that the ON/OFF switch is in the OFF Dosition. Slide
the battery compartment Lid toward the back of the flash until
the battery chamber is fully exposed. Insert 4 AA sized batteries
according to the battery polarity indication as shown inside the
battery chamber. Close the battery compartment lid by sliding
it towards the front of the flash.
MOUNTING THE MAIN CONTROLLER UNIT ONTO THE
CAMERA
Ensure that ON/OFF switch is at the OFF Dosition. Slide the
Hotshoe Base of the main controller unit onto the camera's hots hoe
and fasten the lock ring in an anti-clockwise motion. To detach the
flash unit, turn the locking ring in a clockwise motion until it stops.
Note:
If the camera Inbuilt flash Is in pop.up posH ion. close it before
mounting the flash unit.When attaching or removing the flash
unit, grasp the bottom of the flash to prevent damage to the
ho'shoe foot and the camera hotshoe.
MOUNTING THE RING LIGHT ATTACHMENT ON
THE CAMERA LENS
Check the diameter of the camera lens before mounting. If the
camera lens mounting diameter is 52mm, position the 52mm
threaded ring attachment directly onto the threaded camera lens
and use the Lens securing ring to rotate in a clockwise position
until it is reasonably secured.
In the event that the camera lens diameter is 58mm or 67mm,
use the included adaptor rings and secure it onto the 52mm
threaded ring attachment on the ring light attachment before
mounting it onto the camera lens. (Le. for 67mm thread, use the
67 -52mm adaptor and secure it onto the 52mm threaded ring
attachment before mounting it on to the camera lens).
OPERATING THE FLASH
Once the main controlling unit and the ring light attachment is
properly secured, slide the ON/OFF switch to the left. When the
ready lamp located the back of the flash light up, the flash is
ready to fire. Pressing the flash test button will fire the flash to
insure its operation.
USING THE AUTO CONFIRMATION INDICATOR
The green auto confirmation indicator located at the back of the
flash is used to ensure that your subject is within the effective
TTL range of the flash unit.
When the ready lamp is on, press the camera shutter release
button to fire the flash. If your subject is within the effective TTL
range, the green auto check lamp will illuminate for approximate 2
seconds indicating correct flash exposure has been obtained.
If the green auto check lamp does not illuminate, move closer to
the subject and try again.