
Instruction Manual


www.phocos.com 3 | P a g e
Any-Grid Battery
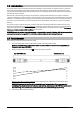
4. Ensure the battery modules are wired as outlined in the Shoto battery manual. Turn on the batteries:
5. Ensure the “ON/OFF” load power button of the Any-Grid(s) is in the ON position (depressed), but no loads are
connected:
The Any-Grid(s) should now be running, the display(s) on.
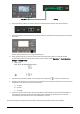
6. Apply the following setting on the Any-Grid to which the Shoto battery bank is connected with the
communication cable. This setting refers to the Any-Grid manual, chapter
Operation → Device Operation
Settings → Settings menus.
•
Battery type
Menu 05: RS-485 (MODBUS RTU) battery
7. Once the setting has been applied, exit the settings menu by pressing to return to the main view.
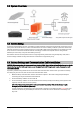
8. Activate the circuit breakers or insert the fuses to energize the various inputs and outputs on the Any-Grid in
the following order (skip any that are not connected):
a) AC input
b) PV input
c) AC output
9. If you are using more than one Any-Grid, this procedure ensures that the unit to which the Shoto battery is
connected, will communicate with the Shoto battery BMS. Automatically, the battery type of all other
connected Any-Grid units will be set to “User-defined”, this is normal.
The commissioning and programming of the battery-related settings of the Any-Grid is now complete.