SW3700 © & ™ Lucasfilm Ltd.
7 1 8 2 3 4 9 5 10 6
empty page before TOC
English 6 Français (Canada) 20
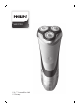
English Introduction Congratulations on your purchase and welcome to Philips! To fully benefit from the support that Philips offers, register your product at www.philips.com/welcome. Please read this user manual, as it contains information about the features of this shaver as well as some tips to make shaving easier and more enjoyable. General description (Fig.
English 7 Warning - To charge the battery, only use the detachable supply unit (HQ850) provided with the appliance. - The supply unit contains a transformer. Do not cut off the supply unit to replace it with another plug, as this causes a hazardous situation. - Children shall not play with the appliance. Cleaning and user maintenance shall not be made by children without supervision. - Always unplug the shaver before you clean it under the tap. - Always check the appliance before you use it.
English - If your shaver comes with a cleaning system, always use the original Philips cleaning fluid (cartridge or bottle, depending on the type of cleaning system). - Always place the cleaning system on a stable, level and horizontal surface to prevent leakage. - If your cleaning system uses a cleaning cartridge, always make sure the cartridge compartment is closed before you use the cleaning system to clean or charge the shaver.
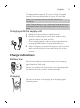
English 9 Charging takes approx. 8 hours. A fully charged shaver has a shaving time of up to 40 minutes. Note: You cannot use the shaver while it is charging. Note: Depending on your shaving/styling behavior and beard type, the operating time may vary over time. Charging with the supply unit 1 Make sure the shaver is switched off. 2 Put the small plug in the shaver and put the supply unit in the wall socket. - The charging light on the shaver indicates the charging status (see 'Charge indications').
English Battery fully charged When the battery is fully charged, the charging light lights up green continuously. Note: After approx. 30 minutes, the charging light goes out to save energy. Using the shaver Always check the shaver and all accessories before using. Do not use the shaver or any accessory if it is damaged, as this may cause injury. Always replace a damaged part with one of the original type. This symbol indicates that the product can be rinsed under running tap water.
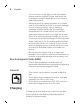
English 11 Start-up sequence When you press the on/off button for the very first time, the charging light flashes in an irregular pattern. Charge the shaver before use. Switching the shaver on and off 1 To switch the shaver on or off, press the on/off button once. Dry shaving 1 Switch the shaver on. 2 Move the shaving heads over your skin in both straight and circular movements to catch all hairs growing in different directions. Exert gentle pressure for a close comfortable shave.
English 1 Push the trimmer release slide switch downwards to open the trimmer. 2 Switch the shaver on. 3 Hold the trimmer perpendicular to the skin and move it downwards while exerting gentle pressure. 4 Switch off and clean the trimmer after each use. 5 Close the trimmer (‘click’). Cleaning and maintenance - Regular cleaning guarantees better shaving results. - Never clean, remove or replace the shaving unit while the shaver is switched on. - Do not apply pressure to shaving head combs.
English 13 Always check if the water is too hot, to prevent burning your hands. Never dry the shaving unit with a towel or tissue, as this may damage the shaving heads. While rinsing shaving heads, water may drip out of the base of shaver. This is a normal occurrence. 1 Switch the shaver off. 2 Rinse the shaving unit under a warm tap. 3 Press the unit release button to open the shaving unit. 4 Rinse the shaving unit and hair chamber under a warm tap.
English 3 Switch the shaver on and rinse the trimmer under the tap. 4 Switch the shaver off after cleaning. 5 Carefully shake off excess water and let the trimmer air dry. 6 Close the trimmer (‘click’). Tip: For optimal performance, lubricate the teeth of the attachment with a drop of sewing machine oil regularly. Replacement Replacing the shaving heads For maximum shaving performance, we advise you to replace the shaving heads every two years. Replace damaged shaving heads immediately.
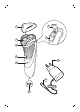
English 15 4 Remove the shaving heads from the shaving unit. Discard the used shaving heads immediately to avoid mixing them with the new shaving heads. 5 Place new shaving heads in the shaving unit. Note: Make sure the notches on both sides of the shaving heads fit exactly onto the projections in the shaving head holder. 6 Put the retaining frame back into the shaving unit and turn the lock clockwise. 1 2 7 Insert the lug of the shaving unit into the slot in the top of the shaver.
English Ordering accessories To buy accessories or spare parts, visit www.shop.philips.com/service or go to your Philips dealer. You can also contact the Philips Consumer Care Center in your country (see the international warranty leaflet for contact details). The following accessories and spare parts are available: - SH30 Philips Shaving Heads. - HQ110 Philips shaving head cleaning spray Disposal - This product contains a rechargeable lithiumion battery which must be disposed of properly.
English 17 and when you dispose of the rechargeable battery. 1 Check if there are screws in the back of the shaver or in the hair chamber. If so, remove them. 2 Remove the outer panels of the shaver with a screwdriver or other tool. If necessary, also remove additional screws and/or parts until you see the printed circuit board with the rechargeable battery. 3 Remove the rechargeable battery. Warranty and support If you need information or support, please www.philips.
English - The guarantee is not valid if a defect is due to damage caused by incorrect use, poor maintenance (e.g. parts blocked by scale) or if alterations or repairs have been carried out by persons not authorized by Philips Consumer Lifestyle. - For the appliance to be used correctly, the user should strictly adhere to all instructions included in the user manual and should abstain from any actions or uses that are described as undesired or which are warned against in the user manual.
English Problem 19 Possible cause Solution The temperature of the appliance is too high. In this case, the appliance does not work. As soon as the temperature of the appliance has dropped sufficiently, you can switch on the appliance again.
Français (Canada) Introduction Félicitations pour votre achat et bienvenue dans l'univers Philips! Pour profiter pleinement des avantages de l'assistance Philips, enregistrez votre produit à l'adresse www.philips.com/welcome. Veuillez lire ce mode d'emploi, qui contient des informations sur les fonctionnalités de ce rasoir, ainsi que des conseils pour un rasage plus facile et plus agréable. Description générale (fig.
Français (Canada) 21 Avertissement - Pour charger la batterie, utilisez uniquement le bloc d’alimentation détachable (HQ8505) fourni avec l’appareil. - Le bloc d’alimentation contient un transformateur. Pour éviter tout risque d’accident, ne coupez pas la fiche du bloc d’alimentation pour la remplacer par une autre. - Les enfants ne doivent pas jouer avec l'appareil. Le nettoyage et l'entretien ne doivent pas être effectués par des enfants sans surveillance.
Français (Canada) - Si votre rasoir est muni d'un système de nettoyage, utilisez toujours le liquide de nettoyage de marque Philips (cartouche ou bouteille, selon le type de système de nettoyage). - Rangez toujours le système de nettoyage sur une surface stable, plane et horizontale pour éviter les fuites. - Si votre système de nettoyage utilise une cartouche, assurez-vous toujours que le compartiment de la cartouche est fermé avant d'utiliser le système pour nettoyer ou recharger le rasoir.
Français (Canada) 23 Général - Ce rasoir peut être nettoyé à l'eau courante en tout sécurité. - L'appareil est conçu pour une tension secteur comprise entre 100 V et 240 V. - Le bloc d’alimentation transforme la tension de 100-240 volts en tension plus faible et plus sécuritaire de 24 volts. Charge en cours Mettez le rasoir en charge avant de l'utiliser pour la première fois et lorsque l'afficheur indique que la pile est presque déchargée. Le chargement dure environ 8 heures.
Français (Canada) Informations relatives à la charge Batterie faible Lorsque la batterie est presque vide, le voyant de charge commence à clignoter en rouge. = Lorsque vous éteignez le rasoir, le voyant de charge continue de clignoter en rouge pendant quelques secondes. Charge Pendant le chargement du rasoir, le témoin de charge clignote en vert. Batterie complètement chargée Le témoin de charge reste allumé en vert lorsque la batterie est entièrement chargée.
Français (Canada) 25 Ce symbole indique que le rasoir peut être rincé sous l’eau courante du robinet. - Utilisez ce rasoir uniquement pour l’usage domestique auquel il est destiné, comme décrit dans le présent mode d’emploi. - Pour des raisons d’hygiène, le rasoir ne doit être utilisé que par une seule personne. - Vous obtiendrez une meilleure taille si vous utilisez le rasoir sur une peau ou des poils secs. Remarque : Ce rasoir est conçu pour une utilisation sans fil uniquement.
Français (Canada) Mise en marche et arrêt du rasoir 1 Mettez l’appareil en marche en appuyant une fois sur le bouton marche/arrêt. Rasage à sec 1 Allumez le rasoir. 2 Faites glisser les têtes de rasage sur votre visage en effectuant des mouvements rectilignes et circulaires afin de couper les poils poussant dans différentes directions. Exercez une légère pression pour un rasage confortable de près.
Français (Canada) 27 3 Maintenez la tondeuse perpendiculairement à la peau et déplacez la vers le bas tout en exerçant une légère pression. 4 Éteignez et nettoyez la tondeuse après chaque utilisation. 5 Fermez la tondeuse (vous entendrez un déclic). Nettoyage et entretien - Nettoyer le rasoir régulièrement assure un rasage optimal. - Ne nettoyez, retirez ou remplacez jamais l’unité de rasage lorsque le rasoir est en marche. - N’exercez pas de pression sur les sabots de la tête de rasage.
Français (Canada) Lorsque vous rincez les têtes de rasage, de l’eau peut s’écouler par la base du rasoir. Ceci est normal. 1 Éteignez le rasoir. 2 Rincez la tête de rasoir sous l’eau tiède du robinet. 3 Appuyez sur le bouton de libération pour ouvrir l’unité de rasage. 4 Rincez l’unité de rasage et le compartiment à poils sous l’eau tiède du robinet. 5 Enlevez soigneusement l’excédent d’eau et laissez sécher le rasoir. 6 Fermez l’unité de rasage.
Français (Canada) 29 3 Allumez le rasoir et rincez la tondeuse à l’eau courante. 4 Après le nettoyage, éteignez le rasoir. 5 Enlevez soigneusement l’excédent d’eau et laissez sécher la tondeuse. 6 Fermez la tondeuse (vous entendrez un déclic). Suggestion : Pour garantir des capacités optimales, appliquez une goutte d’huile pour machine à coudre sur les dents de l’accessoire régulièrement.
Français (Canada) 2 1 3 Tournez le verrou dans le sens antihoraire et retirez le système de fixation. Rangez-le dans un endroit sûr. 4 Retirez les têtes de rasage de l’unité de rasage. Mettez immédiatement au rebut les têtes de rasage utilisées pour éviter de les mélanger avec les nouvelles têtes de rasage. 5 Insérez les nouvelles têtes de rasoir dans l’unité de rasage.
Français (Canada) 31 Rangement Mettre le couvercle de protection sur le rasoir pour éviter les dégâts. Remarque : Avant de ranger le rasoir, laissez-le toujours sécher complètement. Commande d'accessoires Pour acheter des accessoires ou des pièces de rechange, visitez le site Web www.shop.philips.com/service ou rendez-vous chez votre revendeur Philips.
Français (Canada) - Pour obtenir de l’aide, visitez le site Web www.philips.com/support ou composez le numéro sans frais 1-800-243-3050. - Votre produit a été conçu et fabriqué avec des matériaux et composants de grande qualité, qui peuvent être recyclés et réutilisés. Pour obtenir des informations sur le recyclage, contactez vos installations locales de gestion des déchets ou visitez le site www.recycle.philips.com.
Français (Canada) Limites de la garantie 33 - Philips Consumer Lifestyle garantit ses produits pendant deux ans à compter de la date d'achat. En cas de défaillance de l'appareil signalée au cours de la période de garantie, Philips Consumer Lifestyle s'engage à réparer ou à remplacer le produit à ses frais.
Français (Canada) rendez-vous sur le site www.philips.com/support et consultez la liste de questions fréquemment posées ou contactez le Service Consommateurs Philips de votre pays. Problème Cause possible Solution Les résultats de rasage ne sont pas aussi satisfaisants que d'habitude. Les têtes du rasoir sont endommagées ou usées. Remplacez les têtes de rasage. Les têtes du rasoir sont bloquées par de longs poils. Nettoyez les trois têtes de rasoir l’une après l’autre.
Empty page before back cover
© 2017 Koninklijke Philips N.V. All rights reserved Tous droits réservés 4222.002.7406.