
User manual
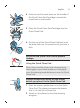

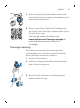
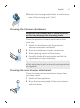
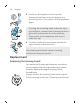
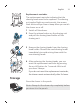

Table Of Contents
- Introduction
- General description (Fig. 1)
- IMPORTANT SAFETY INSTRUCTIONS
- The display
- Charging
- Using the shaver
- Using click-on attachments
- Travel lock
- Cleaning and maintenance
- Replacement
- Storage
- Ordering accessories
- Assistance
- Disposal
- Full Two-Year Warranty
- 45-DAY MONEY-BACK GUARANTEE
- Introducción
- Descripción general (Fig. 1)
- INSTRUCCIONES IMPORTANTES DE SEGURIDAD
- La pantalla
- Carga
- Uso de la afeitadora
- Uso de los accesorios de ajuste de clic
- Bloqueo para viajes
- Limpieza y mantenimiento
- Sustitución
- Almacenamiento
- Pedido de accesorios
- Asistencia
- Desecho
- Garantía Total de Dos Años
- GARANTÍA DE DEVOLUCIÓN DE SU DINERO POR 45 DÍAS

27
English
12Attach the shaving head holder to the bottom
part of the shaving unit (‘click’).
Cleaning the trimmer attachment
Never dry the trimmer with a towel or tissue,
as this may damage the trimming teeth.
Clean the precision trimmer attachment after
each use.
1 Switch on the shaver with the precision
trimmer attachment attached.
2 Rinse the attachment under a warm tap.
3 After cleaning, switch off the shaver.
4 Carefully shake off excess water and let the
attachment air-dry completely.
Tip: For optimal performance, lubricate the teeth
of the attachment with a drop of sewing machine
oil regularly.
Cleaning the nose trimmer attachment
Clean the nose trimmer attachment every time
you have used it.
1 Switch off the appliance.
2 Rinse the trimming head of the nose trimmer
with hot water.