Tripleheader shaver SP9886 www.philips.
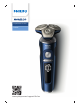
1 2 19 3 4 18 17 16 15 14 10 13 12 11 9 5 6 8 7
empty page before TOC
English 6 Español 34
English Introduction Congratulations on your purchase and welcome to Philips Norelco! To fully benefit from the support that Philips Norelco offers, register your product at www.norelco.com/register. General description (Fig.
English 7 Read all instructions before using this product. DANGER To reduce the risk of electric shock: - Do not reach for a corded charging pad that has fallen into water. Unplug immediately from the power outlet. - Keep the USB power source and the charging pad dry. - Do not place or store the product or charging pad where it can fall or be pulled into a tub or sink. Do not place or drop the product or charging pad into water or other liquid.
English - Never use the product, charging pad or USB power source if it is damaged, if it is not working properly or after it has been dropped or damaged. Never use the charging pad or USB power source after it has been dropped into water. For assistance call 1-800-243-3050. - Keep the USB power source and the charging pad away from heated surfaces - Never drop or insert any object into any opening.
English 9 - Charge, use and store the product at a temperature between 41 °F / 5 °C and 95 °F / 35 °C. - Keep product and batteries away from fire and do not expose them to direct sunlight or high temperatures. - If the product becomes abnormally hot or smelly, changes color or if charging takes longer than usual, stop using and charging the product and contact Philips. - Do not place products and their batteries in microwave ovens or on induction cookers.
English Charging When the shaver is charging, the ring on the pad lights up and the battery charge indicator on the shaver flashes white. The battery charge is indicated by the battery charge percentage flashing on the display, which is shown when the shaver is moved. Quick charge: After approx. 18 minutes charging, the appliance contains enough energy for one shave.
English 11 Remaining battery charge The remaining battery charge is indicated by the battery charge percentage shown on the display. Personal comfort settings The shaver has a feature that allows you to personalize your settings. Depending on your personal shaving needs, choose between three settings, from low to high: comfort, dynamic or efficiency. When you press the button on the left or right of the display, the segment of the personal comfort settings bar lights up to indicate the selected setting.
English Replacement reminder For maximum shaving performance, we advise you to replace the shaving heads once a year. Replace damaged shaving heads immediately. Always replace the shaving heads with original Philips shaving heads. The shaver is equipped with a replacement reminder which reminds you to replace the shaving heads. The shaver beeps, the replacement reminder lights up and the arrows flash to indicate that you have to replace the shaving heads.
English 13 shaving heads are dirty, you have to clean them. If the shaving heads are damaged, you have to replace them. Foreign object on wireless Qi charging pad If there is a foreign (metal) object on the wireless Qi charging pad during charging, the notification symbol on the wireless Qi charging pad lights up. The wireless Qi charging pad switches off automatically and restarts 5 minutes after the foreign object has been removed.
English Charging with the wireless Qi charging pad Note: The charging pad is Qi compliant. Only charge the Qi compatible shaver or other Qi charging compliant appliances on the wireless Qi charging pad provided. Note: Carefully shake off excess water before placing the shaver on the Qi pad. 1 Put the USB plug in the supply unit supplied. 2 Put the supply unit in the wall socket. 1 2 Place the shaver on the cross mark of the wireless Qi charging pad.
English 15 - When the shaver is charging, the ring on the pad lights up and the battery charge indicator on the shaver flashes white. The battery charge is indicated by the battery charge percentage flashing on the display, which is shown when the shaver is moved. 3 When the battery is fully charged, the battery charge indicator and the ring on the pad light up white continuously. Both lights switch off automatically after 15 minutes.
English Switching the shaver on and off 1 To switch on the shaver, press the on/off button once. The battery charge percentage lights up for a few seconds. 2 To switch off the shaver, press the on/off button once. The battery charge percentage lights up for a few seconds and shows the remaining battery charge. Shaving Skin adaptation period Your first shaves may not bring you the result you expect and your skin may even become slightly irritated. This is normal.
English 17 2 Move the shaving heads over your skin in circular movements to catch all hairs growing in different directions. Make sure each shaving head is fully in contact with the skin. Exert gentle pressure for a close, comfortable shave. Note: Do not press too hard, as this can cause skin irritation. 3 Switch off and clean the shaver after each use (see 'Cleaning and maintenance'). The display lights up for a few seconds to show the remaining battery charge.
English 5 Move the shaving heads over your skin in circular movements to catch all hairs growing in different directions. Make sure each shaving head is fully in contact with the skin. Exert gentle pressure for a close, comfortable shave. Note: Do not press too hard, as this can cause skin irritation. Note: Rinse the shaving unit regularly to ensure that it continues to glide smoothly over your skin. 6 Dry your face. 7 Switch off the shaver and clean it after each use.
English 19 Using the precision trimmer attachment You can use the precision trimmer attachment to touch up your beard, sideburns and moustache. 1 Attach the attachment to the appliance (‘click’). 2 Switch on the shaver. 3 Hold the precision trimmer perpendicular to the skin and move it downwards while exerting gentle pressure. 4 Switch off the shaver and clean the attachment after use. Using the nose/ear trimmer attachment You can use the nose/ear trimmer attachment to trim your nose and/or ear hair.
English 4 Slowly move the trimming head around to remove all unwanted hairs in your nostrils. 5 Switch off the appliance and clean the attachment after use. Trimming ear hair When trimming ear hair, make sure your outer ear channels are clean and free from wax. 1 Attach the attachment to the appliance (‘click’). 2 Switch on the appliance. 3 Slowly move the trimming head along the rim of the ear to remove hairs that stick out beyond the rim.
English 21 Travel lock You can lock the shaver when you are going to travel to prevent it from switching on accidentally. Activating the travel lock 3 sec. 1 Press the on/off button for 3 seconds to use the travel lock mode. While you activate the travel lock, the travel lock symbol lights up briefly and the shaver produces a short sound.When the travel lock is activated, the travel lock symbol flashes. If you try to switch on the shaver while the travel lock is active, the travel lock symbol flashes.
English Do not touch shaving heads with hard objects as this may dent or damage the precision-made slotted guards. Do not use compressed air, abrasives, scourers or aggressive liquids such as petrol or acetone to clean the shaver. How do I use the Quick Clean Pod? What does the icon on my Quick Clean Pod mean? Icon Behavior Meaning Becomes visible on the Quick Clean Pod The Quick Clean Pod Cartridge needs to be replaced.
English 23 4 Press the small circular piece on the handle of the Quick Clean Pod Cartridge to break the snap hook on the handle. 5 Place the Quick Clean Pod Cartridge into the Quick Clean Pod. 6 Put the top of the Quick Clean Pod back onto the base and turn it clockwise until you hear a click. Do not tilt the Quick Clean Pod to prevent leakage.
English Each cleaning program takes approximately one minute. 1 Let the shaver air-dry completely in the Quick Clean Pod before storing it. Replacing the Quick Clean Pod Cartridge Replace the Quick Clean Pod Cartridge immediately when the cartridge replacement icon on the Quick Clean Pod becomes visible or follow the table below.
English 25 3 Pour any remaining fluid down a drain and recycle the empty cartridge in accordance with local waste regulations. 4 Place a new Quick Clean Pod Cartridge into the Quick Clean Pod (see 'Preparing the Quick Clean Pod for use'). Scan the QR code to the left or visit www.philips.com/cleaning-cartridge to order replacement Quick Clean Pod Cartridges. Thorough cleaning We advise you to clean the shaving heads thoroughly once a month or when the shaver does not shave as well as it used to.
English 1 2 4 Turn the retaining ring anticlockwise and lift it off the shaving head. Repeat this process for the other retaining rings. Place them aside in a safe place. 5 Remove the shaving heads from the shaving head holder. Each shaving head consists of a cutter and guard. Note: Do not clean more than one cutter and guard at a time, since they are all matching sets.
English 27 12 Attach the shaving head holder to the bottom part of the shaving unit (‘click’). Cleaning the trimmer attachment Never dry the trimmer with a towel or tissue, as this may damage the trimming teeth. Clean the precision trimmer attachment after each use. 1 Switch on the shaver with the precision trimmer attachment attached. 2 Rinse the attachment under a warm tap. 3 After cleaning, switch off the shaver. 4 Carefully shake off excess water and let the attachment air-dry completely.
English 3 Switch on the appliance and rinse the trimming head once more to remove any remaining hairs. Then switch off the appliance again. If rinsing the trimming head under the tap is not sufficient, immerse the trimming head in a glass with warm water for a few minutes. Then switch on the appliance and rinse it under the tap. 2 min. Max. 4 Carefully shake off excess water and let the nose trimmer attachment dry.
English 29 Replacement reminder The replacement reminder indicates that the shaving heads need to be replaced. The shaving unit symbol lights up continuously, the arrows flash white and you hear a beep when you switch the shaver on or off. 1 Switch off the shaver. 2 Press the release button on the shaving unit and pull the shaving head holder off the shaving unit. 3 Remove the shaving heads from the shaving head holder.
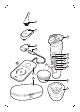
English Ordering accessories To buy accessories or spare parts, visit www.philips.com/parts-and-accessories or go to your Philips dealer. You can also contact the Philips Consumer Care Center in your country (see the international warranty leaflet for contact details). The following accessories and spare parts are available: - SH91 Philips Norelco replacement shaving heads - CC12 Philips Norelco Quick Clean Pod Cartridge 2-pack Assistance For assistance, visit our website: www.philips.
English 31 - Your product is designed and manufactured with high quality materials and components, which can be recycled and reused. For recycling information, please contact your local waste management facilities or visit www.recycle.philips.com.
English This warranty gives you specific legal rights, and you may also have other rights which vary from state to state. Some states do not allow the exclusion or limitation of incidental or consequential damages, so the above exclusion and limitations may not apply to you. *Read enclosed instructions carefully. 45-DAY MONEY-BACK GUARANTEE To enjoy the closest and most comfortable shave from your new Philips Norelco Men’s Shaver, the shaver should be used exclusively for 3 weeks.
English 33 Delivery of refund check will occur 6–8 weeks after receipt of returned product.
Español Introducción ¡Felicitaciones por su compra y bienvenido a Philips Norelco! Para beneficiarse completamente del soporte que ofrece Philips Norelco, registre el producto en www.norelco.com/register. Descripción general (Fig.
Español 35 INSTRUCCIONES IMPORTANTES DE SEGURIDAD Cuando utilice un producto eléctrico, siempre debe seguir las precauciones básicas, incluidas las siguientes: Lea todas las instrucciones antes de usar este producto. PELIGRO Para reducir el riesgo de descarga eléctrica: - No intente recoger una almohadilla de carga enchufada que haya caído al agua. Desconéctelo inmediatamente del enchufe de la pared. - Mantenga la fuente de alimentación USB y la almohadilla de carga secos.
Español - Este producto no está destinado a personas (adultos o niños) con capacidades física, sensorial o mental disminuidas, o que no tengan los conocimientos o la experiencia necesarios, a menos que una persona responsable de su seguridad los supervise o los instruya sobre el uso del producto. Evite que los niños jueguen con este producto. - Use este producto solo para el uso doméstico previsto como se describe en este manual. El uso inadecuado puede causar posibles riesgos o lesiones graves.
Español 37 - Siempre conecte primero la fuente de alimentación USB a la almohadilla de carga y después al tomacorriente. Para desconectar, retire la fuente de alimentación USB del tomacorriente. - Enchufe la fuente de alimentación USB directamente al tomacorriente. No use un cable de extensión. - Desconecte la fuente de alimentación USB antes de conectar o desconectar la almohadilla de carga. - La almohadilla de carga no está diseñada para usarse en un auto.
Español - Si las baterías se dañan o tienen fugas, evite el contacto con la piel o los ojos. Si esto sucede, enjuague bien inmediatamente con agua y busque atención médica. Líquido para cartucho del Quick Clean Pod de Philips Norelco - No ingerir. - Evita el contacto con los ojos. En caso de que entre en contacto con los ojos, enjuaga bien con agua fría. Si la irritación persiste, consulta a un médico. - Manténgase fuera del alcance de los niños.
Español 39 Batería completamente cargada Cuando la batería está totalmente cargada, todas las luces del indicador de carga de la batería y el anillo sobre la almohadilla se iluminan en blanco constantemente. Nota: Ambas luces se apagan automáticamente después de 15 minutos. El porcentaje de carga de batería se ilumina en blanco continuamente, el cual se muestra cuando se mueve la afeitadora.
Español pantalla, el segmento de la barra de ajustes de confort personalizados se enciende para indicar el ajuste seleccionado. Para seleccionar un ajuste más bajo o más alto, presione el botón a la izquierda o derecha de la pantalla. Recordatorio de limpieza Limpie la afeitadora después de cada uso para un óptimo rendimiento (ver 'Limpieza y mantenimiento'). Cuando apaga la afeitadora, el recordatorio de limpieza destella para recordarle limpiarla. Bloqueo para viajes 3 sec.
Español 41 afeitado, necesita restablecer el recordatorio de reemplazo presionando el botón encendido/apagado durante 7 segundos. Símbolo de notificación Sobrecalentamiento Si la afeitadora se sobrecalienta durante la carga, el signo de notificación destella. Cuando esto sucede, la carga de la afeitadora se detiene automáticamente. La carga continúa una vez que la temperatura de la afeitadora baja al nivel normal después de aproximadamente 10 minutos.
Español No coloque ningún objeto (metal) ajeno a la Almohadilla de carga inalámbrica Qi. Solo use la almohadilla de carga inalámbrica Qi para cargar la afeitadora u otro dispositivo (por ejemplo, un smartphone) en cumplimiento con la carga con Qi. Carga Cargue la afeitadora antes de usarla por primera vez y cuando la pantalla indique que la batería está casi agotada. La carga toma aproximadamente 3 horas. Una afeitadora completamente cargada otorga un tiempo de afeitado de hasta 60 minutos.
Español 43 Nota: Elimine cuidadosamente el exceso de agua antes de colocar la afeitadora en la almohadilla Qi. 1 Inserte el puerto USB en la unidad de suministro provista. 1 2 2 Conecte la unidad de suministro al enchufe de pared. Coloque la afeitadora en la marca de cruz en la almohadilla de carga inalámbrica Qi. Asegúrese de que la afeitadora cabe en la cavidad de la almohadilla de carga inalámbrica Qi. Solo cargue la afeitadora en la almohadilla de carga inalámbrica Qi provista.
Español 3 Cuando la batería está totalmente cargada, todas las luces del indicador de carga de la batería y el anillo sobre la almohadilla se iluminan en blanco constantemente. Ambas luces se apagan automáticamente después de 15 minutos. Uso de la afeitadora Siempre revise la afeitadora y todos los accesorios antes de usarla. No use la afeitadora ni ningún accesorio si está dañado, ya que esto puede causar alguna lesión. Siempre reemplace una pieza dañada con una del tipo original.
Español 45 Encendido y apagado de la afeitadora 1 Para encender la afeitadora, pulse el botón de encendido/apagado una vez. El porcentaje de carga de la batería se enciende por unos segundos. 2 Para apagar la afeitadora, pulse el botón de encendido/apagado una vez. El porcentaje de carga de la batería se ilumina durante algunos segundos y muestra la carga disponible en la batería.
Español 2 Mueva los cabezales de afeitado sobre la piel con movimientos circulares para llegar a todos los vellos en las diferentes direcciones de crecimiento. Asegúrese de que cada unidad de afeitado esté siempre en contacto total con la piel. Ejerza una suave presión para una afeitada al ras y cómoda. Nota: No presione demasiado fuerte ya que esto puede producir irritación en la piel. 3 Apague y limpie la afeitadora después de cada uso (ver 'Limpieza y mantenimiento').
Español 47 3 Enjuague la unidad de afeitado con el agua de la llave para garantizar que se deslice suavemente sobre su piel. 4 Encienda la afeitadora. 5 Mueva los cabezales de afeitado sobre la piel con movimientos circulares para llegar a todos los vellos en las diferentes direcciones de crecimiento. Asegúrese de que cada unidad de afeitado esté siempre en contacto total con la piel. Ejerza una suave presión para una afeitada al ras y cómoda.
Español 2 Extraiga el accesorio directo de la afeitadora. Nota: No gire el accesorio mientras lo extrae de la afeitadora. 3 Inserte la lengüeta del accesorio en la ranura en la parte superior de la afeitadora. Luego presione el accesorio hacia abajo para ajustarlo a la afeitadora ("clic"). Uso del accesorio de recorte de precisión Puede usar el accesorio de recorte de precisión para retocar la barba, el bigote y las patillas. 1 Coloque el accesorio en el dispositivo ("haga clic en").
Español 49 Recorte del vello de la nariz Cuando recorte el vello de la nariz, asegúrese de que las fosas nasales estén limpias. 1 Coloque el accesorio en el dispositivo ("haga clic en"). 2 Encienda el aparato. max. 5mm 3 Introduzca con cuidado el cabezal de recorte en una de su fosas nasales. No introduzca el accesorio más de 0,5cm dentro de sus fosas nasales. 4 Mueva lentamente el cabezal recortador alrededor de sus fosas nasales para remover todo el vello no deseado.
Español 3 Mueva lentamente el cabezal de recorte a lo largo del borde del oído para eliminar los vellos salientes. 4 Inserte cuidadosamente el cabezal de recorte en el canal auditivo externo. No introduzcas el cabezal de recorte más de 0,5 cm en el canal auditivo, ya que esto podría dañar el tímpano. max. 5mm 5 Gire lentamente el cabezal de recorte alrededor para eliminar todo el vello no deseado en el canal auditivo externo. 6 Desconecte el dispositivo y limpie el accesorio después de usarlo.
Español 51 un sonido y el símbolo de bloqueo de viaje destella. Desactivación del bloqueo de viaje 1 Pulse el botón de encendido/apagado durante 3 segundos. Cuando desactiva el bloqueo de viaje, la afeitadora emite un sonido y el símbolo de bloqueo de viaje se ilumina.La afeitadora se enciende y ya está lista para usarse de nuevo. Limpieza y mantenimiento Una limpieza frecuente garantiza los mejores resultados de afeitado.
Español Ícono Comportamiento Se vuelve visible en el Quick Clean Pod. Significado Se tiene que reemplazar el cartucho del Quick Clean Pod. Preparación del Quick Clean Pod para el uso 1 Gire y retire la parte superior del Quick Clean Pod. 2 2 Gire la tapa del cartucho del Quick Clean Pod para quitarla. 1 3 Levante la lengüeta del sello y jálela de la esquina para retirar el sello del cartucho del Quick Clean Pod.
Español 53 6 Vuelva a colocar la parte superior del Quick Clean Pod en la base y gírela en el sentido de las manecillas del reloj hasta que escuche un clic. No incline el Quick Clean Pod para evitar derrames. Uso del Quick Clean Pod Nota: Si utiliza la afeitadora con espuma de afeitar, gel de afeitar o productos para antes de afeitar, enjuague bien los cabezales de afeitado antes de usar el Quick Clean Pod.
Español Reemplazo del cartucho del Quick Clean Pod Reemplace el cartucho del Quick Clean Pod inmediatamente cuando el ícono de reemplazo del cartucho del Quick Clean Pod se vuelva visible, o bien, siga las indicaciones que se muestran en la siguiente tabla.
Español 55 3 Vierta el líquido restante por el desagüe y recicle el cartucho vacío conforme a la reglamentación local en materia de residuos. 4 Coloque un nuevo cartucho del Quick Clean Pod en el Quick Clean Pod (ver 'Preparación del Quick Clean Pod para el uso'). Escanea el código QR que se encuentra a la izquierda o visita www.philips.com/cleaning-cartridge para pedir cartuchos de repuesto del Quick Clean Pod.
Español 1 2 4 Gire el anillo de retención en sentido contrario a las agujas del reloj y retírelo del cabezal de la afeitadora. Repita este proceso con los otros anillos de retención. Colóquelos aparte en un lugar seguro. 5 Quite los cabezales de afeitado del soporte del cabezal de afeitado. Cada cabezal de afeitado consiste de un cortador y un protector. Nota: No limpie más de un cortador y protector a la vez, ya que todos son pares.
Español 57 12 Coloque el soporte del cabezal de afeitado en la parte inferior de la unidad de afeitado ("clic"). Limpieza del accesorio de la cortadora Nunca seque los dientes de la cortadora con una toalla o paño, ya que esto puede dañar el dentado. Limpie el accesorio recortador de precisión luego de cada uso. 1 Encienda la afeitadora con el accesorio recortador de precisión adherido. 2 Enjuague el accesorio con agua caliente de la llave. 3 Después de limpiarla, apague la afeitadora.
Español 2 Enjuague el cabezal recortador del recortador nasal con agua caliente. 3 Encienda el aparato y enjuague el cabezal recortador una vez más para remover cualquier vello restante. Luego apague el aparato nuevamente. 2 min. Max. Si enjuagar el cabezal de recorte bajo la llave no es suficiente, sumerja el cabezal de recorte en un vaso de agua caliente por unos minutos. Luego encienda el dispositivo y enjuáguelo bajo la llave.
Español 59 Siempre reemplace los cabezales de afeitado con cabezales originales de Philips (ver 'Pedido de accesorios'). Recordatorio de reemplazo El recordatorio de reemplazo indica que los cabezales de afeitado necesitan ser reemplazados. El símbolo de la unidad de afeitado se ilumina continuamente, las flechas destellan en blanco y se escucha un sonido cuando apaga la afeitadora. 1 Apague la afeitadora.
Español Almacenamiento Guarde la afeitadora en la funda. Nota: Siempre deje secar la afeitadora completamente antes de guardarla en la funda. Pedido de accesorios Para comprar accesorios o piezas de repuesto, visite www.philips.com/parts-and-accessories o acuda a su distribuidor de Philips. También puede ponerse en contacto con el centro de atención al cliente Philips en su país (consulte el folleto de garantía internacional para encontrar los datos de contacto).
Español 61 - Comunícate con los funcionarios locales o de la ciudad para obtener más información acerca del manejo final de la batería. También puede llamar al 1-800-822-8837 o visitar www.call2recycle.org para las ubicaciones donde se pueden desechar las baterías. - Para recibir asistencia, visite nuestro sitio Web www.philips.com/support o comuníquese gratuitamente al 1-800-243-3050.
Español NINGUNA RESPONSABILIDAD ES ASUMIDA POR CUALQUIER DAÑO, INCIDENTAL O RESULTANTE. Para obtener el servicio de garantía, simplemente vaya a www.philips.com/support para asistencia. Para su protección, se sugiere que el envío de las devoluciones del producto se realice por correo certificado con seguro pagado. Cualquier daño que ocurra durante el envío no será cubierto por esta garantía.
Español 63 de ese periodo de tiempo, no está satisfecho con los resultados de su afeitadora para hombre Philips Norelco, puede devolver el producto con su recibo de compra fechado y le reembolsaremos el importe que pagó. El producto debe enviarse por correo certificado pago, con seguro prepago, junto con el recibo original de compra, donde se indique el precio y la fecha de compra. No asumimos ninguna responsabilidad por los paquetes perdidos.
Empty page before back cover
Manufactured for/fabricado por: Philips Personal Health a division of/una división de Philips North America LLC P.O. Box 10313, Stamford, CT 06904 USA This symbol on the product’s nameplate means it is listed by Underwriters’ Laboratories, Inc. Este símbolo en la placa del nombre del producto indica que está registrado en Underwriters' Laboratories, Inc.