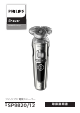
S9000 Prestige フィリップス 電動シェーバー 品番 SP9820/1 2 取扱説明書
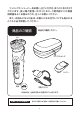
フィリップス シェーバーをお買い上げいただき、まことにありがとう ございます。長 い 間ご愛 用 いただくために、ご使 用 前にこの 取 扱 説明書をよくお読みのうえ、正しくお使いください。 また、お読みになった後は、お使いになる方がいつでも見られる ところに必ず保管してください。 商品のご確認 商品をご確認ください。 プレミアムポーチ トリマー 本体 充電アダプタ ※改良の為、仕様を予告なく変更することがあります。 お買い上げのお客様へ 初めてご使用になる際は、ご使用前に充電してください。 1
目 ●は じ め に 次 商品のご確認 目次 必ずお守りください 各部の名称 デジタル表示・LED表示について 充電のしかた ●ご 使 用 方 法 シェービングのしかた トリマーの使いかた お手入れ方法 刃の交換 保管のしかた 1 2 3〜5 6 7・8 9 10 〜 12 13 14 〜 16 17 17 ● 廃棄について シェーバーを廃棄するとき ●困 っ た と き 故障かな?と思ったら ●英 文 解 説 Guidance in English 21〜46 ●保 保証とアフターサービス 47 48 50 証 仕様 無料修理規定 保証書 18 19・20 最終ページ 2
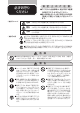
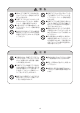
安 全 上 の ご 注 意 必ずお守り ください ○絵表示について ●ここに示した注意事項は、安全に関する重要 な内容ですので、必ず守ってください。 ●誤った取扱いをしたときに想定される内容を 「危険」と「警告」と「注意」とに区分けしてい ます。 危険 人が死亡または重傷を負う可能性が大きい内容。 警告 人が死亡または重傷を負う可能性が想定される内容。 人が傷害を負う可能性および物的損害のみの発生が想定 注意 される内容。 ○絵表示の例 記号は、 「危険、警告、注意」を示します。図の中や近くに具体的な注意 内容(左図の場合は高温注意) を示します。 記号は、してはいけない「禁止」を示します。図の中や近くに具体的な 禁止内容(左図の場合は分解禁止) を示します。 記号は、 必ずしていただく 「強制」 を示します。 図の中や近くに具体的な 強制内容 (左図の場合は電源プラグをコンセントから抜くこと) を示します。 危 険 ●本製品は充電式電池を内蔵しています。 火中投入、 加熱、 高温での充電・使用・放置を しないでください。 発熱・発火・破裂の原因になります。 警 告 ●シェーバー本体・充
警 告 ●濡れた手で充電アダプタを抜き差し しないでください。感電やけがをす ることがあります。 ●充電アダプタは、完全に乾いている ことを確認してからコンセントに差 してください。ショート・感電の原因 になります。 ●充電アダプタを水につけたり、水を かけたりしないでください。故障や、 ショート・感電の原因になります。 ●充電アダプタは変圧器が内蔵され てます。充電アダプタを切り離して 別のプラグに接続するのは危険で すのでおやめください。 ●水場や浴室での充電は絶対にしな いでください。ショート・感電の原因 になります。 ●補助を必要とする人(子どもを含む) に使用させないでください。また、 お 体の不自由な人だけでは使用しな いでください。 ●乳幼児の手の届くところに本製品を 置かないでください。またお子様が 本製品で遊ぶことがないように監視 してください。 ● 刃が破 損または故 障した場 合は、 本製品を使用しないでください。け がの原因になります。交換の際には 必ずフィリップス社製の同型部品と お取り替えください。 注 ●充電時以外は、充電アダプタをコン セントから抜いてくださ
使 用 上 の ご 注 意 1. 本製品はヒゲ(あごヒゲ、口ヒゲ、もみあげなど)の長さを整えたり、シェービングするためのものです。 それ以外の目的で使用しないでください。 2. フィリップスシェーバーを初めてお使いの方は、剃りかたに慣れるまで2〜3週間かかることがあります。 3. 60℃以上の水でシェーバーを洗浄しないでください。 4. 本製品の使用、充電、保管は室温5℃〜35℃の環境下で行ってください(尚、低温や高温で充電すると、 充電池の寿命が短くなります)。 5. 外刃は、薄く仕上げてありますので、刃部を強く押さえたり、硬いものに当てないよう、ていねいに 扱ってください。 6. シェービングユニットは、クリーニング表示(蛇口マーク)が表示された場合、お手入れ方法(P14〜 16)に従って掃除してください。 7. シェービングユニットの清掃や着脱は、必ず電源をOFFにしてから行ってください。 8. 切れ味が衰えてきたり、刃が破損した場合は、使用せず必ず新しい替刃に交換してください。 9.
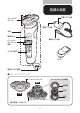
各部の名称 充電アダプタ部 シェービング ユニット 電源プラグ部 本体 電源ボタン 電源コネクタ部 パーソナル コンフォート 設定 デジタル表示 トリマー 電源コネクタ受部 ●シェービングユニット シェービングヘッド シェービングヘッド分解図 裏側 保持板 内刃 表側 外刃 シェービングヘッドホルダー (替刃品番:SH98/81) 6
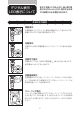
デジタル表示・ LED表示について 初めてお使いになるときや、長い間ご使 用にならなかったときは、表示が出るま でに時間がかかる場合があります。 本体の主な表示 残量表示 充電残量はディスプレイ上に使用可能量( % ) として表示されます。 電源のON/OFFの際に数秒間点灯します。 充電表示 充電中は、本体の充電残量( % ) とバッテリーマークの表示が点滅し ます。 充電完了表示 充電が完了すると、本体の充電残量( % )表示が点灯し続けます。 満充電後しばらくすると消えます。 充電催促表示 充電残量が少なくなると、バッテリーマークがオレンジ色に点滅し ビープ音が鳴ります(電源を OFF にすると、バッテリーマークが 数秒間点滅し、 ビープ音が鳴ります)。 クリーニング表示 シェービング後に電源を OFF にすると、クリーニングをうながす ために蛇口マークが点滅します。表示されるタイミングは使用時 間・状況により異なります。お手入れ方法( P14 〜 16 )をご参照く ださい。 7
シェービングヘッド交換表示 シェービングヘッドの交換マークが点滅しビープ音が鳴ると、交換 時期です。新しい替刃に交換してください(P17参照)。 ブロック表示 シェービングヘッドに長いヒゲがからまっていたりシェービングヘッ ドが破損していると、 「!」マークが赤く点灯し、シェービングヘッドの 交換表示、 クリーニング表示が同時に点滅しビープ音が鳴ります。 この場合、電源をONにすることができません。シェービングヘッド をお手入れするか、交換してください(P14〜17参照)。 ロック表示(カギマークが表示されていると電源は入りません) 3 sec.
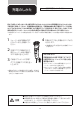
充電のしかた 浴室で充電をしないでください。 初めてお使いになるときや、長い間ご使用にならなかったとき、または充電残量が少なくなったときは、 ご使用前に充電してください。充電時間は約1時間です。充電開始後数分間、充電表示ランプが点滅し ないことがありますが、そのまま充電すると充電表示ランプが点滅します。海外(100〜240V)でのご 使用も可能です。ただし、コンセントの形状や電圧など現地で充分お確かめのうえご使用ください。 ※本製品はリチウムイオン充電池を使用しているため、 ご使用の都度充電をしても充電池の寿命には影響ありま せん。 1 充電が完了すると充電表示ランプが白 4 く点灯します。 シェーバー本体の電源がOFF になっていることを確認してく ださい。 ※満充電後、約15分経過すると充電表示ランプ が消えます。 2 充電アダプタの電源コネクタ 部をシェーバー本体の電源コ ネクタ受部に差し込みます。 クイックチャージ 充電残量が 0 の状態で充電アダプタで 5 分間充電すると、シェービング1 回分が急 速充電されます。 トに充電ア 3 ご家庭のコンセン ダプタの電源プラグ部を差 ※ク
シェービングの しかた(ドライ) 肌が乾いた状態でのシェービングの しかたです。 警告 シェーバー本体は防水加工をしており、浴室でも使用できますが、水や 液体の中に浸けないでください(故障の原因となります)。 ●モーターの始動時、微弱の振動がシェーバー本体に伝わりますが、問題はありません。 ●ほこりなどで肌が汚れている場合、 ふきとってからご使用ください。 ●ご使用の前に外刃の破れや変形がないか確認してください (外刃に破れや変形があると肌を傷つける原因になります) 。 ●ヒゲ剃り以外の目的(頭髪など) には、使用しないでください。 ●静止している本体を手に取るなどすると、本体が振動を感知し、 充電残量の表示が白く光ります。 1 電源ボタンを押し、電源をONにします。 ※カギマークが表示されている場合はロック機 能が ON になっています。ロックを解除して から電源を ON にしてください。 刃を肌に軽く押しあて、円を描くように動 2 かしながら剃ります。 電源を 3 シェービング後は電源ボタンを押し、 OFFにします。 パーソナルコンフォート設定 ヒゲの 濃さや肌タイプに 合わせて 3 種
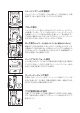
上手に 剃るには 肌に強く押しつけるのではなく、軽く押しあてて 円を描くように回転させながら剃るのがコツです。 ほお 肌を伸ばし、 ヒゲを立たせるように円を描く ように小さく回転させながら剃ります。 あごの裏側 刃を肌に軽くあて、図のようにあごを上げて円 を描くように小さく回転させながら剃ります。 ほおの奥から首筋 片方の手で肌を後ろに引っ張りながら剃り ます。 鼻の下 鼻の下を伸ばし、円を描くように小さく回転 させながら剃ります。 フィリップスのシェーバーを初めてお使いの方は、 剃りかたに慣れるまで2〜3週間かかることがあ ります。 初めてのシェービングで思い通りの結果が得られないことや、 少し肌にヒリヒリ感が残る場 合がありますが、 これは普通のことです。 フィリップスのシェーバーに限らずシェービング方法を変 える時には、 肌もヒゲも新しいシェービング方法に慣れる時間が必要です。 新しいシェーバーに肌を 慣らす為、 まずは3週間このシェーバーを使い続けてみてください (最低でも1週間に3回以上) 。 この 3週間は、あまりシェービング方法を変えたりせず、同じシェーバーで肌を慣らすことが大切です
シェービングフォームやシェービング ジェルを使ったシェービングのしかた です。剃った部分を実感しながら、なめ らかなシェービングができます。 警告 シェービングの しかた(ウェット) シェーバー本体は防水加工をしており、浴室でも使用できますが、水や 液体の中に浸けないでください(故障の原因となります)。 ●モーターの始動時、微弱の振動がシェーバー本体に伝わりますが、問題はありません。 ●ご使用の前に外刃の破れや変形がないか確認してください (外刃に破れや変形があると肌を傷つける原因になります) 。 ●ヒゲ剃り以外の目的(頭髪など) には、使用しないでください。 ●石けんもお使いいただけますが、肌の上での滑りをよくするため、 シェービングフォームやジェルの使用をお勧めします。 ●静止している本体を手に取るなどすると、本体が振動を感知し、充電残量の表示が白く光ります。 1 顔を濡らし、市販のシェービングフォーム またはシェービングジェルを付けます。 電 5 シェービング後は電源ボタンを押し、 源をOFFにします。 ドを水で濡らし、肌の 2 シェービングヘッ 上でなめらかに動くようにします。 (P
トリマーの 使いかた 1 トリマーはヘアーライン、もみあげ、 ヒゲなどを整えるのに便利です。 シェービングユニットのつけかた 4 トリマーをはずし (図 ) 、 シェービングユ シェービングユニットのはずしかた シェービングユニットを本体からはずし ます。 1 ニットの突起部 (図 2 ) をシェーバー上 部の溝 (図 3 ) に合わせ、 カチッと音がす るまで押し込み (図 4 ) 、 本体に取りつけ ます。 ※シェービングユニット は、回さずにまっすぐ 引き抜いてください。 ※電源が OFF になって いることを確かめてく ださい。 ー の 突 起 部( 図 )をシェー 2 トリマ バー上部の溝(図 ) に合わせ、 カチッ 1 1 2 ※トリマーは、回さ ずにまっすぐ引き 抜いてください。 と音がするまで押し込み(図 3 )、本体 に取り付けます。電源をONにすると、 トリマー先端の刃が往復してカットし ます。 1 2 3 カチッ 4 2 カチッ 3 鏡を見ながらトリマーをカットしたいと 3 ころに直角にあたるようにしてくださ い。一度に切らずに、少しずつカットし て
お手入れ方法 注意 ●お手入れの際は、 電源をOFFにしてから水洗いしてください。 ●シェービングユニットは水洗いできますが、 本体は水中に浸けないでください。 ●シェービングユニットを乾燥させる時に、 タオルやティッシュペーパーを使用しない でください。刃を傷める場合があります。 シェービングヘッドのお手入れ方法 ※洗剤は使用しないでください。 ※ぬるま湯( 40 ℃前後)でのお手入れをおすすめします。臭いのもととなる皮脂や汗などが取れやすくな ります。ただし、熱湯はお止めください。故障の原因となります。 ※お手入れ中にシェ−バーの底から水が漏れてくる場合がありますが、異常ではありません。 1 ドの余分な水を切り、 4 シェービングヘッ よく乾かします。 シェービングユニット を取り付けた状態で シェーバーの電源を ぬるま湯ま ONにし、 たは水ですすぎ洗い をします。 ※周囲に気をつけてください。 ト 2 シェービングユニッ からシェービングヘッ 乾いたことを確認 5 したら、 シェービン ドホルダーを取り外 してください。 グヘッドホルダー をシェービングユ ニット受 部に取り 付
シェービングヘッドのお手入れ方法(分解+水洗い) ※1カ月に1度、 またはシェーバーの切れ味が落ちてきたら、 シェービングヘッドを分解して水洗いすることを おすすめします。 ※お手入れの際は、電源をOFFにしてから分解や水洗いをしてください。 1 内刃と外刃をぬ 4 るま湯または水 シェービングユニットからシェービング ヘッドホルダーを取り外し、シェービ ングヘッドホルダ ー および受部にた まったヒゲクズを、ぬるま湯または水で 約30秒洗い流します。 でしっかり洗 い 流し、余 分 な 水 を切ってよく乾 かします。 ※周囲に気をつけてください。 ※内刃と外刃は一組ずつ洗ってください。 ※内 刃と外 刃 の 組 み 合わせを変えた場 合、 シェービング性能が回復するまで数週間か かることがあります。 シェービングヘッ 5 ドホルダーに外 ドホルダーの保持板 2 シェービングヘッ を反時計回りに回して(図 )、シェー 刃と内刃を戻し ます。 1 ビングヘッドホルダーから取り外します (図 2 )。他の保持板も同様に、反時計 回りに回して外します。 ※取り外した 保 持 板 は なくさな い
トリマーのお手入れ方法 ※トリマーは、使用後必ずお手入れしてください。 1 トリマーを取り付けた状態でシェーバーの電源をONに し、 ぬるま湯または水ですすぎ洗いをします。 OFFにし、トリマーを充分に乾燥さ 2 シェーバーの電源を せてください。 ※トリマーはタオルやティッシュペーパーなどでふかないでください。 刃を傷める原因になります。 16
刃の交換 替刃( SH98/81 ) と交換する場合 ※シェービング性能を維持するために、刃は2年ごとに交換することをおすすめします。 ※交換する際は、必ずフィリップス社製の替刃にお取り替えください。 ※シェービングヘッド交換表示が点灯したら、刃の交換時期です。 専用の替刃 (品番:SH98/81)と交換してください。 1 電源ボタンを2回目のビープ音が鳴る 3 まで約 7秒間押し続けて、シェーバーを シェービングユニット からシェービングヘッ ドホルダーを取り外 します。 ※電 源 が OFF に なっ リセットしてください。 ※リセットを行わない場合、シェービングを 9 回行うと自動的にリセットされます。 ていることを確かめ てください。 7 sec.
シェーバーを 廃棄するとき ※お客様による充電池の 修理交換はできません。 リチウムイオン充電池のリサイクルについて このシェーバーはリチウムイオン充電池を使用しています。 リチウムイオン電池はリサイクル可能な貴重な資源です。 ご使用済みの製品の廃棄に際しては、 リチウムイオン充電 池を取り出し、各自治体の処理方法に従い、 リサイクル協力 店にお持ちください。 注意 Li-ion ●製品を廃棄するとき以外は、 絶対に本体を分解しないでください。 ●本体内部の金具は鋭いので、 ご注意ください。 充電池の取り外しかた 電源をONにして、完全に動作しなくなるまで充電池を放電させてから、行ってください。 1 モーターユニット 5 にある左 右 3つず 本体よりシェービン グユニットを取り外 します。 つ、計6つのツメを は ずし、カバ ー を 開けます。 2 本体上部に空いて いる穴と銀色のリン モーターユニット 6 から充電池ホル グのすき間にドライ バーをこじ入れてカ バーをはずします。 ダーを持ち上げ て取り出します。 ライバー を 使 い 本 体 上 部 の ねじ 3 ド2本をは
故障かな? と思ったら 故障かな?と思ったら、 お調べください。 だんだん切れ味が悪くなった ▶シェービングヘッド部が汚れていないか確認してください。 ▶シェービングヘッド部が損傷または摩耗していないか確認してください。 損傷または摩耗しているときは、 シェービングヘッドを交換してください。 (替刃品番:SH98/81) 。 ▶シェービングヘッドに長いヒゲがからまっていないか確認してください。 充電しても使用時間が極端に短い ▶シェーバーが完全に止まるまで作動させてから、もう一度充電してください。 それでも改善されないときは、充電池の寿命です。 シェーバーの電源ボタンを押しても作動しない ▶充電がされていない場合は1時間以上の充電をしてください。 ▶カギマーク が表示する場合はロックを解除してください。 ▶プラグ解除お知らせ表示 らはずしてください。 が表示する場合は充電アダプタをシェーバー本体か ▶3つのマーク が一度に点滅する場合は刃が動かなくなるほど汚れて いるか、破損を示す表示です。シェービングヘッドをお手入れするか、交換をしてく ださい。 ▶刃が破損している場合は交換をしてください
充電できない ▶シェーバー本体の電源コネクタ受部に充電アダプタのコードがきちんと差し込まれて いるか確認してください。 ▶充電アダプタの電源プラグ部はコンセントにきちんと差し込まれて確認してください。 ▶充電アダプタの電源コードが断線している場合は、フィリップスサポートセンターに お問い合わせいただき、同型充電アダプタ (品番:HQ8505) をご注文ください。 以上の点検により、正常な状態に戻らない場合は、 フィリップスサポートセンターにお問い合わせください。 20
SP9820/12 English 17 SP98xx/12 1 16 2 14 15 13 12 3 11 7 10 8 6 9 5 4 21
English Introduction Congratulations on your purchase and welcome to Philips! To fully benefit from the support that Philips offers, register your product at www.philips.com/welcome. Please read this user manual, as it contains information about the features of this shaver as well as some tips to make shaving easier and more enjoyable. General description (Fig.
English Danger - Keep the supply unit dry. Warning - To charge the battery, only use the detachable supply unit (HQ8505) provided with the appliance. - The supply unit contains a transformer. Do not cut off the supply unit to replace it with another plug, as this causes a hazardous situation.
English Caution - Never use water hotter than 60°C to rinse the shaver. - Only use this appliance for its intended purpose as shown in the user manual. - For hygienic reasons, the appliance should only be used by one person. - Never use compressed air, scouring pads, abrasive cleaning agents or aggressive liquids such as petrol or acetone to clean the appliance. - Water may drip from the socket at the bottom of the shaver when you rinse it.
English The display Note: Remove any sticker or protective foil from the display before using the product. Charging When the shaver is charging, the battery charge indicator on the shaver flashes white.The battery charge is indicated by the battery charge percentage flashing on the display, which is shown when the shaver is moved. Quick charge: After approx. 5 minutes charging, the shaver contains enough energy for one shave.
English Remaining battery charge The remaining battery charge is indicated by the battery charge percentage shown on the display. Personal comfort settings The shaver has a feature that allows you to personalize your settings. Depending on your personal shaving needs, choose between three settings, from low to high: comfort, dynamic or efficiency. When you press the button on the left or right of the display, the segment of the personal comfort settings bar lights up to indicate the selected setting.
English Replacement reminder For maximum shaving performance, replace the shaving heads every two years. The shaver is equipped with a replacement reminder which reminds you to replace the shaving heads. The shaver beeps, the replacement reminder lights up and the arrows flash to indicate that you have to replace the shaving heads. Note: After replacing the shaving heads, you can reset the replacement reminder by pressing the on/off button for 7 seconds.
English Notification symbol Overheating If the shaver overheats during charging, the notification symbol flashes. When this happens, the shaver automatically stops charging. Charging continues once the temperature of the shaver has decreased to the normal level after approx. 10 minutes. Blocked shaving heads If the shaving heads are blocked, the notification symbol continuously lights up red. The replacement reminder and the cleaning reminder alternately flash white and the shaver beeps.
English Quick charge After approx. 5 minutes of charging the shaver contains enough power for one shave. Charging with the supply unit 1 Make sure the shaver is switched off. 2 Put the small plug in the shaver and put the supply unit in the wall socket. The display of the shaver indicates that the shaver is charging. 3 After charging, remove the supply unit from the wall socket and pull the small plug out of the shaver.
English Switching the shaver on and off 1 To switch on the shaver, press the on/off button once. The battery charge percentage lights up for a few seconds. 2 To switch off the shaver, press the on/off button once. The battery charge percentage lights up for a few seconds and shows the remaining battery charge. Shaving Skin adaptation period Your first shaves may not bring you the result you expect and your skin may even become slightly irritated. This is normal.
English Dry shaving 1 Switch on the shaver. 2 Move the shaving heads over your skin in circular movements to catch all hairs growing in different directions. Make sure each shaving head is fully in contact with the skin. Exert gentle pressure for a close, comfortable shave. Note: Do not press too hard, as this can cause skin irritation. 3 Switch off and clean the shaver after each use (see 'Cleaning and maintenance'). The display lights up for a few seconds to show the remaining battery charge.
English 3 Rinse the shaving unit under the tap to ensure that the shaving unit glides smoothly over your skin. 4 Switch on the shaver. 5 Move the shaving heads over your skin in circular movements to catch all hairs growing in different directions. Make sure each shaving head is fully in contact with the skin. Exert gentle pressure for a close, comfortable shave. Note: Do not press too hard, as this can cause skin irritation.
English 3 Insert the lug of the attachment into the slot in the top of the shaver. Then press down the attachment to attach it to the shaver(‘click’). Using the precision trimmer attachment You can use the precision trimmer attachment to touch up your beard, sideburns and moustache. 1 Attach the attachment to the appliance (‘click’). 2 Switch on the appliance. 3 Hold the precision trimmer perpendicular to the skin and move it downwards while exerting gentle pressure.
English While you activate the travel lock, the travel lock symbol lights up briefly and the shaver produces a short sound. When the travel lock is activated, the travel lock symbol flashes. 3 sec. If you try to switch on the shaver while the travel lock is active, the travel lock symbol flashes. Deactivating the travel lock 1 Press the on/off button for 3 seconds. While you deactivate the travel lock, the travel lock symbol lights up briefly and the shaver produces a short sound.
English Never dry the shaving unit with a towel or tissue, as this may damage the shaving heads. While rinsing the shaving unit, water may drip out of the bottom of the shaver. This is a normal occurrence. 1 Switch on the shaver. 2 Rinse the shaving unit under a warm tap. You can also use the cleaning brush to remove excess hairs before rinsing. 3 Switch off the shaver. Pull the shaving head holder off the bottom part of the shaving unit. 4 Rinse the hair chamber and shaving head holder under the tap.
English 5 Carefully shake off excess water and let the shaving head holder air-dry completely. 6 Attach the shaving head holder to the bottom part of the shaving unit (‘click’). Thorough cleaning We advise you to clean the shaving heads thoroughly once a month or when the shaver does not shave as well as it used to. 1 Switch off the shaver. 2 Pull the shaving head holder off the bottom part of the shaving unit. 3 Rinse the hair chamber and shaving head holder under the tap.
English 5 Remove the shaving heads from the shaving head holder. Each shaving head consists of a cutter and guard. Note: Do not clean more than one cutter and guard at a time, since they are all matching sets. If you accidentally put a cutter in the wrong shaving guard, it may take several weeks before optimal shaving performance is restored. 6 Clean the cutter and guard under the tap. You can also use the cleaning brush to remove excess hairs before rinsing. 7 Shake off excess water.
English 12 Attach the shaving head holder to the bottom part of the shaving unit (‘click’). Cleaning the trimmer attachment Never dry the trimmer with a towel or tissue, as this may damage the trimming teeth. Clean the trimmer attachment after each use. 1 Switch on the appliance with the precision trimmer attachment attached. 2 Rinse the attachment under a warm tap. 3 After cleaning, switch off the appliance. 4 Carefully shake off excess water and let the attachment air-dry completely.
English Replacement reminder The replacement reminder indicates that the shaving heads need to be replaced.The shaving unit symbol lights up continuously, the arrows flash white and you hear a beep when you switch the shaver on or off. 1 Switch off the shaver. Pull the shaving head holder off the bottom part of the shaving unit. 2 Discard the old shaving head holder and attach the new shaving head holder to the bottom part of the shaving unit (‘click’). 7 sec.
English Ordering accessories To buy accessories or spare parts, visit www.philips.com/parts-and-accessories or go to your Philips dealer. You can also contact the Philips Consumer Care Center in your country (see the international warranty leaflet for contact details).
English Recycling - Do not throw away the product with the normal household waste at the end of its life, but hand it in at an official collection point for recycling. By doing this, you help to preserve the environment. - This product contains a built-in rechargeable battery which shall not be disposed of with normal household waste. Please take your product to an official collection point or a Philips service center to have a professional remove the rechargeable battery.
English 1 Remove the click-on attachment from the appliance. 2 On top of the appliance insert a screwdriver between the black cylinder and silver ring. Force the silver ring up off the appliance and remove the top panel. 3 Unscrew the two screws and remove the frame. 4 Remove the two back black covers and slide the front housing off the appliance. 5 Unscrew the two screws at the top of the inner panel.
English 6 Place a screwdriver between the lips of the inner panel and bend them aside. Then remove the inner panel. 7 Lift out the printed circuit board with the rechargeable battery. 8 Bend the battery tags aside with a screwdriver. 9 Remove the rechargeable battery.
English Warranty and support If you need information or support, please visit www.philips.com/support or read the international warranty leaflet. Warranty restrictions The shaving heads (cutters and guards) are not covered by the terms of the international warranty because they are subject to wear. Troubleshooting This chapter summarizes the most common problems you could encounter with the appliance. If you are unable to solve the problem with the information below, visit www.philips.
English Problem Possible cause The appliance The shaving heads does not shave are damaged or as well as it used worn. to. Solution Replace the shaving heads (see 'Replacement'). Hairs or dirt obstruct Clean the shaving heads the shaving heads. in the regular way or clean them thoroughly. I replaced the shaving heads, but the display still shows the replacement reminder. You have not reset the appliance. Reset the appliance by pressing the on/off button for approx. 7 seconds.
English Problem Possible cause Solution The notification symbol flashes and the shaver beeps after cleaning the shaving heads. The shaving heads are damaged. Replace the shaving heads (see 'Replacement'). Water is leaking During cleaning, from the bottom water may collect of the appliance. between the inner body and the outer shell of the appliance. This is normal and not dangerous because all electronics are enclosed in a sealed power unit inside the appliance.
保証と アフターサービス 保証書と修理サービスについて (必ずお読みください) 〈保証書・最終ページに付属〉 ● 保証書は、必ず「お買い上げ日・販売店名」等の記入 をお確かめのうえ、販売店から受け取っていただき 内容をよくお読みのあと大切に保管してください。 保証 期間 お買い上げ日から2年間 対象 部分 本体、充電アダプタ(シェービ ングユニット、 トリマーを除く) 【補修用性能部品の保有期間】 ● 補修用性能部品の保有期間は製造打ち切り後6年です。 ● 性能部品とは、その製品の機能を維持するために必要な部品です。 【ご不明な点や修理に関するご相談は】 ● 修理に関するご相談ならびにご不明な点は、 フィリップスサポートセンターにお問い合わ せください。 【修理を依頼されるときは】 ● 修理をご依頼される前に、 この取扱説明書をよくお読みいただき、 再度点検ください。尚、 異常のあるときはご使用を中止し、 フィリップスサポートセンターにお問い合わせください。 【保証期間中は】 ● 製品と保証書をご用意いただき、 フィリップスサポートセンターにお問い合わせください。保 証書の記載内容により無
便 利 メ モ お買い上げ日 年 月 日 お買い上げ 店 名 TEL.
49
キリトリ線 無料修理規定 〈無料修理規定〉 1. 取扱説明書、本体貼付ラベル等の注意書に従った正常な使用状態で保証期間 内に故障した場合には、無料修理します。 フィリップスサポート 2. 保証期間内に故障して無料修理をお受けになる場合には、 センターにお問い合わせください。 3. ご贈答品の修理に関するご相談は、フィリップスサポートセンターにお問い 合わせください。 4.
C E R T I F I C AT E O F P U R C H A S E この保証書は、 「無料修理規定」記載内容で無料修理を行うことをお約束するものです。お買い上げの日 から下記期間中に故障が発生した場合は、 フィリップスサポートセンターにお問い合わせください。 お客様にご記入いただいた個人情報(保証書の控え)は、株式会社フィリップス・ジャパンのホームペー ジ http://www.philips.co.