
operation manual

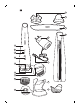


Table Of Contents
- Introduction
- General description (Fig. 1)
- Important
- Features
- Using the brush head
- Cleaning
- Charging
- Storage
- Brush head replacement
- Recycling
- Warranty and support
- Troubleshooting
- 介绍
- 基本说明'图 1)
- 注意事项
- 功能
- 使用刷头
- 清洁
- 充电
- 存放
- 刷头更换
- 回收
- 保修和支持
- 故障种类和处理方法
- 簡介
- 一般說明 (圖 1)
- 重要事項
- 功能
- 使用刷頭
- 清潔
- 充電
- 存放
- 更換刷頭
- 回收
- 保固與支援
- 疑難排解
- 소개
- 구성품 명칭(그림 1)
- 중요 사항
- 기능
- 브러시 헤드 사용
- 세척
- 충전
- 보관
- 브러시 헤드 교체
- 재활용
- 품질 보증 및 지원
- 문제 해결

English
Introduction
Congratulations on your purchase and welcome to Philips! To fully
benefit from the support that Philips offers, register your product at
www.philips.com/welcome.
With VisaPure Advanced you will enjoy a range of benefits to reveal a
radiant, revitalized and refreshed skin. Thanks to Intelligent Head
Recognition, the appliance recognizes which head you put on and
automatically activates a customized DualMotion program, with
dedicated levels of rotation, duration and vibration. This means you
get great skincare results! VisaPure Advanced comes with a diverse
set of heads that can be easily integrated into your skincare routine.
You can use all heads with your current skincare products like
cleansers, creams, oils and serums. This user manual contains usage
instructions for the device and information about the recommended
cleansing process. In the box you find separate leaflets with usage
information and instructions for the other attachments.
Why cleansing?
Cleansing is an essential part of the daily skincare routine. VisaPure
Advanced cleanses your skin better compared to cleansing by hand*.
It cleanses your skin thoroughly and removes dead skin cells and
make-up. Through research we found out that your skincare products
will be absorbed better after you have used VisaPure Advanced.
Therefore your skin feels clean and soft after you used VisaPure
Advanced.
* Internal study performed in the Netherlands in 2015 with 15 women.
General description (Fig. 1)
1 Handle
2 Charging light and battery low indication
3 Intensity setting indication
-
Intensity setting 1
-
Intensity setting 2
4 On/off button
5 Connection pin
6 Charging pins
6
English