
Operation Manual

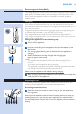


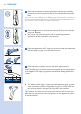

8 Press the ash button to release a ash. Now you have 2 options to
release the next ash:
A Keeptheashbuttonpressed.Theappliancereleasesoneash
afteranotheraslongasthesafetyringisinfullcontactwiththeskin.
Immediatelyaftertheappliancehasashed,slidetheappliancetothe
nextarea.Makesurethesafetyringisfullypressedontotheskin.
This‘Slide&Flashmode’isespeciallyconvenientfortreatmentoflarger
areaslikethelegs.
B Letgooftheashbuttonaftereachash.Forthenextash,placethe
applianceonthearearightnexttothepreviouslyashedarea.Make
surethesafetyringisfullypressedontotheskin.
This‘Step&Flashmode’guaranteesaprecisetreatmentofe.g.theupper
lip,kneesorankles.
Note: After a few seconds, the appliance is ready to ash again, so make sure
that you move it to the next area immediately after it has ashed.
Do not treat exactly the same area multiple times during one session.
This does not improve the effectiveness of the treatment, but increases
the risk of skin reactions.
Note: The visible light produced by the appliance is the reection of the ash
on the skin and is harmless to your eyes. It is not necessary to wear goggles
during use.
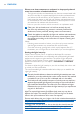
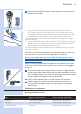
9 To avoid untreated areas, always make sure there is a slight overlap
with the previously treated area when you place the appliance on the
skin. The effective light only comes out of the light exit window. Make
sure the ashes are produced close to each other.
10 Switch off the appliance after you have nished the treatment.
11 Check the light exit window and the attachment for hairs and
dirt and clean the appliance after use (see chapter ‘Cleaning and
maintenance’).
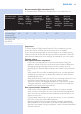
Guidelines for treatment
Average treatment time
Area Approx. treatment time Recommended attachment
Underarms 1minuteperunderarm Body/Precisionattachment
Bikiniline 1minuteperside Body/Precisionattachment
Entirebikiniarea 4minutes Body/Precisionattachment
ENGLISH 19