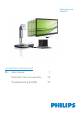
USB Docking stand SB4B1928 19” 28” www.philips.
Table of Contents 1. Important �����������������������������������������������1 1.1 Safety precautions and maintenance �1 1.2 Notational Descriptions ���������������������������2 1.3 Disposal of product and packing material ���������������������������������������������������������������3 2. Setting up the USB docking stand ����4 2.1 Installation ���������������������������������������������������������4 2.2 Operating the USB docking stand ������7 3.
1. Important 1. Important This electronic user’s guide is intended for anyone who uses the Philips USB docking stand. Take time to read this user manual before you use your USB docking stand. It contains important information and notes regarding operating your USB docking stand.
1. Important Service • The casing cover should be opened only by qualified service personnel. • If there is any need for any document for repair or integration, please contact with your local service center. (please refer to the chapter of “Consumer Information Center”) • 1.2 Notational Descriptions The following subsections describe notational conventions used in this document.
1. Important making products that can easily be recycled. At Philips, end-of-life management primarily entails participation in national take-back initiatives and recycling programs whenever possible, preferably in cooperation with competitors, which recycle all materials (products and related packaging material) in accordance with all Environmental Laws and taking back program with the contractor company. 1.
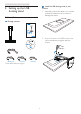
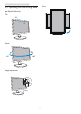
2. Setting up the USB docking stand Install the USB docking stand to your monitor 2. Setting up the USB docking stand 1. Place the monitor face down on a smooth surface. Pay attention not to scratch or damage the screen. 2.1 Installation Package contents SB4B1928 2. Snap in the base in the VESA mount area. Use a screwdriver to tighten the four screws. USB docking stand 使用 前请阅读使用说明 inkl © 2015 Kon User’s Manual USB docking stand drivers 保留备用 sN h ili p ijke P .V.
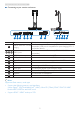
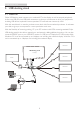
2. Setting up the USB docking stand Connecting to your monitor and server 1 2 3 4 5 6 7 8 9 10 11 12 13 Components Description For connection with USB devices (USB 1.0, 1.1, 2.0, 3.0 USB3.0 with B.C.1.2 fast compatible). USB port is compatible for quick-charging B.C.1.2 1 charging compatible devices. For connection with USB devices (USB 1.0, 1.1, 2.0, 3.0 2 12 13 USB 3.0 port compatible). USB 3.0 upstream port For connection with a notebook/PC.
2. Setting up the USB docking stand Connect to AC power 1. Connect your USB docking stand power cord to the power connector. 2. Connect the power cord to an AC outlet. 3. Turn on your USB docking stand by switching “ON” the power switch. Connect to computer 1. Connect one end of the USB 3.0 cable to the USB 3.0 port on the rear of the docking stand. 2. Connect the other end of the USB 3.0 cable to the USB 3.0 port on your notebook/PC. Connect to USB docking stand 1.
2. Setting up the USB docking stand Pivot 2.
3. USB docking stand 3. USB docking stand 3.1 What is it? Philips USB docking stand connects your notebook/PC to the display as well as external peripherals. It turns one USB port into USB/video connectors, so that you could access to all of your peripherals, including USB device, keyboard & mouse, speakers, SD card and even internet by LAN. With this stand there’s no need to purchase a new dock with future notebook purchases. It unclutters your desk, to give you more space for a more productive work area.
3. USB docking stand USB docking stand W/ display USB docking stand W/ display Monitor Monitor DP or HDMI DP or HDMI DP or HDMI USB USB docking stand W/ display USB PC USB Monitor DP or HDMI Notebook Note 1. You could extend to maximum six displays for Windows and four displays for Mac system. 2. Due to the limitation of transmission bandwidth, large content videos that are 4K or above, may experience less smooth picture image. Mode Single Head Dual Head Connection Type Max Resolution DP 1.
3. USB docking stand 3.2 Minimum systems requirement 1 Operation system For optimal performance, use the docking stand with notebook/PC running the Windows Vista, Windows 7 or Windows 8/8.1 operation system. System requirement 2 Minimum System Requirements PC with non-4K displays • Microsoft Windows Vista® (32-bit or 64-bit) • Microsoft Windows 7 (32-bit or 64-bit) • Microsoft Windows 8 (32-bit or 64-bit) • Microsoft Windows 8.
3. USB docking stand 3.3 Setting the software 1 Installing the DisplayLink USB Graphics Software Do not connect a DisplayLink devices/screen to your USB docking stand before the installation. (1). Insert the included driver CD USB docking stand 使用 前请阅读使用说明 i n kl © 2015 Ko n User’s Manual USB docking stand drivers 保留备用 ijke P h il ips .A N. V ll r ig h se Philips and the Philips’ Shield Emblem are registered trademarks of Koninklijke Philips N.V.
3. USB docking stand For Windows OS For Mac OS (3). Follow the on- screen instructions until the installation is completed. Note For details regarding your DisplayLink user guide, please refer to the CD that comes with your USB docking stand at the following directory: \PC\Drivers The latest version of this software can be obtained from: http://www.DisplayLink.com For further support please visit http://www.displaylink.com/support. For Mac OS X installation support please visit: http://www.displaylink.
3. USB docking stand 3.4 Using the software 1 Using DisplayLink 1. Using DisplayLink to configure the display of an extra monitor. In the notification area, click the DisplayLink icon, and select "DisplayLink Manager". 2. To extend the Windows desktop, click " Multiple displays" tab, and select " Extend these displays". To mirror the primary monitor, click " Multiple displays" tab, and select " Duplicate these displays".
3. USB docking stand 3. Click the DisplayLink icon . A menu appears with several options. These are shown and described below. \ Further Support Please visit http://www.displaylink.com/support or http://www.displaylink.org/forum. Menu Option Sub-menu Option Description DisplayLink Manager This is the UI title. Clicking on this item will show the version of DisplayLink software installed.
3. USB docking stand Sub-menu Option Menu Option Screen Resolution Right Left Extends the display to the left of the main display. Above Extends the display above of the main display. Below Extends the display below the main display. Rotated Left Rotated Right Upside-Down Extend To Displays a list of available resolutions. Some resolutions may be enclosed by [ ]. Please see, Inferred Modes.
4. Technical Specifications 4. Technical Specifications Picture/Display Supported resolution Ergonomics Tilt Swivel Height Adjustment Pivot Adjustment Height adjustment locking system Monitor size Connectivity Signal Output Signal Input Earphone jack Microphone LAN port SD card: Convenience Cable management VESA mount Power On mode Standby mode (S3) Off mode Power LED Indicator Power Supply Dimension Stand (WxHxD) Weight Stand Product with packaging Single Head HDMI1.3: 2560 x 1440@50Hz (max.) or DP1.
4. Technical Specifications Operating Condition Temperature range (operation) Temperature range (Non-operation) Relative humidity Environmental ROHS Packaging Specific Substances Compliance and standards Regulatory Approvals Cabinet Color Finish 0°C to 40 °C -20°C to 60°C 20% to 80% YES 100% recyclable 100% PVC BFR free housing CB,CU-EAC, CE, EMF, ErP, Semko, C-tick Front column: silver, back column: black, base:black Texture Note 1.
5. Regulatory Infomation EN 55022 Compliance (Czech Republic Only) 5. Regulatory Information CE Declaration of Conformity This product is in conformity with the following standards • EN60950-1:2006+A11:2009+A1:20 10+A12:2011 (Safety requirement of Information Technology Equipment). • EN55022:2010 (Radio Disturbance requirement of Information Technology Equipment). • EN55024:2010 (Immunity requirement of Information Technology Equipment).
5. Regulatory Infomation North Europe (Nordic Countries) Information Aus ergonomischen Gründen wird empfohlen, die Gr undfarben Blau und Rot nicht auf dunklem Untergrund zu verwenden (schlechte Lesbarkeit und erhöhte Augenbelastung bei zu geringem Zeichenkontrast wären die Folge). Der arbeitsplatzbezogene Schalldruckpegel nach DIN 45 635 beträgt 70dB (A) oder weniger. Placering/Ventilation VARNING: FÖRSÄKRA DIG OM ATT HUVUDBRYTARE OCH UTTAG ÄR LÄTÅTKOMLIGA, NÄR DU STÄLLER DIN UTRUSTNING PÅPLATS.
5. Regulatory Infomation Restriction on Hazardous Substances statement (India) Information for U.K. only This product complies with the “India E-waste Rule 2011” and prohibits use of lead, mercury, hexavalent chromium, polybrominated biphenyls or polybrominated diphenyl ethers in concentrations exceeding 0.1 weight % and 0.01 weight % for cadmium, except for the exemptions set in Schedule 2 of the Rule. WARNING - THIS APPLIANCE MUST BE EARTHED.
5. Regulatory Infomation How to connect a plug 根据中国大陆《电子电气产品有害物质 限制使用标识要求》(也称为中国大陆 RoHS),以下部分列出了本产品中可能包 含的有害物质的名称和含量。 The wires in the mains lead are coloured in accordance with the following code: BLUE -“NEUTRAL”(“N”) 有害物质 BROWN -“LIVE”(“L”) 部件名称 GREEN&YELLOW -“EARTH”(“E”) 1. The GREEN&YELLOW wire must be connected to the terminal in the plug which is marked with the letter "E" or by the Earth symbol or coloured GREEN or GREEN&YELLOW. 2.
6. Customer care and warranty 6. Customer care and warranty 6.1 Customer Care & Warranty For warranty coverage information and additional support requirement valid for your region, please visit www.philips.com/support website for details. You may also contact your local Philips Customer Care Center number listed below. Contact Information for WESTERN EUROPE region: Country CSP Hotline Number Price Opening Hours Austria RTS +43 0810 000206 € 0.
6. Customer care and warranty Contact Information for CENTRAL AND EASTERN EUROPE region: Country Call center CSP Consumer care number Belarus NA IBA +375 17 217 3386 +375 17 217 3389 Bulgaria NA LAN Service +359 2 960 2360 Croatia NA MR Service Ltd +385 (01) 640 1111 Czech Rep.
6. Customer care and warranty Contact Information for APMEA region: Country Australia ASP AGOS NETWORK PTY LTD Consumer care number Opening hours 1300 360 386 Mon.~Fri. 9:00am-5:30pm New Zealand Visual Group Ltd. 0800 657447 Mon.~Fri. 8:30am-5:30pm Hong Kong Macau Company: Smart Pixels Technology Ltd. Hong Kong: Tel: +852 2619 9639 Macau:Tel: (853)-0800-987 Mon.~Fri. 9:00am-6:00pm Sat. 9:00am-1:00pm India REDINGTON INDIA LTD Tel: 1 800 425 6396 SMS: PHILIPS to 56677 Mon.~Fri.
7. Troubleshooting & FAQs DisplayLink driver not able to install. 7. Troubleshooting & FAQs Get the driver by either: 1. Downloading the latest driver from the DisplayLink website at www.displaylink.com/support. 7.1 Troubleshooting This page deals with problems that can be corrected by a user. If the problem still persists after you have tried these solutions, contact Philips customer service representative. 2. Connect to Windows Update with Docking stand.
© 2015 Koninklijke Philips N.V. All rights reserved. Philips and the Philips Shield Emblem are registered trademarks of Koninklijke Philips N.V. and are used under license from Koninklijke Philips N.V. Specifications are subject to change without notice.