Cloud monitor base SB4B1927CB www.philips.
Table of Contents 1. Important �����������������������������������������������1 1.1 Safety precautions and maintenance �1 1.2 Notational Descriptions ���������������������������2 1.3 Disposal of product and packing material ���������������������������������������������������������������3 2. Setting up the cloud monitor base ���4 2.1 Installation ���������������������������������������������������������4 2.2 Operating the cloud monitor base ����6 2.
1. Important the power cable or DC power cord for normal operation. 1. Important This electronic user’s guide is intended for anyone who uses the Philips cloud monitor base. Take time to read this user manual before you use your cloud monitor base. It contains important information and notes regarding operating your monitor.
1. Important • In order to maintain the best performance of your cloud monitor base and use it for a longer lifetime, please use the cloud monitor base in a location that falls within the following temperature and humidity ranges. 1.2 Notational Descriptions The following subsections describe notational conventions used in this document. Notes, Cautions and Warnings Throughout this guide, blocks of text may be accompanied by an icon and printed in bold or italic type.
1. Important making products that can easily be recycled. At Philips, end-of-life management primarily entails participation in national take-back initiatives and recycling programs whenever possible, preferably in cooperation with competitors, which recycle all materials (products and related packaging material) in accordance with all Environmental Laws and taking back program with the contractor company. 1.
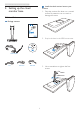
2. Setting up the cloud monitor base Install the cloud monitor base to your monitor 2. Setting up the cloud monitor base 1. Place the monitor face down on a smooth surface. Pay attention not to scratch or damage the screen. 2.1 Installation Package contents Cloud monitor base SB4B1927CB 2. Snap in the base in the VESA mount area. Cloud monitor base 使用 前请阅读使用说明 inkl © 2014 Kon User’s Manual Monitor drivers SmartControl software 保留备用 sN h ili p ijke P .V.
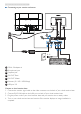
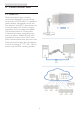
2. Setting up the cloud monitor base Connecting to your monitor and server 3 2 1 4 5 7 6 7 RJ-45 1 12Vdc, 3A adapter in 2 Microphone input 3 Earphone jack 4 DVI-OUT Slave 5 DVI-OUT Master 6 Ethernet (10 / 100 / 1000 Mbps) 7 USB port 2.0 Connect to cloud monitor base 1. Connect the monitor signal cable to the video connector on the back of your cloud monitor base. 2. Connect RJ-45 LAN cable to the LAN port on back of your cloud monitor base. 3.
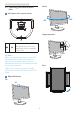
2. Setting up the cloud monitor base Swivel 2.2 Operating the cloud monitor base Description of the control buttons +65˚ -65˚ Height adjustment 1 Switch power ON and OFF. Press power key to turn it on. Hold power key for 6 seconds to turn it off. 120mm Note When your cloud monitor base is on the DC Off mode, WOL function which stands for wake on LAN is ready for the host server administrator, while WOL activated, power LED will blink by one second.
2. Setting up the cloud monitor base 2.3 Citrix server requirements 1 Citrix Software 1. XenDesktop 5.5 or higher on Windows 7 SP1 (32bit or 64bit) 2. XenApp 6.5 or higher on Windows server 2008 R2 3. VDI-In-a-Box 5.0 or higher with virtual machine on Windows 7 SP1 (32bit or 64bit) 2 Network: 1.
3. Cloud monitor base Firmware 3. Cloud monitor base 3.1 What is it? Philips cloud monitor base is zero/thin client solution designed for Virtual Desktop Infrastructure (VDI). VDI offers IT organizations greater flexibility, manageability, security and cost reduction. With VDI IT administrators can more easily adapt the IT needs to changing organization with new systems and updates. The centralized nature of VDI also offers IT administrators better manageability and security of systems.
3. Cloud monitor base Firmware 3.2 Power Key Function 1 Cloud Monitor Base operation 1. Shortly press power key to turn it on. 2. Hold power key for 6 seconds to turn it off. 3. When AC power plugs in, power LED will be lighted up for 1 second and then be turned off. This action sets WOL function ready and power down the cloud monitor base. 4. USB ports are not supporting 5V standby power at cloud monitor base DC Off mode. 3.3 Cloud monitor base User Interface 1 Connection To Use cloud monitor base 1.
3. Cloud monitor base Firmware 2. Login widget Label Description Protocol Show the connection protocol type. Server IP Input Citrix XenDesktop/XenApp/VDI-in-a-Box server IP address the user connects to. Username Input the user account name. Password Input the user account password. Domain Input the Citrix server domain name. This column is optional. Login Press this button will pass the connection information to Citrix server and show the VDI list. 3.
3. Cloud monitor base Firmware 4. Menu items Menu Item Description Close login widget and open “Power” menu, which includes “Reboot”, “Power off ”, “Close” function. Open “Volume Control Tool”. The icon will be changed if volume is setting to zero. Close login widget and open “Settings” menu. User can adjust settings about “Display”, “Keyboard”, “Language”, “Mouse”, “Network”, “Time” functions. Close login widget and open “Network Test Tool”. User can check network connection to the destination IP.
3.
3. Cloud monitor base Firmware Label Description Network Status This item expresses network cable connection status icon. This icon will change when the cable is loose / plugged out or re-plugged in. DHCP Select this item to specify DHCP mode to get local IP. It will lock “IP Address”, “Subnet Mask”, “Default Gateway”, “DNS” fields and update these values from DHCP server. When user presses “Apply” button, system will send DHCP request to DHCP server and get distributed IP from DHCP server.
4. Technical Specifications 4. Technical Specifications Platform Processor Frequency ROM RAM System Client solution Picture/Display Vertical refresh rate Horizontal frequency Monitor max.
4. Technical Specifications Power Supply Standby mode supported Dimension Stand (WxHxD) Weight Stand Product with packaging Operating Condition Temperature range (operation) Temperature range (Non-operation) Relative humidity MTBF Environmental ROHS Packaging Specific Substances Compliance and standards Regulatory Approvals Cabinet Color Finish Built-in, 100-240VAC, 50/60Hz Wake on LAN (WOL) 310 x 463 x 261 mm 3.0 kg 4.
5. Regulatory Infomation EN 55022 Compliance (Czech Republic Only) 5. Regulatory Information CE Declaration of Conformity This product is in conformity with the following standards • EN60950-1:2006+A11:2009+A1:20 10+A12:2011 (Safety requirement of Information Technology Equipment). • EN55022:2010 (Radio Disturbance requirement of Information Technology Equipment). • EN55024:2010 (Immunity requirement of Information Technology Equipment).
5. Regulatory Infomation North Europe (Nordic Countries) Information 2. nur original-Ersatzteile verwendet werden. Placering/Ventilation VARNING: FÖRSÄKRA DIG OM ATT HUVUDBRYTARE OCH UTTAG ÄR LÄTÅTKOMLIGA, NÄR DU STÄLLER DIN UTRUSTNING PÅPLATS. 3. bei Ersatz der Bildröhre nur eine bauartgleiche eingebaut wird.
5. Regulatory Infomation China RoHS The People's Republic of China released a regulation called "Management Methods for Controlling Pollution by Electronic Information Products" or commonly referred to as China RoHS. All products produced and sold for China market have to meet China RoHS request.
6. Customer care and warranty 6. Customer care and warranty 6.1 Customer Care & Warranty For warranty coverage information and additional support requirement valid for your region, please visit www.philips.com/support website for details. You may also contact your local Philips Customer Care Center number listed below. Contact Information for WESTERN EUROPE region: Country CSP Hotline Number Price Opening Hours Austria RTS +43 0810 000206 € 0.
6. Customer care and warranty Contact Information for CENTRAL AND EASTERN EUROPE region: Country Call center CSP Consumer care number Belarus NA IBA +375 17 217 3386 +375 17 217 3389 Bulgaria NA LAN Service +359 2 960 2360 Croatia NA MR Service Ltd +385 (01) 640 1111 Czech Rep.
6. Customer care and warranty Contact Information for APMEA region: Country Australia ASP AGOS NETWORK PTY LTD Consumer care number Opening hours 1300 360 386 Mon.~Fri. 9:00am-5:30pm New Zealand Visual Group Ltd. 0800 657447 Mon.~Fri. 8:30am-5:30pm Hong Kong Macau Company: Smart Pixels Technology Ltd. Hong Kong: Tel: +852 2619 9639 Macau:Tel: (853)-0800-987 Mon.~Fri. 9:00am-6:00pm Sat. 9:00am-1:00pm India REDINGTON INDIA LTD Tel: 1 800 425 6396 SMS: PHILIPS to 56677 Mon.~Fri.
7. Troubleshooting & FAQs Visible signs of smoke or sparks 7. Troubleshooting & FAQs 7.1 Troubleshooting This page deals with problems that can be corrected by a user. If the problem still persists after you have tried these solutions, contact Philips customer service representative. Common Problems No Picture (Power LED not lit) • Make sure the power cord is plugged into the power outlet and into the back of the cloud monitor base.
© 2014 Koninklijke Philips N.V. All rights reserved. Philips and the Philips Shield Emblem are registered trademarks of Koninklijke Philips N.V. and are used under license from Koninklijke Philips N.V. Specifications are subject to change without notice.