
User manual

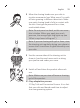
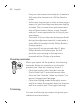
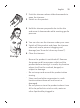
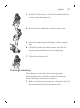
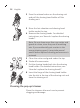
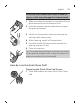
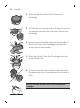
Table Of Contents
- Contents
- IMPORTANT SAFETY INSTRUCTIONS
- General description
- Introduction
- What do the icons on the display mean?
- What is my shaver telling me?
- How do I charge my product?
- How do I use my product?
- How do I clean my shaver?
- How do I connect my shaver and smartphone?
- How do I replace the shaving heads?
- Accessories
- Assistance
- Further guidance
- Disposal
- Full Two-Year Warranty
- 45-DAY MONEY-BACK GUARANTEE
- Trademarks
- Contenido
- INSTRUCCIONES IMPORTANTES DE SEGURIDAD
- Información general
- Introducción
- ¿Qué significan los íconos de la pantalla?
- ¿Qué indica la afeitadora?
- ¿Cómo se carga el producto?
- ¿Cómo se usa el producto?
- ¿Cómo se limpia la afeitadora?
- ¿Cómo conecto la afeitadora con mi smartphone?
- ¿Cómo se reemplazan los cabezales de afeitado?
- Accesorios
- Asistencia
- Orientación adicional
- Desecho
- Garantía Total de Dos Años
- GARANTÍA DE DEVOLUCIÓN DE SU DINERO POR 45 DÍAS
- Marcas registradas
- Blank Page
- Blank Page

23
English
2 Move the shaving heads over your skin in
circular movements (see 'Main menu') to catch
all hairs growing in different directions. Make
sure each shaving head is fully in contact with
the skin. Exert gentle pressure for a close,
comfortable shave.
Note: Do not press too hard, as this can cause
skin irritation. When you apply too much
pressure, the orange light ring lights up (see
'What is my shaver telling me?').
Note: If you are shaving with gel or foam, rinse
the shaving unit regularly during your shave to
ensure that it continues to glide smoothly over
your skin.
3 Use the narrow sides of the shaving unit to
shave in hard-to-reach areas such as along
your jawline and under your nose.
4 Switch off and clean the product after each
use.
Note: Make sure you rinse all foam or shaving
gel off the product.
21-Day adaptation process
-
21 Day Trial and Conversion Process. It is a fact
that your skin and beard need time to adjust
to a new grooming system.