
User manual
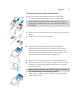
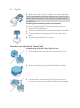
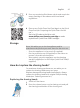

Table Of Contents
- Contents
- General description
- Introduction - Identify your shaver
- Fig. A
- Fig. B
- Important safety information
- What do the icons on the display mean? (Fig. A)
- What do the icons on the display mean? (Fig. B)
- Main menu (Fig. A)
- Main menu (Fig. B)
- How do I connect my shaver and smartphone? (Fig. A)
- How do I connect my shaver and smartphone? (Fig. B)
- What is my shaver telling me? (Fig. A)
- What is my shaver telling me? (Fig. B)
- How do I charge my appliance?
- How do I use my appliance and the attachments?
- How do I clean my appliance and the attachments?
- Storage
- How do I replace the shaving heads?
- Ordering accessories
- Troubleshooting
- Further guidance
- Recycling
- Trademarks

43
English
4
Press the small circular piece on the handle of the
Quick Clean Pod Cartridge to break the snap hook on
the handle.
5
Place the Quick Clean Pod Cartridge into the Quick
Clean Pod.
6
Put the top of the Quick Clean Pod back onto the base
and turn it clockwise until you hear a click.
Do not tilt the Quick Clean Pod to prevent leakage.
Using the Quick Clean Pod
Note: If you use the shaver with shaving foam, shaving
gel or pre-shave products, thoroughly rinse the shaving
heads before you use the Quick Clean Pod (see 'How do I
clean my appliance and the attachments?').
Always shake excess water off the shaver before you
place it in the Quick Clean Pod.
1
Place the shaver upside down into the Quick Clean
Pod. While switched on, the shaver automatically
detects that it is in the Quick Clean Pod.
2
Switch on the shaver to start the cleaning program.
Each cleaning program takes approximately one
minute. During the cleaning program the remaining
time is displayed as a countdown clock on the handle.
3
Let the shaver air-dry completely in the Quick Clean
Pod before storing it.