S8860 22_002_5921_1_DFU-Luxury_A6_v9.
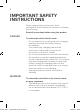
IMPORTANT SAFETY INSTRUCTIONS When using an electrical product, basic precautions should always be followed, including the following: Read all instructions before using this product. DANGER To reduce the risk of electric shock: -- Do not reach for a corded product or charging pad that has fallen into water. Unplug immediately. -- The power plug, charging pad and the accessories connected to it are not for immersion or for use in shower. -- Do not use an extension cord with this product.
-- Close supervision is required when this product or charging pad is used by, on, or near children, or persons with limited physical, sensory, or mental capabilities or invalids. -- Use this product and charging pad for its intended household use as described in this manual. Do not use attachments not recommended by Philips North America LLC.
-- Never put the product, charging pad or attachments in direct sunlight or store at a temperature above 140°F (60°C). -- Keep the cord, charging pad and power plug dry at all times. Do not handle with wet hands. -- To prevent possible damage to the cord, do not wrap cord around the product or charging pad. -- Do not attempt to open the product to remove or replace the built-in rechargeable battery. -- Only use the power plug, USB plug and other accessories supplied with the product.
Contents IMPORTANT SAFETY INSTRUCTIONS_____________________ Introduction__________________________________________ General description (Fig.
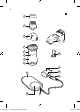
1 1 2 3 16 17 4 5 15 6 7 8 14 13 9 12 10 22_002_5921_1_DFU-Luxury_A6_v9.
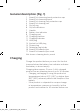
General description (Fig.
-- The charging pad is a Class III construction. 1 Attach USB plug to power plug. 2 Put the power plug into any 100V to 240C AC outlet and place the product onto the circular section of the charging platform of the charging pad. Use only the power plug, cord and USB plug provided. -- The charging pad beeps when the product is correctly placed onto the charging platform. 3 After charging, remove the power plug from the wall outlet.
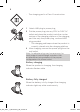
Battery low When the battery is almost empty, the battery low indicator flashes orange. Using the product Always check the product and all accessories before using. Do not use the product or any accessory if it is damaged, as this may cause injury. Always replace a damaged part with one of the original type. This symbol indicates that the product can be used in the bath or shower. -- Use this product for its intended household use as described in this manual.
-- If you are still not convinced after 21 days, Philips will refund you the full purchase price as long as the request is received within 45 days of purchase. Switching the product on and off 1 o switch on the product, turn the on/off ring T counterclockwise to the 'on' indication (I). 2 To switch off the product, turn the on/off ring clockwise to the 'off' indication (0). Shaving For best results on skin comfort, pre-trim your beard if you have not shaved for 3 days or longer.
1 Apply some water to your skin. 2 Apply shaving foam or shaving gel to your skin. 3 Rinse the shaving unit under the tap to ensure that the shaving unit glides smoothly over your skin. 4 Switch on the product. 5 Move the shaving heads over your skin in circular movements to catch all hairs growing in different directions. Exert gentle pressure for a close, comfortable shave. Note: Rinse the shaving unit regularly to ensure that it continues to glide smoothly over your skin.
3 Insert the lug of the desired attachment into the slot in the top of the product. Then press down the attachment to attach it to the product ('click'). Using the beard styler attachment with comb You can use the beard styler with the comb attached to style your beard at one fixed setting, but also at different length settings. You can also use it to pre-trim any long hairs before shaving for a more comfortable shave.
1 Pull the comb off the beard styler. Note: Grab the comb in the center to pull it off the beard styler. Do not pull at the sides of the comb. 2 Switch on the product. 3 Hold the beard styler perpendicular to the skin and move the product downwards while you exert gentle pressure. 4 Clean the beard styler after use. Using the cleansing brush attachment Use the rotating cleansing brush with your daily cleansing cream.
4 Moisten your face with water and apply a cleanser to your face. 5 Switch on the product. 6 Gently move the brush across your skin from the nose towards the ear. Do not push the cleansing brush too hard onto the skin. 20 sec. 7 After approx. 20 seconds, move the product to your other cheek. Do not cleanse the sensitive area around your eyes. 20 sec. 20 sec. 8 After approx. 20 seconds move the product to your forehead. Gently move the brush from left to right.
Cleaning and maintenance -- Regular cleaning guarantees better shaving results. -- Never clean, remove or replace shaving unit while motor is on. -- Do not apply pressure to shaving head combs. -- Do not touch shaving heads with hard objects as this may dent or damage precision-made slotted combs. -- Do not use abrasives, scourers or aggressive liquids such as gasoline or acetone to clean the shaver, charging pad or any attachments.
4 Rinse the shaving head holder under a warm tap. 5 Carefully shake off excess water and let the shaving head holder air dry. 6 Reattach the shaving head holder to the bottom part of the shaving unit ('click'). Cleaning the charging pad 1 Wipe the surface of the charging pad with a slightly damp cloth to remove any dirt. 2 22_002_5921_1_DFU-Luxury_A6_v9.indd 16 Dry the surface with a dry cloth after cleaning.
Cleaning the Smartclick attachments Cleaning the cleansing brush 1 Switch off the product. 2 Detach the brush head from the attachment base. Note: Do not twist the brush head while you pull it off the brush base. 3 Clean both parts thoroughly with warm water and mild soap. 4 Dry the cleansing brush with a towel being careful not to bend the bristles. Cleaning the beard styler Clean the beard styler after each use. 1 Pull the comb off the beard styler.
Replacement Replacing the cleansing brush head The brush head should be replaced every 3 months or earlier if the brush hairs are bent or damaged. 1 Switch off the product. 2 Detach the brush head from the attachment base. 3 Discard the used brush head. 4 Attach the new cleansing brush head to the brush base. Replacing the shaving heads For maximum shaving performance, we advise you to replace the shaving heads once a year. Replace damaged shaving heads immediately.
3 1 2 3 Place the retaining ring holder on the retaining ring, turn it counterclockwise and lift it off the shaving head. Remove the retaining ring from the retaining ring holder and repeat this process for the other retaining rings. Place them aside in a safe place. 4 Remove the shaving heads from the shaving head holder. Discard the used shaving heads immediately to avoid mixing them with the new shaving heads. 5 Place the new shaving heads in the shaving head holder.
7 Reattach the shaving head holder to the bottom part of the shaving unit ('click'). These products have no other user-serviceable parts. For assistance call 1-800-243-3050. Storage -- Be sure the product is turned off. Remove cord from outlet before storing it in a safe, dry location where it will not be crushed, banged, or subject to damage. -- Do not wrap cord around the product or charging pad when storing. -- Store cord in a safe location where it will not be cut or damaged.
Disposal -- This product contains a rechargeable lithiumion battery which must be disposed of properly. -- Contact your local town or city officials for battery disposal information. You can also call 1-800-822-8837 or visit www.call2recycle.org for battery drop-off locations. -- For assistance, visit our website www.philips.com/ support or call 1-800-243-3050 toll free. -- Your product is designed and manufactured with high quality materials and components, which can be recycled and reused.
NO RESPONSIBILITY IS ASSUMED FOR ANY SPECIAL, INCIDENTAL OR CONSEQUENTIAL DAMAGES. In order to obtain warranty service, simply go to www.philips.com/support for assistance. It is suggested that for your protection you return shipments of product by insured mail, insurance prepaid. Damage occurring during shipment is not covered by this warranty. NOTE: No other warranty, written or oral, is authorized by Philips North America LLC.
45-DAY MONEY-BACK GUARANTEE If you are not fully satisfied with your product send the product back and we’ll refund you the full purchase price. The product must be shipped prepaid by insured mail, insurance prepaid, have the original sales receipt, indicating purchase price and date of purchase, and the money-back guarantee return authorization form enclosed. We cannot be responsible for lost mail. The product must be postmarked no later than 45 days after the date of purchase.
Manufactured for: Philips Personal Health a division of Philips North America LLC P.O. Box 10313, Stamford, CT 06904 This symbol on the product’s nameplate means it is listed by Underwriters’ Laboratories, Inc. PHILIPS and Philips shield are a registered trademarks of Koninklijke Philips N.V. ©2017 Philips North America LLC. All rights reserved. 22_002_5921_1_DFU-Luxury_A6_v9.indd 24 www.philips.com 4222.002.5921.