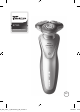
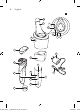
S7740 Tripleheader shaver 22_002_7341_1_DFU-Luxury_A6_v5.
English IMPORTANT SAFETY INSTRUCTIONS When using an electric product, basic precautions should always be followed, including the following: Read all instructions before using this product. DANGER To reduce the risk of electric shock: -- Do not reach for a corded product/SmartClean system that has fallen into water. Unplug immediately. -- Power plug and the accessories connected to it are not for immersion or for use in shower. -- Do not use an extension cord with this product.
English 3 -- Close supervision is required when this product/SmartClean system is used by, on, or near children, or persons with limited physical, sensory, or mental capabilities or invalids. -- Use this product/SmartClean system for its intended household use as described in this manual. Do not use attachments not recommended by Philips North America LLC.
English -- Never put the product/SmartClean system in direct sunlight or store at a temperature above 140°F (60°C). -- Keep the power cord dry at all times. Do not handle with wet hands. -- To prevent possible damage to the cord, do not wrap cord around the product/SmartClean system. -- Do not attempt to open the product to remove or replace the built-in rechargeable battery. -- Only use the power cord and other accessories supplied with the product.
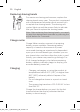
English 5 Contents Important safety instructions ___________ 2 I General description (Fig.
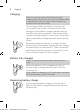
English 1 13 12 14 15 16 17 18 11 1 19 10 2 9 3 8 20 7 6 5 4 22_002_7341_1_DFU-Luxury_A6_v5.
English 7 General description (Fig.
English Charging Note: If you press the on/off button during charging, the 'unplug for use' symbol flashes white to remind you that you have to disconnect the product from the wall outlet. Quick charge: When the battery is empty and you connect the product to an electrical outlet, the lights of the battery charge indicator light up one after the other repeatedly. When the product contains enough energy for one shave, the bottom light of the battery charge indicator starts flashing slowly.
English 9 Battery low When the battery is almost empty, the bottom light of the battery charge indicator flashes orange. ’Unplug for use’ reminder The ‘unplug for use’ symbol flashes to remind you that you have to disconnect the product from the power outlet before you can switch it on. Cleaning reminder Clean the shaver after every shave for optimal performance (see 'Cleaning and maintenance'). When you switch off the product, the cleaning reminder flashes to remind you to clean the product.
English Replacing shaving heads For maximum shaving performance, replace the shaving heads every year. The product is equipped with a replacement reminder which reminds you to replace the shaving heads. The shaving unit symbol lights up and the arrows flash to indicate that you have to replace the shaving heads. Note: After replacing the shaving heads, you need to reset the replacement reminder by pressing the on/off button for 7 seconds.
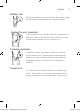
English 11 Charging takes approx. 1 hour. A fully charged shaver has a shaving time of up to 50 minutes. Note: You cannot use the product while it is charging. Charging with the power cord 1 2 1 Make sure the product is switched off. 2 Put the small plug in the product and connect the power plug into any 100V to 240V AC outlet. Use only the power cord and SmartClean system provided. The display on the shaver will indicate the product is charging.
English 4 Hold the shaver upside down above the holder. Make sure the front of the shaver points towards the SmartClean system holder. 1 2 3 5 Place the shaver in the holder, tilt the shaver backwards and press down the top cap to connect the shaver (‘click’). The battery symbol starts to flash to indicate that the product is charging. When the battery is fully charged, the battery symbol lights up continuously.
English 13 Put it to the test -- 21 Day Trial and Conversion Process. It is a fact that your skin and beard need time to adjust to a new grooming system. -- Use your new shaver exclusively for 3 weeks to fully enjoy the closeness of a Philips Norelco shave. -- At first you may not get as close a shave as you expect, or your face may even become slightly irritated. This is normal since your beard and skin will need time to adjust. Invest 3 weeks and you'll soon experience the full joy of your new shaver.
English 2 Move the shaving heads over your skin in circular movements to catch all hairs growing in different directions. Exert gentle pressure for a close, comfortable shave. Note: Do not press too hard, this can cause skin irritation. 3 Switch off and clean the product after each use. The display lights up for a few seconds to show the remaining battery status. Wet shaving For a more comfortable shave, you can also use this product on a wet face with shaving foam or shaving gel.
English 15 5 Move the shaving heads over your skin in circular movements to catch all hairs growing in different directions. Exert gentle pressure for a close, comfortable shave. Note: Do not press too hard, this can cause skin irritation. Note: Rinse the shaving unit regularly to ensure that it continues to glide smoothly over your skin. 6 Dry your face. 7 Switch off and clean the product after each use. Note: Make sure you rinse all foam or shaving gel off the product.
English 3 Insert the lug of the attachment into the slot in the top of the product. Then press down the attachment to attach it to the product (‘click’). Using the precision trimmer You can use the trimmer to groom your beard, sideburns and moustache. 1 Attach the trimmer to the product ('click'). 2 Switch on the product. 3 Hold the trimmer perpendicular to the skin and move the product downwards while you exert gentle pressure. 4 22_002_7341_1_DFU-Luxury_A6_v5.
English 17 Travel lock Activating the travel lock 1 Press the on/off button for 3 seconds to enter the travel lock mode. 3 sec. While you activate the travel lock, the travel lock symbol lights up continuously. When the travel lock is activated, the travel lock symbol flashes. Deactivating the travel lock 1 Press the on/off button for 3 seconds. The travel lock symbol flashes and then lights up continuously. The product is now ready for use again.
English -- Do not use abrasives, scourers or aggressive liquids such as gasoline or acetone to clean the shaver. -- Do not place or clean any parts of the SmartClean system in a dishwasher. Cleaning the shaver under the tap Clean the shaver after every shave for optimal performance. Always check if the water is too hot, to prevent burning your hands. Never dry the shaving unit with a towel or tissue, as this may damage the shaving heads.
English 4 19 Rinse the hair chamber under the tap. 5 Rinse the shaving head holder under a warm tap. 6 Carefully shake off excess water and let the shaving head holder air dry. 7 Attach the shaving head holder to the bottom part of the shaving unit (‘click’). Cleaning the shaver in the SmartClean system Keep cleaning cartridge(s) out of reach of children. Do not take internally. Avoid contact with eyes. In case of eye contact, thoroughly flush with cold water.
English -- Place the SmartClean system on a flat, stable and fluid-resistant surface to avoid any leakage. Be careful not to tip or move the SmartClean System when it is ready for use. -- Use this product for its intended household use as described in this manual. Preparing the SmartClean system for use Caution: Do not tilt the SmartClean system to prevent leakage. Note: Hold the SmartClean system while you prepare it for use. 1 Put the small plug in the back of the SmartClean system.
English 21 6 While holding the SmartClean system with one hand, gently push the top part of the SmartClean system back down (‘click’). Using the SmartClean system Note: If you use the shaver with shaving foam or gel, quickly rinse under warm water before cleaning in the SmartClean system. Caution: Always shake excess water off the shaver before you place it in the SmartClean system. 1 Press the top cap to be able to place the shaver in the holder ('click').
English 4 Press the on/off button on the SmartClean system to start the cleaning program. During the cleaning phase, the cleaning symbol flashes. When the cleaning phase is done (after approx. 10 minutes), the cleaning symbol lights up continuously. When the cleaning program is done, the ready symbol lights up continuously. 30 minutes after the cleaning program and charging are done, the SmartClean system switches off automatically.
English 23 Cleaning the precision trimmer Never dry with a towel or tissue, as this may damage the trimming teeth. Clean the trimmer after each use. 1 Switch the product on. 2 Rinse the trimmer under a warm tap. 3 After cleaning, switch off the product. 4 Carefully shake off excess water and let the trimmer air dry. 5 For optimal performance, lubricate the teeth of the trimmer with a drop of mineral oil every six months.
English 2 Pull the shaving head holder off the bottom part of the shaving unit. 3 Turn the retaining rings counterclockwise and remove them. Place them aside in a safe place. 2 1 4 Remove the shaving heads from the shaving head holder. Discard the used shaving heads immediately to avoid mixing them with the new shaving heads. 5 Place the new shaving heads in the shaving head holder.
English 25 -- Each retaining ring has two recesses that fit exactly into the projections of the shaving head holder. Turn the ring clockwise until you hear a click to indicate that the ring is fixed. Note: Hold the shaving head holder in your hand when you reinsert the shaving heads and reattach the retaining rings. Do not place the shaving head holder on a surface, as this may cause damage to the shaving heads. 1 7 Attach the shaving head holder to the bottom part of the shaving unit (‘click’).
English 4 Unpack the new cleaning cartridge and pull off the seal. 5 Place the cleaning cartridge in the SmartClean system. 6 While holding the SmartClean system with one hand, gently push the top part of the SmartClean system back down (‘click’). Note: When the SmartClean system is ready for use, do not move the product to prevent leakage. These products have no other user-serviceable parts. For assistance call 1-800-243-3050. Storage Store the product in the travel case.
English 27 Accessories Replacement parts and accessories may be purchased at a store near you or on our website www.philips.com/store. The following accessories are available: -- SH70 Philips Norelco shaving heads -- RQ111 Philips Norelco SmartClick beard styler -- RQ585 Philips Norelco SmartClick cleansing brush -- JC302 (2-pack), JC303 (3-pack) Philips Norelco SmartClean cleaning cartridges Assistance For assistance, visit our website: www.philips.com/support or call toll free 1-800-243-3050.
English Full Two-Year Warranty Philips North America LLC warrants this new product (except cutters and combs) against defects in materials or workmanship for a period of two years from the date of purchase, and agrees to repair or replace any defective product without charge.
English 29 45-DAY MONEY-BACK GUARANTEE To enjoy the closest and most comfortable shave from your new Philips Norelco Men’s Shaver, the shaver should be used exclusively for 3 weeks. This allows your hair and skin enough time to adapt to the Philips Norelco Shaving System. If, after that period of time, you are not fully satisfied with your Philips Norelco Men’s Shaver, send the product back along with dated sales receipt and we’ll refund you the full purchase price.
Español INSTRUCCIONES IMPORTANTES DE SEGURIDAD Cuando utilice un producto eléctrico, siempre debe seguir las precauciones básicas, incluidas las siguientes: Lea todas las instrucciones antes de usar este producto. PELIGRO Para reducir el riesgo de descarga eléctrica: -- No intente agarrar un producto/sistema SmartClean que haya caído al agua. Desenchúfelo inmediatamente. -- El enchufe de alimentación y los accesorios conectados no deben sumergirse ni usarse en la ducha.
Español 31 ADVERTENCIA Para reducir el riesgo de quemaduras, incendio, descarga eléctrica o lesiones: -- El uso de este producto/sistema SmartClean debe estar bajo estricta supervisión cuando sea operado por niños, en niños o cerca de ellos o por personas con capacidades físicas, sensoriales o mentales limitadas o por personas discapacitadas. -- Use este producto/sistema SmartClean solo para el uso doméstico previsto como se describe en este manual.
Español -- Siempre conecte primero el enchufe al producto/sistema SmartClean, después enchúfelo a la pared y luego coloque la afeitadora en el sistema SmartClean. Asegúrese de que el enchufe esté insertado firmemente en la afeitadora/sistema SmartClean, hasta la marca indicada en el enchufe. Para desconectar, apague el sistema SmartClean, desconecte el enchufe de carga del enchufe de pared.
Español 33 Contenido Instrucciones importantes de seguridad ___ Descripción general (Fig.
Español 1 13 12 14 15 16 17 18 11 1 19 10 2 9 3 8 20 7 6 5 4 22_002_7341_1_DFU-Luxury_A6_v5.
Español 35 Descripción general (Fig.
Español Carga Nota: Si presiona el botón apagado/encendido durante la carga, el símbolo 'desconecte para usar' destella en blanco para recordarle desconectar el producto del enchufe de pared. Carga rápida Cuando la batería está agotada y conecta el producto a un enchufe eléctrico, las luces del indicador de carga de la batería se iluminan una después de la otra repetidamente.
Español 37 Carga de batería disponible Cuando la batería está totalmente cargada, todas las luces del indicador de carga de la batería se iluminan en blanco constantemente. Batería baja Cuando la batería está casi agotada, la luz inferior del indicador de carga de la batería destella en color naranja. Recordatorio de 'Desconecte para usar' El símbolo 'desconecte para usar' destella para recordarle desconectar el producto del tomacorriente de pared antes de que pueda encenderlo.
Español Reemplazo de los cabezales de afeitado Para un rendimiento de afeitado óptimo, le aconsejamos que reemplace los cabezales de afeitado cada año. Este producto está equipado con un recordatorio de reemplazo que le recuerda reemplazar los cabezales de afeitado. El símbolo de la unidad de afeitado se ilumina y las flechas destellan para indicar que tiene que reemplazar los cabezales de afeitado.
Español 39 -- El conector de alimentación transforma la CA de 100-240 V a menos de 24 V de CC. Cargue la afeitadora antes de usarla por primera vez y cuando la pantalla indique que la batería está casi agotada. La carga toma, aproximadamente, 1 hora. Una afeitadora completamente cargada otorga un tiempo de afeitado de hasta 50 minutos. Nota: No puede usar el producto mientras se carga. Carga con el cable de alimentación 1 2 1 Asegúrese de que el producto esté apagado.
Español 3 Presione la tapa superior para poder colocar la afeitadora en el sostenedor ("clic"). 4 Mantenga la afeitadora hacia abajo por encima del soporte. Asegúrese de que la parte frontal de la afeitadora apunte hacia el soporte del sistema SmartClean. 1 2 3 5 Coloque la afeitadora en el soporte, incline hacia atrás la afeitadora y presione hacia abajo la tapa superior para conectar la afeitadora ("clic").
Español 41 Este símbolo indica que el producto puede utilizarse en el baño o en la ducha. -- Use este producto para su uso previsto en el hogar, según se describe en este manual. -- Por motivos de higiene, el producto debe emplearse únicamente por una persona. -- El recorte es más fácil cuando la piel y el vello están secos. -- Asegúrese de que el sistema SmartClean no se moje ni que esté cerca del agua. Nota: Este producto solo se puede utilizar sin cable.
Español Encendido y apagado del aparato 1 Para encender o apagar el producto, presione el botón de encendido/apagado una vez. Afeitado Para obtener los mejores resultados de confort sobre la piel, recorte su barba si no se ha afeitado durante 3 días o más. Afeitado seco 1 Encienda el producto. 2 Mueva los cabezales de afeitado sobre la piel con movimientos circulares para llegar a todos los vellos en las diferentes direcciones de crecimiento.
Español 1 Humedezca la piel. 2 Aplique espuma o gel de afeitar sobre la piel. 43 3 Enjuague la unidad de afeitado con el agua de la llave para garantizar que se deslice suavemente sobre su piel. 4 Encienda el producto. 5 Mueva los cabezales de afeitado sobre la piel con movimientos circulares para llegar a todos los vellos en las diferentes direcciones de crecimiento. Ejerza una suave presión para una afeitada cercana y agradable.
Español Uso de los accesorios de ajuste de clic Quitar y poner los accesorios de ajuste de clic 1 Asegúrese de que el producto esté apagado. 2 Extraiga el accesorio del producto. Nota: No gire el accesorio mientras la extrae del producto. 3 Inserte la lengüeta del accesorio en la ranura en la parte superior del producto. Luego presione el accesorio hacia abajo para ajustarlo al producto ("clic") Uso de la cortadora Puede usar la cortadora para recortar la barba, el bigote y las patillas.
Español 45 Bloqueo para viajes Activación del sistema de bloqueo 1 Pulse el botón de encendido/apagado durante 3 segundos para ingresar el modo de bloqueo de viaje. 3 sec. Cuando activa el bloqueo de viaje el símbolo de bloqueo de viaje se ilumina constantemente. Cuando se activa el bloqueo de viaje, el símbolo de bloqueo de viaje destella. Desactivación del bloqueo de viaje 1 Pulse el botón de encendido/apagado durante 3 segundos.
Español Limpieza y mantenimiento -- Una limpieza frecuente garantiza los mejores resultados en el afeitado. -- El sistema SmartClean y la afeitadora pueden limpiarse con un paño húmedo. -- Nunca limpie, retire ni reemplace la unidad de afeitado con el motor en funcionamiento. -- No aplique presión a los peines del cabezal de afeitado. -- No toque los cabezales de afeitado con objetos duros, debido a que podría deformar o dañar los peines que cuentan con ranuras de precisión.
Español 47 1 Encienda el producto. 2 Enjuague la unidad de afeitado con agua caliente de la llave. 3 Apague el producto. Saque el soporte del cabezal de afeitado desde la parte inferior de la unidad de afeitado. 4 Enjuague el vello de la cámara de acumulación bajo la llave. 5 Enjuague el sostenedor del cabezal de afeitado con agua caliente de la llave. 6 Elimine cuidadosamente el exceso de agua y deje que el soporte del cabezal de afeitado se seque al aire.
Español Limpieza de la afeitadora en el sistema SmartClean Mantenga los cartuchos limpios lejos del alcance de los niños. No ingerir. Evite el contacto con los ojos. En caso de que entre en contacto con los ojos, enjuague bien con agua fría. Si la irritación persiste, consulte a un médico. -- Solo utilice esta afeitadora, el sistema SmartClean y el cartucho de limpieza (JC302) proporcionados para cargar o limpiar la afeitadora.
Español 49 Precaución: No incline el sistema SmartClean para evitar fugas. Nota: Sostenga el sistema SmartClean mientras lo prepara para su uso. 1 Coloque la clavija pequeña en el enchufe que se encuentra en la parte posterior del sistema SmartClean. 2 Conecte el enchufe eléctrico al enchufe de pared. 1 2 3 Mientras sostiene el sistema SmartClean con una mano, pulse el botón situado en el costado del sistema SmartClean y levante la parte superior del sistema SmartClean.
Español Uso del sistema SmartClean Nota: Si utiliza la afeitadora con espuma o gel de afeitar, enjuáguela rápidamente con agua caliente antes de limpiarla en el sistema SmartClean. Precaución: Elimine el exceso de agua de la afeitadora antes de colocarla en el sistema SmartClean. 1 Presione la tapa superior para poder colocar la afeitadora en el sostenedor ("clic"). 2 Mantenga la afeitadora hacia abajo por encima del soporte.
Español 51 Cuando el programa de secado termina, el símbolo de finalización se ilumina constantemente. El sistema SmartClean se apaga automáticamente 30 minutos después de que se completa el programa de limpieza y carga. El símbolo de batería se enciende constantemente para indicar que la afeitadora está completamente cargada. La carga toma, aproximadamente, 1 hora. 5 Para permitir que la afeitadora se seque puede dejarla en el sistema SmartClean hasta la próxima afeitada.
Español Limpieza de la cortadora Nunca seque el elemento de corte con una toalla o papel desechable, ya que esto puede dañar el dentado de recorte. Limpie la cortadora después de cada uso. 1 Encienda el producto. 2 Enjuague la cortadora con agua caliente de la llave. 3 Después de su uso, apague el producto. 4 Elimine cuidadosamente el exceso de agua y deje que la cortadora se seque al aire.
Español 53 2 Saque el soporte del cabezal de afeitado desde la parte inferior de la unidad de afeitado. 3 Gire los anillos de retención a la izquierda y retírelos. Colóquelos dentro de un lugar seguro. 2 1 4 Quite los cabezales de afeitado del soporte del cabezal de afeitado. Deseche los cabezales de afeitado inmediatamente para evitar mezclarlos con los nuevos. 5 Coloque los cabezales de afeitado nuevos en el soporte del cabezal de afeitado.
Español -- Cada anillo de retención tiene dos ranuras que ajustan perfecto en los salientes del soporte del cabezal de afeitado. Gire el anillo a la derecha hasta que escuche un clic para indicar que el anillo está fijo. Nota: Tome el sostenedor del cabezal de afeitado en su mano cuando vuelva a insertar los cabezales de afeitado y vuelva ajustar los anillos de retención. No coloque el soporte del cabezal de afeitado sobre una superficie, ya que esto pueden dañar los cabezales de afeitado.
Español 55 2 Quite el cartucho de limpieza vacío del sistema SmartClean y tire los restos de líquido de limpieza del cartucho. Puede vaciar de manera segura el líquido de limpieza en el lavabo. 3 Deseche el cartucho de limpieza vacío. Para obtener información sobre el reciclaje del producto, póngase en contacto con su administración local. 4 Desempaque el nuevo cartucho de limpieza y saque el sello. 5 Coloque el cartucho de limpieza en el sistema SmartClean.
Español Almacenamiento Guarde el producto en el estuche de viaje. Nota: Siempre deje que el aparato se seque antes de guardarlo en el estuche de viaje. Puede colocar la afeitadora en el sistema SmartClean hasta que la vuelva a usar. -- Asegúrese de que el producto esté apagado. Retire el cable del enchufe y del producto antes de guardarlo. Guarde el producto en un lugar seguro y seco donde no pueda aplastarse, golpearse o dañarse. -- No enrolle el cable alrededor del producto para guardarlo.
Español 57 Asistencia Para asistencia, visite nuestro sitio web: www.philips.com/support o llame al número gratuito 1-800-243-3050. La información en línea está disponible las 24 horas, los siete días de la semana. Desecho -- Este producto posee una batería recargable de litio-ión que debe desecharse apropiadamente. -- Contacte a sus funcionarios locales o de la ciudad para mayor información acerca del manejo final de la batería. También puede llamar al 1-800-822-8837 o visitar www.call2recycle.
Español Garantía Total de Dos Años Philips North America LLC garantiza este producto nuevo (excepto cuchillas y peines) contra defectos en los materiales o en la mano de obra por un período de dos años desde la fecha de compra y acepta reparar o reemplazar cualquier producto defectuoso sin cargo.
Español 59 GARANTÍA DE DEVOLUCIÓN DE SU DINERO POR 45 DÍAS Use su nueva afeitadora Philips Norelco para hombres como método exclusivo de afeitado durante tres semanas para disfrutar de un afeitado cómodo y al ras. Esto permite que su pelo y su piel se acostumbren al sistema de afeitado Philips Norelco.
Manufactured for: Philips Personal Health a division of Philips North America LLC P.O. Box 10313, Stamford, CT 06904 This symbol on the product’s nameplate means it is listed by Underwriters’ Laboratories, Inc. Norelco and Tripleheader are registered trademarks of Philips North America LLC. PHILIPS and Philips shield are a registered trademarks of Koninklijke Philips N.V. ©2017 Philips North America LLC. All rights reserved. Fabricado por: Philips Personal Health una división de Philips North America LLC P.