
User manual
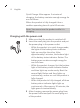
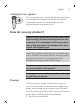

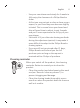
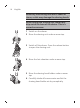
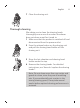

Table Of Contents
- Contents
- IMPORTANT SAFETY INSTRUCTIONS
- Introduction
- General description
- What do the icons on my product handle mean?
- How do I charge my product?
- How do I use my product?
- How do I clean my shaver?
- Storage and travel
- How do I replace the shaving heads?
- Accessories
- Assistance
- Disposal
- Full Two-Year Warranty
- 45-DAY MONEY-BACK GUARANTEE
- Contenido
- INSTRUCCIONES IMPORTANTES DE SEGURIDAD
- Introducción
- Información general
- ¿Qué significan los íconos que están en el mango del producto?
- ¿Cómo se carga el producto?
- ¿Cómo se usa el producto?
- ¿Cómo se limpia la afeitadora?
- Almacenamiento y viaje
- ¿Cómo se reemplazan los cabezales de afeitado?
- Accesorios
- Asistencia
- Desecho
- Garantía Total de Dos Años
- GARANTÍA DE DEVOLUCIÓN DE SU DINERO POR 45 DÍAS
- Blank Page
- Blank Page

20
English
5 Clean the cutter and guard under the tap.
6 Shake off excess water.
7 Put the shaving heads back into the shaving
head holder. For detailed instructions, see
'How do I replace the shaving heads?'.
8 Insert the hinge of the shaving head holder
into the slot in the top of the shaving unit and
close the shaving unit.
Cleaning the click-on attachments
Never dry the trimmer or beard styler
attachments with a towel or tissue, as this may
damage the trimming teeth.
The accessories supplied may vary for different
products. The box shows the accessories that
have been supplied with your product.
Clean the click-on attachments after each use for
optimal performance.
1 Make sure that the product is switched off.
2 Twist the attachment to remove it from the
handle.
3 Clean the parts thoroughly with warm water.
4 Carefully shake off excess water from the
beard styler, combs and nose/ear trimmer
attachments and let them air dry completely.